Jeep Wrangler TJ. Manual - part 558


  Index      Jeep     Jeep Wrangler TJ - service repair manual 2005 year


Search            


Content   ..  556  557  558  559   ..


Jeep Wrangler TJ. Manual - part 558


FRONT SEAT BACK RECLINER
CABLE

REMOVAL

(1) Remove seat cushion cover. (Refer to 23 -

BODY/SEATS/SEAT

CUSHION

COVER

-

REMOVAL)

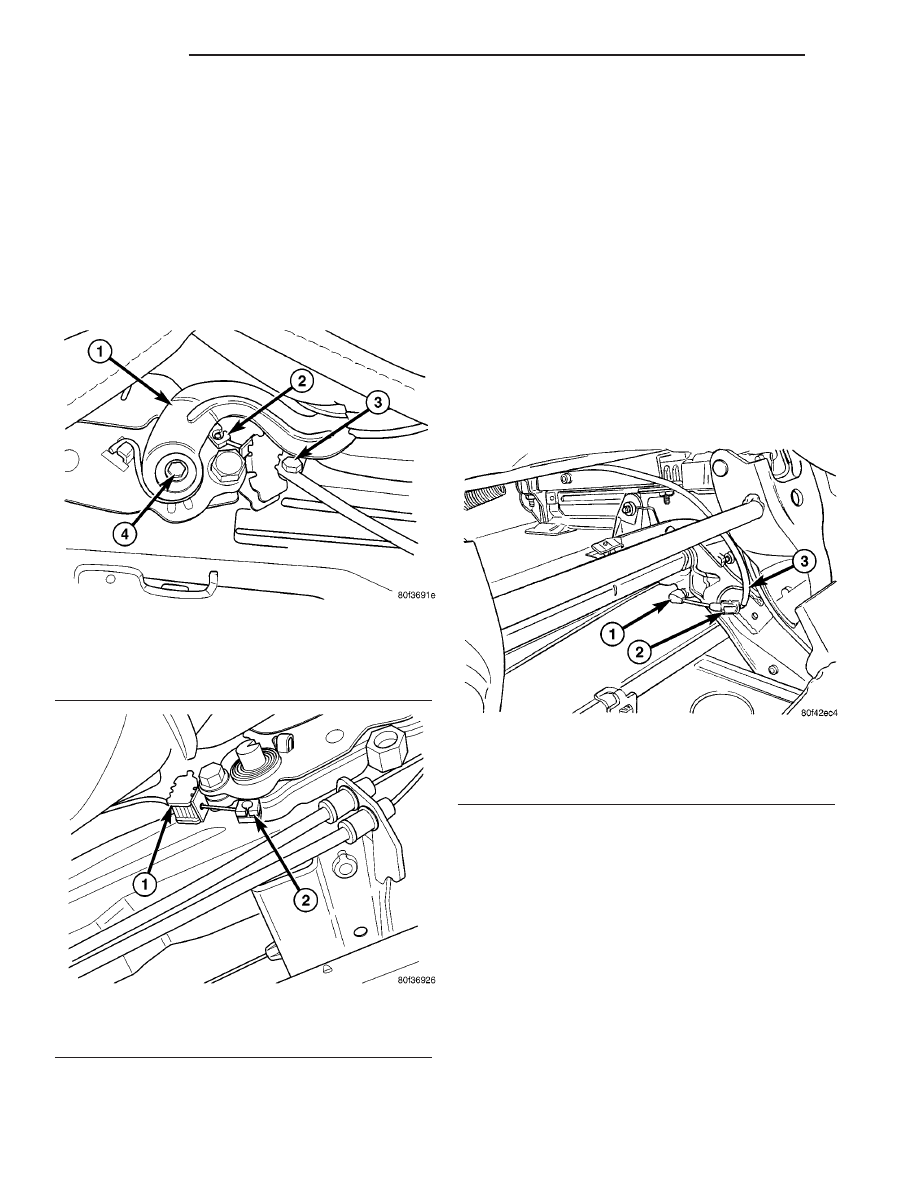
(2) Disengage cable from recliner release handle.

(Fig. 6) and (Fig. 7)

(3) Route cable through seat cushion pad.
(4) Disengage cable from mounting bracket.

INSTALLATION

(1) Engage cable to mounting bracket.
(2) Route cable through seat cushion pad.
(3) Engage cable to recliner release.
(4) Install seat back cover. (Refer to 23 - BODY/

SEATS/FRONT SEAT BACK COVER - INSTALLA-
TION)

FRONT SEAT FOLDING
RELEASE CABLE

REMOVAL

(1) Remove the seat. (Refer to 23 - BODY/SEATS/

SEAT - REMOVAL)

(2) Disconnect the release cable folding end. (Fig.

8)

Fig. 8 RELEASE CABLE/FOLDING END

1 - CABLE END CLIP
2 - CABLE HOUSING
3 - CABLE ASSEMBLY

Fig. 6 RECLINER HANDLE/CABLE

1 - RECLINER HANDLE
2 - RECLINER CABLE END
3 - RECLINER CABLE
4 - RECLINER HANDLE BOLT

Fig. 7 RECLINER CABLE END

1 - RECLINER CABLE
2 - RECLINER CABLE END

23 - 74

SEATS

TJ

(3) Remove the inboard recliner. (Refer to 23 -

BODY/SEATS/SEAT BACK RECLINER - REMOVAL)

(4) Disconnect the release cable assembly at the

inboard recliner, from the support bracket. (Fig. 9)

(5) Disconnect the cable assembly at the slider and

remove. (Fig. 10)

INSTALLATION

(1) Connect the cable assembly at the slider.
(2) Connect the inboard release cable assembly to

the support bracket at the recliner.

(3) Install the inboard recliner. (Refer to 23 -

BODY/SEATS/SEAT BACK RECLINER - INSTAL-
LATION)

(4) Connect the folding end of the release cable

assembly.

(5) Install the seat. (Refer to 23 - BODY/SEATS/

SEAT - INSTALLATION)

FRONT SEAT BACK DUMP
CABLE

REMOVAL

(1) Remove the seat back cover. (Refer to 23 -

BODY/SEATS/FRONT

SEAT

BACK

COVER

-

REMOVAL)

(2) Disconnect the dump cables from the recliners.

(Fig. 4)

(3) Remove the two dump handle assembly screws

and remove the release cable assembly.

INSTALLATION

(1) Install the dump handle assembly and install

the two screws.

(2) Connect the dump cables at the recliners.
(3) Install the seat back cover. (Refer to 23 -

BODY/SEATS/SEAT BACK COVER - INSTALLA-
TION)

Fig. 9 RELEASE CABLE/RECLINER END

1 - CABLE ASSEMBLY
2 - CABLE HOUSING
3 - SEAT CUSHION FRAME
4 - CABLE SUPPORT BRACKET

Fig. 10 RELEASE CABLE/SLIDER END

1 - CABLE HOUSING
2 - CABLE END
3 - SLIDER
4 - SEAT CUSHION FRAME

TJ

SEATS

23 - 75

FRONT SEAT FOLDING RELEASE CABLE (Continued)

FRONT SEAT TRACK
ADJUSTER

REMOVAL

(1) Remove the seat. (Refer to 23 - BODY/SEATS/

SEAT - REMOVAL)

(2) Position aside the seat back cover. (Refer to 23

- BODY/SEATS/SEAT BACK COVER - REMOVAL)

(3) Remove the recliner covers. (Refer to 23 -

BODY/SEATS/SEAT BACK RECLINER - REMOVAL)

(4) Position aside the seat cushion cover. (Refer to

23

-

BODY/SEATS/SEAT

CUSHION

COVER

-

REMOVAL)

(5) Disconnect the recliner cable ends. (Fig. 11)

and (Fig. 12)

(6) Remove the seat cushion to hinge bolts. (Fig.

11) and (Fig. 12)

(7) Disconnect the folding release cable from the

seat back recliner, if equipped. (Fig. 11)

(8) Remove the seat back assembly.
(9) Remove the two bolts on either side of the seat

cushion and remove the seat track assembly. (Fig. 13)

INSTALLATION

(1) Install the seat track assembly and install the

two front bolts.

(2) Install the seat back assembly.
(3) Connect the folding release cable assembly end

to the seat back recliner.

(4) Install the seat back assembly bolts.
(5) Tighten the seat track bolts to 50 N·m (37 ft.

lbs.)

(6) Connect the recliner cables.

(7) Install the seat cushion cover. (Refer to 23 -

BODY/SEATS/SEAT CUSHION COVER - INSTAL-
LATION)

(8) Install the recliner covers. (Refer to 23 - BODY/

SEATS/SEAT BACK RECLINER - INSTALLATION)

(9) Install the seat back cover. (Refer to 23 -

BODY/SEATS/SEAT BACK COVER - INSTALLA-
TION)

(10) Install the seat. (Refer to 23 - BODY/SEATS/

SEAT - INSTALLATION)

Fig. 11 INBOARD SEAT CUSHION AND HINGE

1 - RECLINER CABLE
2 - SEAT CUSHION FRAME BOLTS
3 - SEAT CUSHION FRAME
4 - FOLDING RELEASE CABLE ASSEMBLY END

Fig. 12 SEAT CUSHION AND HINGE

1 - SEAT CUSHION FRAME BOLTS
2 - RECLINER CABLE END
3 - RECLINER HANDLE

Fig. 13 FRONT SEAT CUSHION BOLTS

1 - SEAT TRACK
2 - SEAT CUSHION FRAME BOLT
3 - SEAT CUSHION

23 - 76

SEATS

TJ

REAR SEAT

REMOVAL

(1) Remove the add-a-trunk, if equipped. (Refer to

23 - BODY/INTERIOR/ADD-A-TRUNK - REMOVAL)

(2) Using the latch handle, fold the seat back down

and tip the seat assembly forward. (Fig. 14)

(3) Squeeze the release bar and disengage the

front latches. (Fig. 15)

(4) Remove the seat through tailgate opening.

INSTALLATION

(1) Position the seat on the rear floor panel and

engage the seat frame release latch with the front
strikers.

(2) Roll seat back and engage the rear latches with

the rear strikers.

(3) Return the seat back to the up position.
(4) Install the add-a-trunk, if equipped. (Refer to

23 - BODY/INTERIOR/ADD-A-TRUNK - INSTALLA-
TION)

REAR SEAT BACK

REMOVAL

(1) Remove rear seat. (Refer to 23 - BODY/SEATS/

REAR SEAT - REMOVAL)

(2) Remove the bolts attaching the seat back

assembly to the seat cushion and remove the seat
back. (Fig. 16)

INSTALLATION

(1) Position the seat back on the seat cushion and

install the bolts.

(2) Tighten the bolts to 50 N·m (37 ft. lbs.).
(3) Install rear seat. (Refer to 23 - BODY/SEATS/

REAR SEAT - INSTALLATION)

Fig. 14 REAR SEAT BACK

1 - REAR SEAT BACK
2 - RELEASE HANDLE

Fig. 15 REAR SEAT RELEASE LATCH ROD

1 - RELEASE LATCH ROD
2 - REAR SEAT CUSHION
3 - REAR SEAT LATCH ASSEMBLY
4 - REAR SEAT LATCH STRIKER (4)

Fig. 16 REAR SEAT BACK HINGE

1 - SEAT CUSHION BOLTS
2 - SEAT BACK HINGE
3 - SEAT CUSHION

TJ

SEATS

23 - 77


Content   ..  556  557  558  559   ..