Jeep Grand Cherokee WK. Manual - part 1409


  Index      Jeep     Jeep Grand Cherokee WK - service repair manual 2005 year


Search            


Content   ..  1407  1408  1409  1410   ..


Jeep Grand Cherokee WK. Manual - part 1409


LOW/REVERSE SWITCH VALVE

The low/reverse switch valve allows the low/reverse clutch to be operated by either the LR/CC solenoid or the MS
solenoid.

REMOVAL

NOTE: The valve body can be removed for service without having to remove the transmission assembly.
The valve body can be disassembled for cleaning and inspection of the individual components. (Refer to 21
- TRANSMISSION/AUTOMATIC - 45RFE/VALVE BODY - DISASSEMBLY)

1. Shift transmission into PARK.

2. Raise vehicle.

3. Disconnect wires at the solenoid and pressure

switch assembly connector.

4. Position drain pan under transmission oil pan.

5. Remove transmission oil pan.

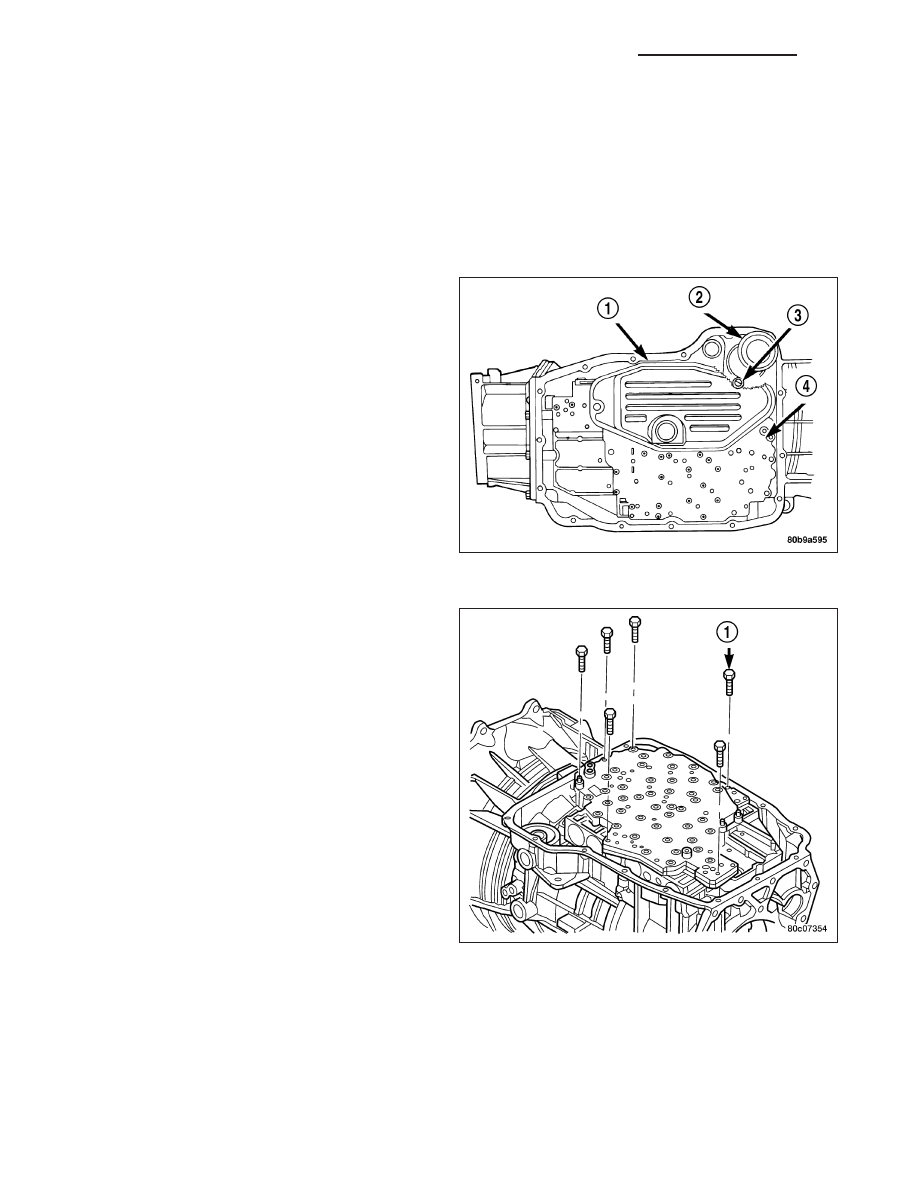
6. Remove the primary oil filter (1) from valve body.

7. Remove bolts (1) attaching valve body to transmis-

sion case.

8. Lower the valve body and work the electrical con-

nector out of transmission case.

9. Separate the valve body from the transmission.

21 - 446

AUTOMATIC TRANSMISSION - 545RFE - SERVICE INFORMATION

WK

DISASSEMBLY

1. Remove the bolts (1) holding the solenoid and

pressure switch assembly to the valve body. Do not
remove the screws on the top of the solenoid and
pressure switch assembly.

2. Separate the solenoid and pressure switch assem-

bly from the valve body.

3. Remove the screw holding the detent spring (2)

onto the valve body.

4. Remove the detent spring (2) from the valve body.

5. Remove the TRS selector plate (1) from the valve

body and the manual valve.

6. Remove the clutch passage seals (3) from the

valve body, if necessary.

1 - TRS SELECTOR PLATE
2 - DETENT SPRING
3 - CLUTCH PASSAGE SEALS

WK

AUTOMATIC TRANSMISSION - 545RFE - SERVICE INFORMATION

21 - 447

7. Remove the screws holding the accumulator cover onto the valve body.

8. Remove the accumulator springs and pistons (1, 6-9) from the valve body. Note which accumulator piston and

spring belong in each location.

9. Place the valve body on the bench with the transfer

plate upward.

NOTE: The valve body contains seven check balls.
The transfer plate must be placed upward to pre-
vent losing the check balls when the transfer plate
is removed from the valve body.

10. Remove the screws holding the valve body to the

valve body transfer plate.

11. Remove the transfer plate from the valve body.

Note the location of all check balls.

12. Remove the check balls from the valve body.

Valve Body Components

1 - LOW/REVERSE ACCUMULATOR

6 - OVERDRIVE ACCUMULATOR

2 - LOW/REVERSE SWITCH VALVE

7 - UNDERDRIVE ACCUMULATOR

3 - UPPER VALVE BODY

8 - 4C ACCUMULATOR

4 - MANUAL VALVE

9 - 2C ACCUMULATOR

5 - SOLENOID SWITCH VALVE

21 - 448

AUTOMATIC TRANSMISSION - 545RFE - SERVICE INFORMATION

WK

13. Remove

the

retainers

securing

the

solenoid

switch valve (1), manual valve (2), and the low/re-
verse switch valve (3) from the valve body and
remove the associated valve and spring. Tag each
valve and spring combination with location infor-
mation to aid in assembly.

1 - SOLENOID SWITCH VALVE
2 - MANUAL VALVE
3 - LOW REVERSE SWITCH VALVE
4 - LOW REVERSE ACCUMULATOR
5 - 2ND CLUTCH ACCUMULATOR
6 - UNDERDRIVE ACCUMULATOR
7 - OVERDRIVE ACCUMULATOR
8 - 4TH CLUTCH ACCUMULATOR
9 - CHECK BALLS (7)

WK

AUTOMATIC TRANSMISSION - 545RFE - SERVICE INFORMATION

21 - 449


Content   ..  1407  1408  1409  1410   ..