Jeep Grand Cherokee WJ. Manual - part 530


  Index      Jeep     Jeep Grand Cherokee WJ - service repair manual 2001 year


Search            


Content   ..  528  529  530  531   ..


Jeep Grand Cherokee WJ. Manual - part 530


BUCKET SEAT HEAD RESTRAINT SLEEVE

REMOVAL

(1) Remove head restraint.
(2) Remove seat back.
(3) Remove seat back cover.
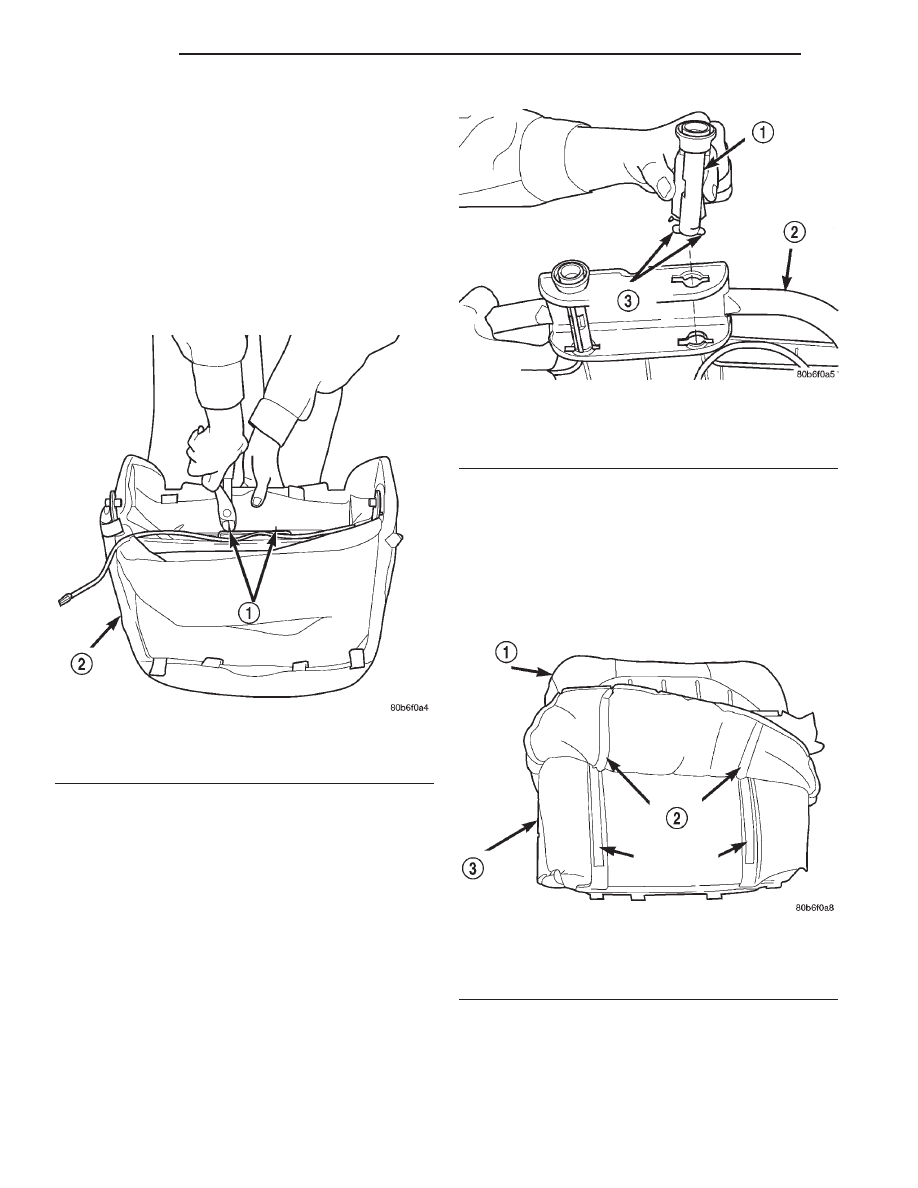
(4) Remove hog rings attaching cushion pad to

seat back frame (Fig. 5).

(5) Remove cushion pad from seat back frame.
(6) Rotate head restraint sleeve 1/4 turn counter-

clockwise to release retaining tab.

(7) Pull sleeve from seat back frame (Fig. 6).

INSTALLATION

(1) Position sleeve in seat back frame.
(2) Rotate head restraint sleeve 1/4 turn clockwise

to engage retaining tab.

(3) Install cushion pad onto seat back frame.
(4) Install hog rings attaching cushion pad to seat

back frame.

(5) Install seat back cover.
(6) Install seat back.
(7) Install head restraint.

BUCKET SEAT BACK COVER

REMOVAL

(1) Remove head restraint.
(2) Using a trim stick, carefully pry head restraint

release button caps from the top of seat back.

(3) Remove seat back.
(4) Disengage J-strap at base of seat back.
(5) Slide hand between the face of the seat back

pad and the cushion cover and carefully separate
hook and loop fastener (Fig. 7).

(6) Roll cover upward and disengage hog rings.
(7) Roll cover upward to top of seat back.
(8) Separate cover from seat back.

INSTALLATION

(1) Position cover inside-out at the top of seat

back.

(2) Roll cover downward.
(3) Engage hog rings.

Fig. 5 Cushion Pad

1 – HOG RING
2 – SEAT BACK CUSHION PAD

Fig. 6 Head Restraint Sleeve

1 – HEAD RESTRAINT SLEEVE
2 – SEAT BACK FRAME
3 – RETAINING TAB

Fig. 7 Seat Back Cover

1 – SEAT BACK COVER
2 – HOOK AND LOOP FASTENER
3 – SEAT BACK PAD

23 - 18

BODY

WJ

REMOVAL AND INSTALLATION (Continued)

(4) Align seat back cover with hook and loop fas-

teners and secure.

(5) Roll cover downward.
(6) Engage J-strap at base of seat back.
(7) Install seat back.

NOTE: The taller head restraint release button cap
is positioned on the left hand side and the head
restraint button cap with the hidden button is posi-
tioned on the right hand side.

(8) Position head restraint release button caps on

head restraint sleeves and press to secure.

(9) Install head restraint.

BUCKET SEAT CUSHION COVER

REMOVAL

(1) Remove seat from vehicle.
(2) Remove seat back.
(3) Disengage J-straps attaching cushion cover to

seat cushion frame.

(4) Disengage hog rings attaching cushion cover to

cushion frame at rear of seat along bottom of cushion
cover (Fig. 8).

(5) Roll up edges of cover and route seat function

switches through access hole on outboard side of seat
cushion, if equipped.

(6) Disengage seat cushion heater element connec-

tor, if equipped.

(7) Disengage hog rings attaching cover to cushion

along cover insert.

(8) Separate seat cushion cover from seat cushion.

INSTALLATION

(1) Position seat cover on cushion.

(2) Engage hog rings attaching cushion cover to

cushion along insert.

(3) Engage seat cushion heater element connector,

if equipped.

(4) Route seat function switches through access

hole on outboard side of seat cushion, if equipped.

(5) Engage J-straps attaching cushion cover to seat

cushion frame.

(6) Engage hog rings attaching cushion cover to

cushion frame.

(7) Install seat back.
(8) Install seat.

REAR SEAT CUSHION RELEASE LATCH

REMOVAL

(1) Unlatch seat and pivot seat upward.
(2) Disengage J-strap at seat cushion base panel.
(3) Roll back cushion cover.
(4) Remove screws attaching latch to base panel.
(5) Separate latch from base panel.

INSTALLATION

(1) Position latch on base panel.
(2) Install screws attaching latch to base panel.

Tighten screws to 8 N·m (75 in. lbs.) torque.

(3) Route the cushion release strap from the loop

on the latch through the slot in the trim cover.

(4) Engage J-strap at seat cushion base panel.
(5) latch seat.

REAR SEAT CUSHION

REMOVAL

(1) Disengage seat cushion at rear by pulling

upward on release strap.

(2) Remove bolts attaching seat cushion to floor

pan (Fig. 9).

(3) Remove seat cushion from vehicle.

INSTALLATION

(1) Position seat cushion in vehicle.
(2) Install bolts attaching seat cushion to floor

pan. Tighten bolts to 11 N·m (8 ft. lbs.) torque.

(3) Lock seat cushion down by pressing firmly on

center of cushion until latch engages.

REAR SEAT CUSHION COVER

REMOVAL

(1) Remove rear seat cushion.
(2) From the underside of the seat, disengage

J-straps attaching cover to seat cushion base panel.

(3) Remove push-in fasteners attaching cushion

cover to seat cushion base panel (Fig. 10).

(4) Roll back cover.

Fig. 8 Seat Cushion Cover

1 – HOG RING
2 – CUSHION COVER

WJ

BODY

23 - 19

REMOVAL AND INSTALLATION (Continued)

(5) Disengage hog rings attaching cushion cover to

seat cushion foam pad.

(6) Separate cushion cover from seat cushion foam

pad.

INSTALLATION

(1) Position cushion cover on seat cushion foam

pad.

(2) Engage hog rings attaching cushion cover to

seat cushion foam pad.

(3) Align

cushion

cover

and

engage

J-straps

attaching cushion cover to seat cushion base panel.

(4) Install push-in fasteners attaching cushion

cover to seat cushion base panel.

(5) Install rear seat cushion.

REAR SEAT BACK LATCH RELEASE HANDLE

REMOVAL

(1) Pull handle to release latch.
(2) Remove screws attaching release handle to seat

back frame.

(3) Using a small flat blade, disengage retainers

securing latch release cable housing to latch release
handle.

(4) Rotate cable end until barrel end aligns with

key hole slot in latch release handle.

(5) Disengage cable barrel end from release han-

dle.

(6) Separate latch release handle from seat back

(Fig. 11).

INSTALLATION

(1) Route cable end into latch release handle.
(2) Rotate cable end until barrel end aligns with

key hole slot in latch release handle and insert into
handle.

(3) Engage retainers securing latch release cable

housing to latch release handle.

(4) Position latch release handle in seat back.

Ensure seat back cover is properly aligned.

(5) Install screws attaching release handle to seat

back frame.

Fig. 9 Rear Seat Cushion

1 – SEAT CUSHION
2 – FLOOR PAN

Fig. 10 Push-in Fasteners

1 – CUSHION COVER
2 – SEAT CUSHION BASE PANEL
3 – PUSH-IN FASTENER

Fig. 11 Rear Seat Release Handle

1 – REAR SEAT FOLDING RELEASE HANDLE

23 - 20

BODY

WJ

REMOVAL AND INSTALLATION (Continued)

REAR SEATBACK

REMOVAL

(1) Move rear seat cushions to forward cargo posi-

tion.

(2) Remove bolts attaching seatback side support

bracket to floor pan (right side) (Fig. 12).

(3) Tilt seatback forward, and slide it outboard to

detach it from pin on center pivot bracket.

(4) Remove right side (60%) seatback from vehicle.
(5) Remove bolts attaching seatback side support

bracket and center pivot bracket to floor pan (left
side).

(6) Remove left side (40%) seatback from vehicle.

INSTALLATION

(1) Position left side (40%) seatback in vehicle.
(2) Position left side support bracket and center

pivot bracket with bolt holes aligned and install
bolts. Tighten bolts to 28 N·m (20 ft. lbs.) torque.

(3) Position right side (60%) seatback in vehicle.
(4) Install seatback onto center pivot bracket pin.

Ensure seat back is properly engaged on the center
pivot pin.

(5) Position right side support bracket with bolt

holes aligned and install bolts. Tighten bolts to 28
N·m (20 ft. lbs.) torque.

(6) Return seat cushions to seating position.

REAR SEAT BACK LATCH/HINGE

REMOVAL

(1) Remove seat back.
(2) Disengage J-straps on outboard side of seat

back.

(3) Disengage release cable from latch.
(4) Remove bolts attaching latch/hinge to seat back

frame.

(5) Separate latch/hinge from seat back frame.

INSTALLATION

(1) Position latch/hinge on seat back frame.
(2) Install bolts attaching latch/hinge to seat back

frame. Tighten bolts to 28 N·m (20 ft. lbs.) torque.

(3) Engage latch release cable.
(4) Engage J-straps on outboard side of seat back.
(5) Install seat back.

REAR SEAT BACK COVER

REMOVAL

(1) Remove seat back.
(2) Remove head restraint.
(3) Remove head restraint caps.
(4) Disengage J-straps on outboard side of seat

back.

(5) Disengage J-straps at base of seat back.
(6) Remove screws attaching latch release handle

to seat back frame.

(7) Roll seat back cover upward.
(8) Disengage hook and loop fasteners attaching

seat back cover to seat back pad (Fig. 13).

(9) Roll seat back cover upward and route latch

release handle through seat back cover.

(10) Separate seat back cover from seat back.
(11) Separate seat back pad from seat back frame.

INSTALLATION

(1) Position seat back cover and pad on seat back

frame.

(2) Route latch release handle through seat back

cover.

(3) Roll seat back cover partially downward align-

ing holes in seat back cover for head restraint and
latch release handle.

(4) Roll seat back cover downward align and

engage hook and loop fasteners to seat back pad.

(5) Engage J-straps at base of seat back.
(6) Engage J-straps on outboard side of seat back.
(7) Install screws attaching latch release handle to

seat back frame.

(8) Install head restraint.
(9) Install seat back.

Fig. 12 Rear Seat Back

1 – SEAT BACK
2 – FLOOR PAN
3 – CENTER PIVOT BRACKET
4 – SIDE SUPPORT BRACKET

WJ

BODY

23 - 21

REMOVAL AND INSTALLATION (Continued)


Content   ..  528  529  530  531   ..