Jaguar X-Type Sedan and Estate (Wagon). Manual - part 635


  Index      Jaguar     Jaguar X-Type Sedan and Estate (Wagon) (2.0 L, 2.5 L and 3.0 L Gasoline; 2.0 L and 2.2 L, Diesel) - manual 2001-2009 year


Search            


Content   ..  633  634  635  636   ..


Jaguar X-Type Sedan and Estate (Wagon). Manual - part 635


Published: 11-May-2011

Glass, Frames and Mechanisms - Rear Door Window Regulator and Motor

Removal and Installation

Removal

1. Remove the rear door window glass.

For additional information, refer to: 

Rear Door W indow Glass

 (501-11

Glass, Frames and Mechanisms, Removal and Installation).

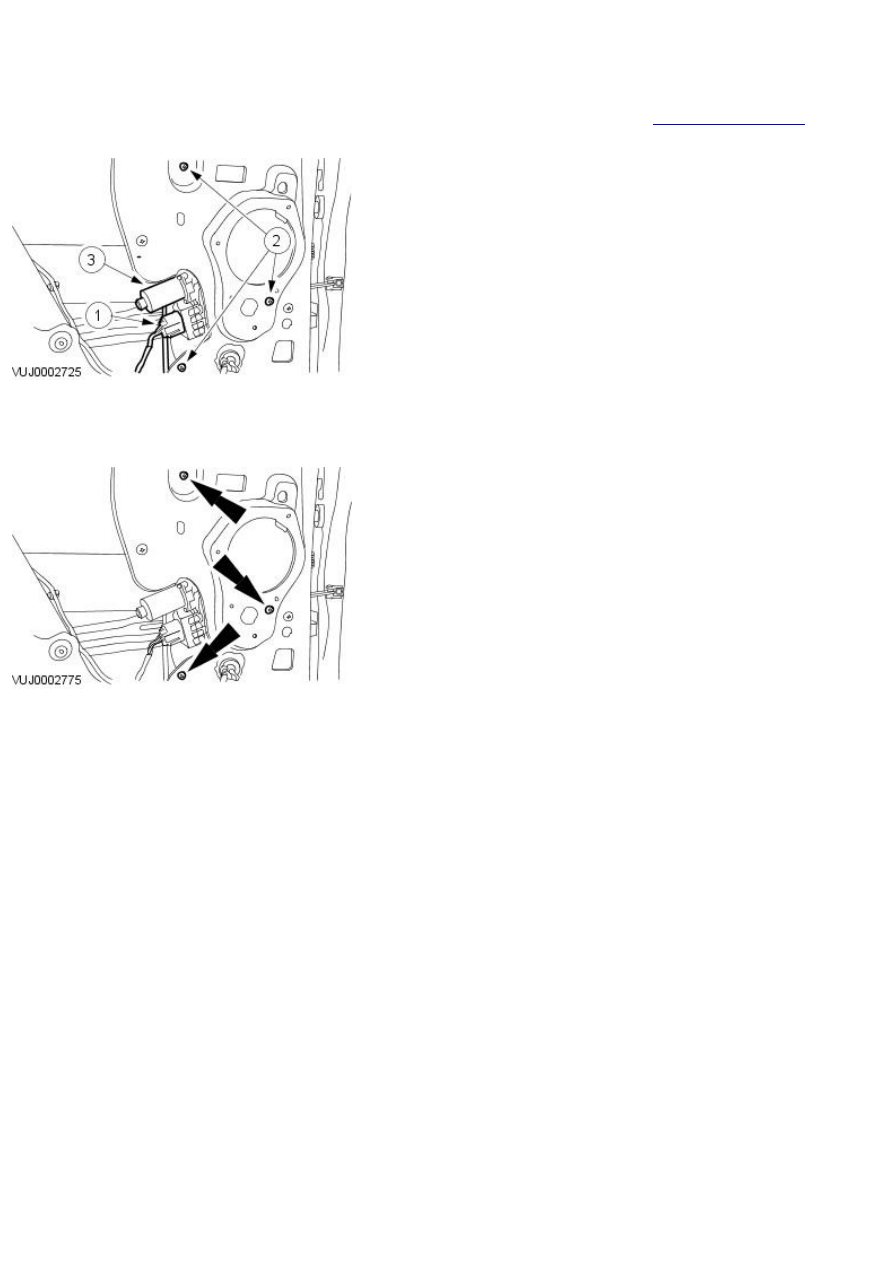
2. Remove the rear motor and window regulator.

1. Disconnect the electrical connector.

2. Remove the retaining screws.

3. Remove the rear motor and window regulator.

Installation

1. To install, reverse the removal procedure.

2. Tighten to 7 Nm.

Published: 11-May-2011

Glass, Frames and Mechanisms - Rear Quarter Window Glass

Removal and Installation

Special Tool(s)

Spray Bottle

WK9

Lubricant Concentrate

WK9L

Power Cutting Tool

WK10HD

Cutting Blade - Side

WK4ZS

Adhesive Removal Blade - Body

WK6

Betagun application gun

Betagun 111

Removal

1. Remove the rear quarter window glass weatherstrip.

2. Remove the rear quarter window glass finisher trim.

3. Remove the loadspace trim panel.

For additional information, refer to: 

Loadspace Trim Panel

 (501-05

Interior Trim and Ornamentation, Removal and Installation).

4. Apply a suitable protective tape to the edge of the headliner above the

rear quarter glass.

5. Dispense 20ml of WK9L lubricant into the WK9 spray bottle, fill the

spray bottle with water and mix.

6. 

CAUTION: Make sure cutting lubricant does not contact any

electrical components. Failure to follow this instruction may result in
damage to the component.

Apply cutting lubricant to the rear quarter window glass adhesive.

7. Install the cutting tool blade BTB-W K4ZS to the cutting tool

BTB-W K10HD.

8. 

W ARNING: W hen removing the rear quarter window glass,

personal protection must be worn. Failure to follow this instruction may
result in personal injury.

• CAUTIONS:

 Make sure the rear quarter glass edge seal is not damaged when

cutting the rear quarter window glass adhesive.

 Support the rear quarter window glass when cutting the rear quarter

window glass adhesive.

• NOTE: Apply cutting lubricant to the cutting tool frequently throughout
the cutting process.

Using the special tool cut through the rear quarter window glass
adhesive.

9. Remove the rear quarter window glass.

Installation

1. WARNINGS:

 If the rear quarter window glass is being installed at a temperature

of 23°C (73°F) or above make sure the vehicle is not driven for at least 1
hour after installation.

 If the rear quarter window glass is being installed at a temperature

of 11°C (52°F) make sure the vehicle is not driven for at least 1.5 hours
after installation.

 If the rear quarter window glass is being installed at a temperature

of 5°C (41°F) make sure the vehicle is not driven for at least 2 hours after
installation.

 If the rear quarter window glass is being installed at a temperature

below 5°C (41°F) use heat and make sure the windshield glass adhesive
has set before the vehicle is driven.

Using the special tool, remove any residual adhesive from the body
aperture.

2. If the original rear quarter window glass is to be installed remove any

residual adhesive from the rear quarter window glass using the special
tool.

3. Thoroughly clean rear quarter window glass surface using Betawipe

spirit.

4. Thoroughly clean the mating face of the body using Betawipe spirit.

5. Apply primer to the mating face of the glass.

6. Apply primer to the mating face of the body.


Content   ..  633  634  635  636   ..