Jaguar X-Type Sedan and Estate (Wagon). Manual - part 280


  Index      Jaguar     Jaguar X-Type Sedan and Estate (Wagon) (2.0 L, 2.5 L and 3.0 L Gasoline; 2.0 L and 2.2 L, Diesel) - manual 2001-2009 year


Search            


Content   ..  278  279  280  281   ..


Jaguar X-Type Sedan and Estate (Wagon). Manual - part 280


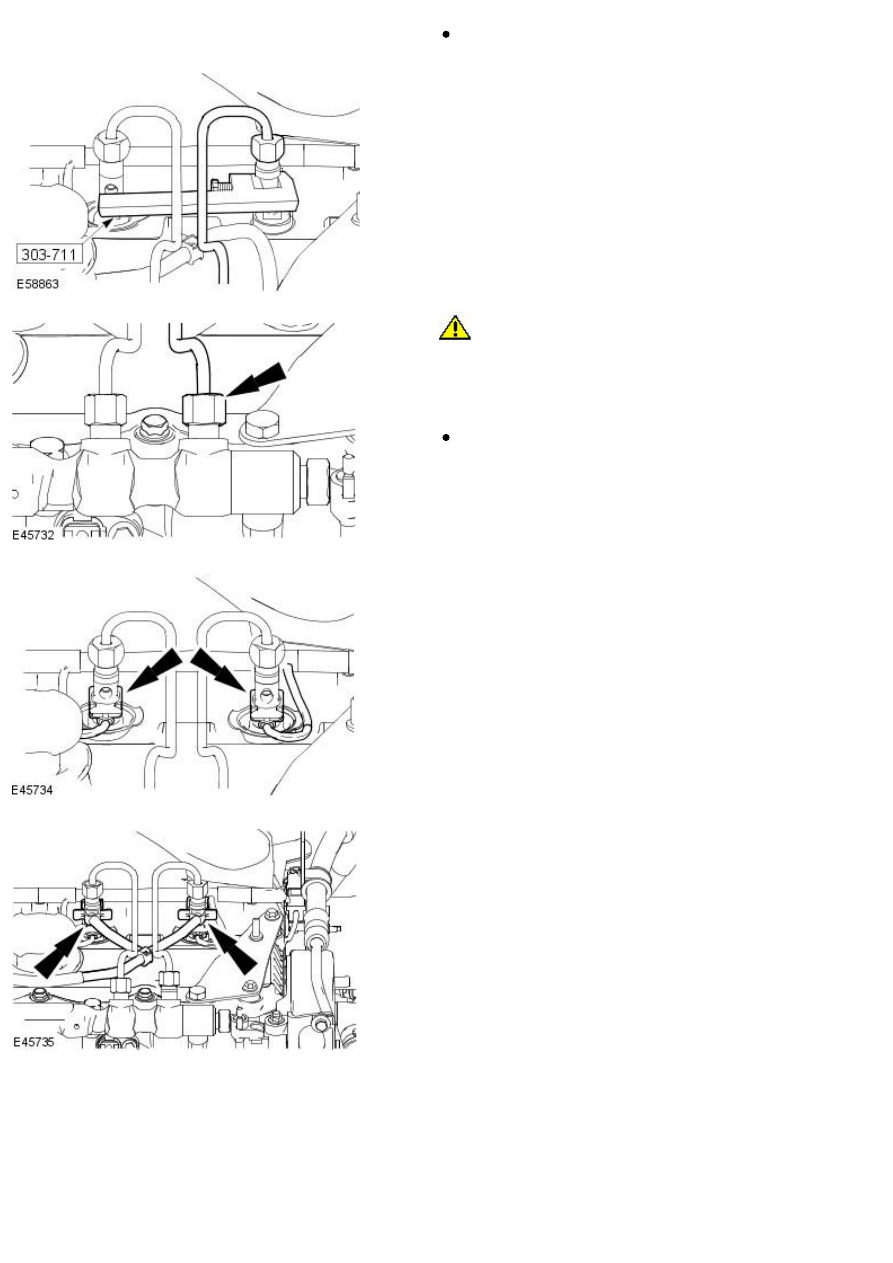
union at the fuel injector.

Tighten to 40 Nm.

18. Remove the special tool.

19. 

CAUTION: Make sure the tool used to tighten the high-pressure

fuel supply line unions is used at the top of the union as this is where
there is most material. Failure to follow this instruction may result in
damage to the union.

Tighten the high-pressure fuel supply line union at the fuel injection
supply manifold.

Tighten to 40 Nm.

20. Connect the fuel injector electrical connectors.

21. Connect the fuel return lines to the fuel injectors.

22. NOTE: Remove the oil filler cap and oil level indicator.

Install the engine cover.

23. Install the oil filler cap.

24. Install the oil level indicator.

25. Using the Jaguar approved diagnostic system, configure the new fuel

injector to the engine control module (ECM).

Published: 11-May-2011

Fuel Charging and Controls - 2.0L Duratorq-TDCi/2.2L Duratorq-TDCi (110kW/150PS)
- Puma - Fuel Metering Valve

Removal and Installation

Removal

• W ARNINGS:

 Do not smoke or carry lighted tobacco or open flame of any type when working on or near any fuel related components. Highly

flammable mixtures are always present and may ignite. Failure to follow these instructions may result in personal injury.

 This procedure involves fuel handling. Be prepared for fuel spillage at all times and always observe fuel handling precautions. Failure

to follow these instructions may result in personal injury.

 The fuel system remains pressurized after the ignition is switched off. If communications with a suitable tester (able to read fuel rail

pressure and temperature) can be established, wait until the tester indicates pressure of less than 20 bar (290 lb/in²), and temperature of
less than 35 degrees C (95 degrees F) before working on the system. If communications with a suitable tester cannot be established, the
fuel system must NOT be worked on for a period of fifteen minutes following the ignition being switched off. Failure to follow this
instruction may result in personal injury.

 If taken internally, DO NOT induce vomiting. Seek medical attention. Failure to follow this instruction may result in personal injury.

 If fuel contacts the eyes, flush the eyes with cold water or eyewash solution and seek medical attention. Failure to follow this

instruction may result in personal injury.

 W ash hands thoroughly afer handling, as prolonged contact may cause irritation. Should irritation develop, seek medical attention.

Failure to follow this instruction may result in personal injury.

• CAUTIONS:

 Make sure the workshop area in which the vehicle is being worked on is as clean and as dust free as possible. Foreign matter from

work on clutches, brakes or from machining or welding operations can contaminate the fuel system and may result in later malfunction.

 Before disconnecting any part of the system, it is imperative that all dust, dirt and debris is removed from around components to

prevent ingress of foreign matter in to the fuel system. Failure to follow this instruction may result in damage to the vehicle.

 Diesel fuel injection equipment is manufactured to very precise tolerances and fine clearances. It is therefore essential that absolute

cleanliness is observed when working with these components. Always install blanking plugs to any open orifices or lines.

1. Remove the air cleaner assembly.

For additional information, refer to: 

Air Cleaner

 (303-12B Intake Air

Distribution and Filtering - 2.0L Duratorq-TDCi/2.2L Duratorq-TDCi
(110kW/150PS) - Puma, Removal and Installation).

2. Remove the air cleaner mount bracket.

Detach the wiring harness.

Remove the air cleaner bracket retaining bolts.

3. 

CAUTION: Protect the fuel metering valve and fuel temperature

sensor electrical connectors to prevent contamination with the cleaning
fluid.

Clean the fuel pump and surrounding areas.
For additional information, refer to: 

Fuel Injection Component Cleaning

(303-04B Fuel Charging and Controls - 2.0L Duratorq-TDCi/2.2L
Duratorq-TDCi (110kW /150PS) - Puma, General Procedures).

4. Disconnect the fuel metering valve and fuel temperature sensor

electrical connectors.

5. 

CAUTION: Always carry out the cleaning process before carrying

out any repairs to the fuel injection system components. Failure to follow
this instruction may result in foreign matter ingress to the fuel injection
system.

Remove the fuel metering valve.

Install a new blanking plug to the open port of the fuel pump.

Installation

• W ARNINGS:

 Do not smoke or carry lighted tobacco or open flame of any type when working on or near any fuel related components. Highly

flammable mixtures are always present and may ignite. Failure to follow these instructions may result in personal injury.

 This procedure involves fuel handling, Be prepared for fuel spillage at all times and always observe fuel handling precautions. Failure

to follow these instructions may result in personal injury.

• CAUTIONS:

 Diesel fuel injection equipment is manufactured to very precise tolerances and fine clearances. It is therefore essential that absolute

cleanliness is observed when working with these components. Always install blanking plugs to any open orifices or lines.

 Make sure the workshop area in which the vehicle is being worked on is as clean and dust free as possible. Foreign matter from work

on clutches, brakes or from machining or welding operations can contaminate the fuel system and may result in later malfunction.

 Always carry out the cleaning process before carrying out any repairs to the fuel injection system components. Failure to follow this

instruction may result in foreign matter ingress to the fuel injection system.

 Diesel fuel injection equipment is manufactured to very precise tolerances and fine clearances. It is therefore essential that absolute

cleanliness is observed when working with these components. Always install blanking plugs to any open orifices or lines.

• NOTE: Install a new fuel metering valve and O-ring seal.

1. Remove and discard the blanking plug from the fuel pump.

2. Using a suitable multipurpose lubricant spray, lubricate the O-ring seal.

3. CAUTIONS:

 The fuel metering valve must be installed correctly into the fuel

pump so that the mating faces are in contact with each other. Failure to
follow this instruction may result in damage to the fuel metering valve.

 Always carry out the cleaning process before carrying out any repairs

to the fuel injection system components. Failure to follow this instruction
may result in foreign matter ingress to the fuel injection system.

Install the fuel metering valve and O-ring seal.

Install the fuel metering valve retaining bolts finger tight.


Content   ..  278  279  280  281   ..