Jaguar X-Type Sedan and Estate (Wagon). Manual - part 210
 

  Index      Jaguar     Jaguar X-Type Sedan and Estate (Wagon) (2.0 L, 2.5 L and 3.0 L Gasoline; 2.0 L and 2.2 L, Diesel) - manual 2001-2009 year


Search            


Content   ..  208  209  210  211   ..


Jaguar X-Type Sedan and Estate (Wagon). Manual - part 210


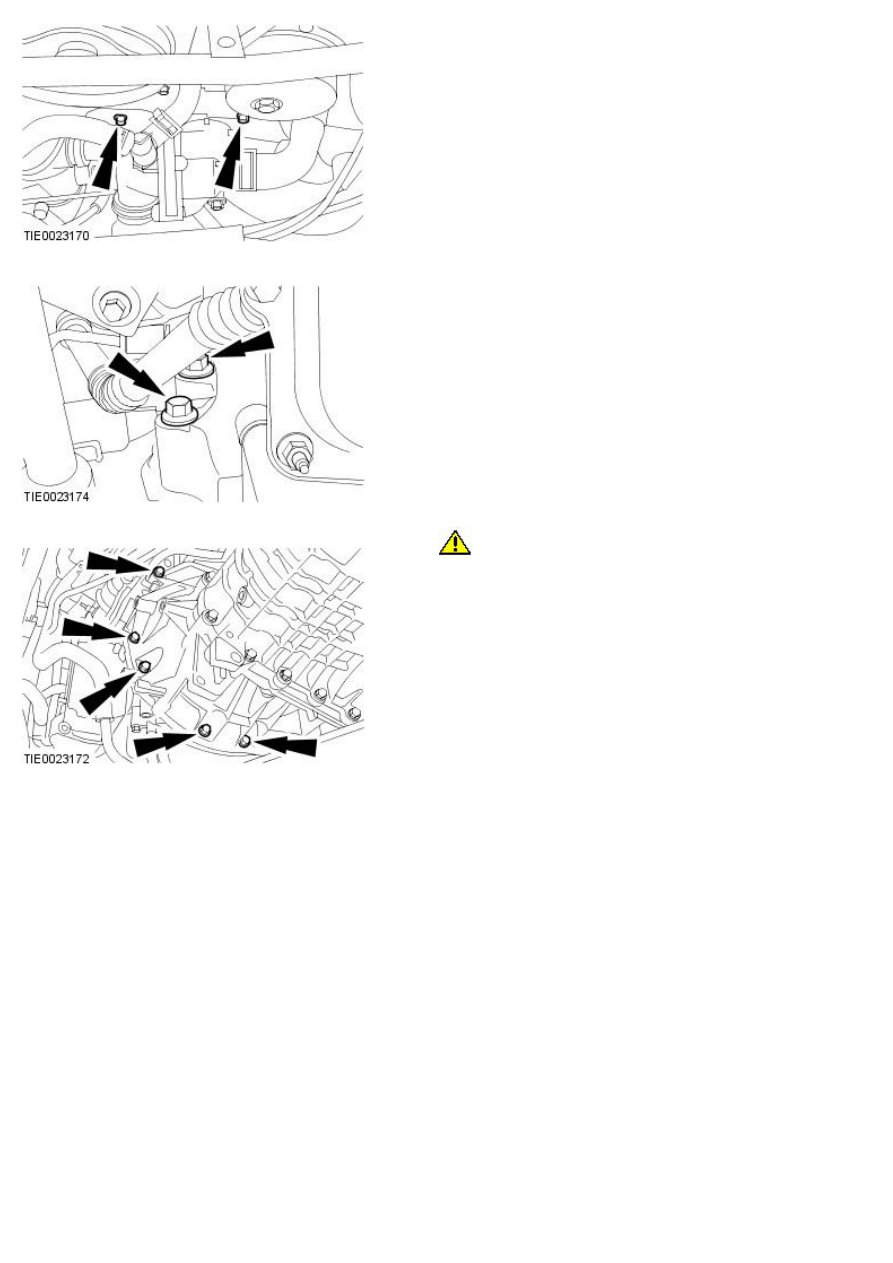
96. Remove the transmission upper retaining bolts.

97. Remove the transmission right-hand retaining bolts.

98. 

CAUTION: Do not support the engine and transaxle assembly

directly on the oil pan. Failure to follow this instruction may cause damage
to the component.

Remove the engine assembly from the transmission assembly.

Published: 11-May-2011

Engine - 2.0L Duratorq-TDCi/2.2L Duratorq-TDCi (110kW/150PS) - Puma -
Engine2.2L Duratorq-TDCi (110kW/150PS) - Puma

Removal

Special Tool(s)

Remover/Installer, Cooling Hose Clamp

303-397 (24-003)

Ball joint splitter

204-192

Wheel hub puller

205-491

Adaptor nuts

205-491-01

Forcing screw

204-269

Powertrain assembly jack

HTJ1200-02

Engine lifting eye

303-1067

5 Point Security Torx Bit

418-535

Removal

All vehicles

1. Remove and discard the steering column lower retaining bolt.

2. Remove the steering column coupling.

3. Remove the battery tray.

For additional information, refer to: 

Battery Tray

 (414-01 Battery,

Mounting and Cables, Removal and Installation).

4. Recover the air conditioning refrigerant.

For additional information, refer to: 

Air Conditioning (A/C) System

Recovery, Evacuation and Charging

 (412-00 Climate Control System -

General Information, General Procedures).

5. Drain the cooling system.

For additional information, refer to: 

Cooling System Draining, Filling and

Bleeding

 (303-03B Engine Cooling - 2.0L Duratorq-TDCi/2.2L

Duratorq-TDCi (110kW /150PS) - Puma, General Procedures).

6. Remove the exhaust flexible pipe.

For additional information, refer to: 

Exhaust Flexible Pipe - 2.0L

Duratorq-TDCi/2.2L Duratorq-TDCi (110kW/150PS) - Puma

 (309-00

Exhaust System, Removal and Installation).

Vehicles without auxiliary heating

7. Disconnect the heater hoses from the heater core.

Vehicles with electric booster heater

8. Detach the electric booster heater electrical connector from the

subframe retaining tang.

9. Detach the coolant hoses from the retaining clips.

10. Detach the coolant hose.

Disconnect the coolant hose.

Vehicles with fuel fired booster heater

11. Disconnect the fuel fired booster heater electrical connector from the

subframe retaining tang.


Content   ..  208  209  210  211   ..