Infiniti QX56 (JA60). Manual - part 470


  Index      Infiniti     Infiniti QX56 (JA60) - service repair manual 2010 year


Search            


Content   ..  468  469  470  471   ..


Infiniti QX56 (JA60). Manual - part 470


EM-34

< ON-VEHICLE REPAIR >

OIL PAN AND OIL STRAINER

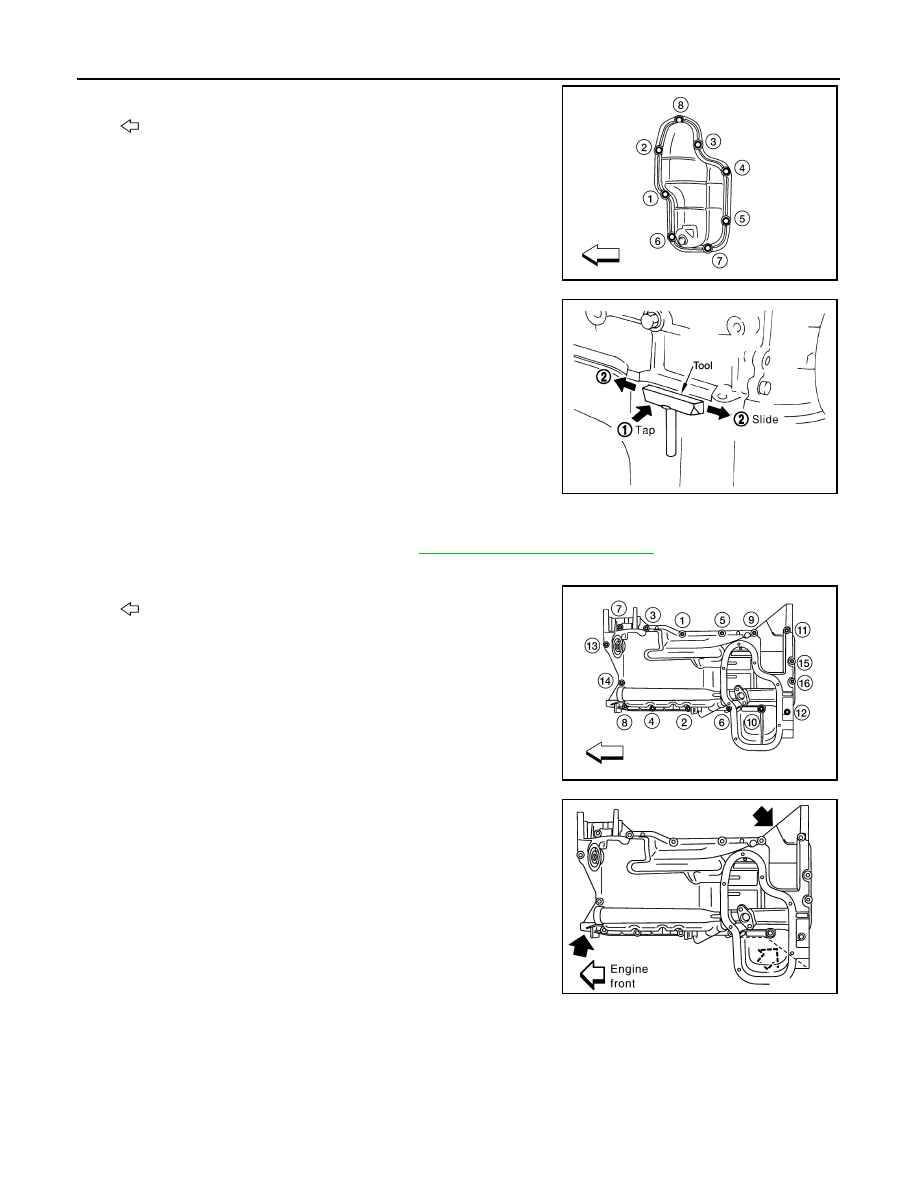
a. Remove the oil pan (lower) bolts in the reverse order as shown

using power tool.

: Engine front

b. Insert Tool between the lower oil pan and the upper oil pan.

CAUTION:

• Be careful not to damage the mating surface.

• Do not insert a screwdriver, this will damage the mating

surfaces.

c.

Slide (2) the Tool by tapping (1) its side with a hammer to

remove the lower oil pan from the upper oil pan.

4. Remove the oil strainer from the oil pan (upper).
5. Remove the oil cooler, if necessary. Refer to 

LU-12, "Removal and Installation"

.

6. Remove the oil pan (upper) using the following steps.
a. Remove the oil pan (upper) bolts in the reverse order as shown.

: Engine front

b. Remove the oil pan (upper) from the cylinder block by prying it at

the points shown, using suitable tool.

CAUTION:

Do not damage mating surface.

AWBIA0832ZZ

Tool number

: KV10111100 (J-37228)

WBIA0566E

AWBIA0833ZZ

KBIA2468E

OIL PAN AND OIL STRAINER

EM-35

< ON-VEHICLE REPAIR >

C

D

E

F

G

H

I

J

K

L

M

A

EM

N

P

O

7. Remove the O-rings from the oil pump and front cover.

NOTE:

Do not reuse O-rings.

INSPECTION AFTER REMOVAL

Clean the oil strainer.

INSTALLATION

1. Install the oil pan (upper) using the following steps.
a. Apply liquid gasket thoroughly as shown.

Use Genuine RTV Silicone Sealant or equivalent. Refer to 

GI-

15, "Recommended Chemical Products and Sealants"

.

CAUTION:

Apply liquid gasket to outside of bolt hole for the hole
shown by  .

b. Install new O-rings to the oil pump and front cover side.

c. Tighten the bolts in numerical order as shown.

2. Install the oil strainer to the oil pan (upper).

KBIA2469E

KBIA2470E

KBIA2469E

M6 

× 30 mm (1.18 in)

: No. 16, 17

M8 

× 25 mm (0.98in)

: No. 1, 3, 5, 7, 9, 13, 15

M8 

× 45 mm (1.77 in)

: No. 2, 4, 6, 8, 10, 14

M8 

× 123 mm (4.84in) : No. 11, 12

PBIC2553E

EM-36

< ON-VEHICLE REPAIR >

OIL PAN AND OIL STRAINER

3. Install the oil pan (lower).
a. Apply liquid gasket thoroughly as shown.

Use Genuine RTV Silicone Sealant or equivalent. Refer to

GI-15, "Recommended Chemical Products and Sealants"

.

b. Tighten the oil pan (lower) bolts in numerical order as shown.

4. Install the oil pan drain plug.
5. Install engine assembly. Refer to 

EM-78, "Removal and Installation"

.

• Do not fill the engine oil for at least 30 minutes after oil pan is installed.

INSPECTION AFTER INSTALLATION

1. Check engine oil level and add engine oil if necessary. Refer to 

LU-8, "Inspection"

.

2. Start the engine, and check for leaks of engine oil.
3. Stop engine and wait for 10 minutes.
4. Check engine oil level again.

KBIA2471E

PBIC2595E

IGNITION COIL

EM-37

< ON-VEHICLE REPAIR >

C

D

E

F

G

H

I

J

K

L

M

A

EM

N

P

O

IGNITION COIL

Exploded View

INFOID:0000000005148993

Removal and Installation

INFOID:0000000005148994

REMOVAL

1. Disconnect the harness connector from the ignition coil.
2. Remove the ignition coil.

CAUTION:

Do not shock ignition coil.

INSTALLATION

Installation is in the reverse order of removal.

1.

Ignition coil

2.

Spark plug

WBIA0796E


Content   ..  468  469  470  471   ..