Infiniti Q45. Manual - part 545


  Index      Infiniti     Infiniti Q45 - service repair manual 2006 year


Search            copyright infringement  


Content   ..  543  544  545  546   ..


Infiniti Q45. Manual - part 545


HEADLINING

EI-59

C

D

E

F

G

H

J

K

L

M

A

B

EI

5.

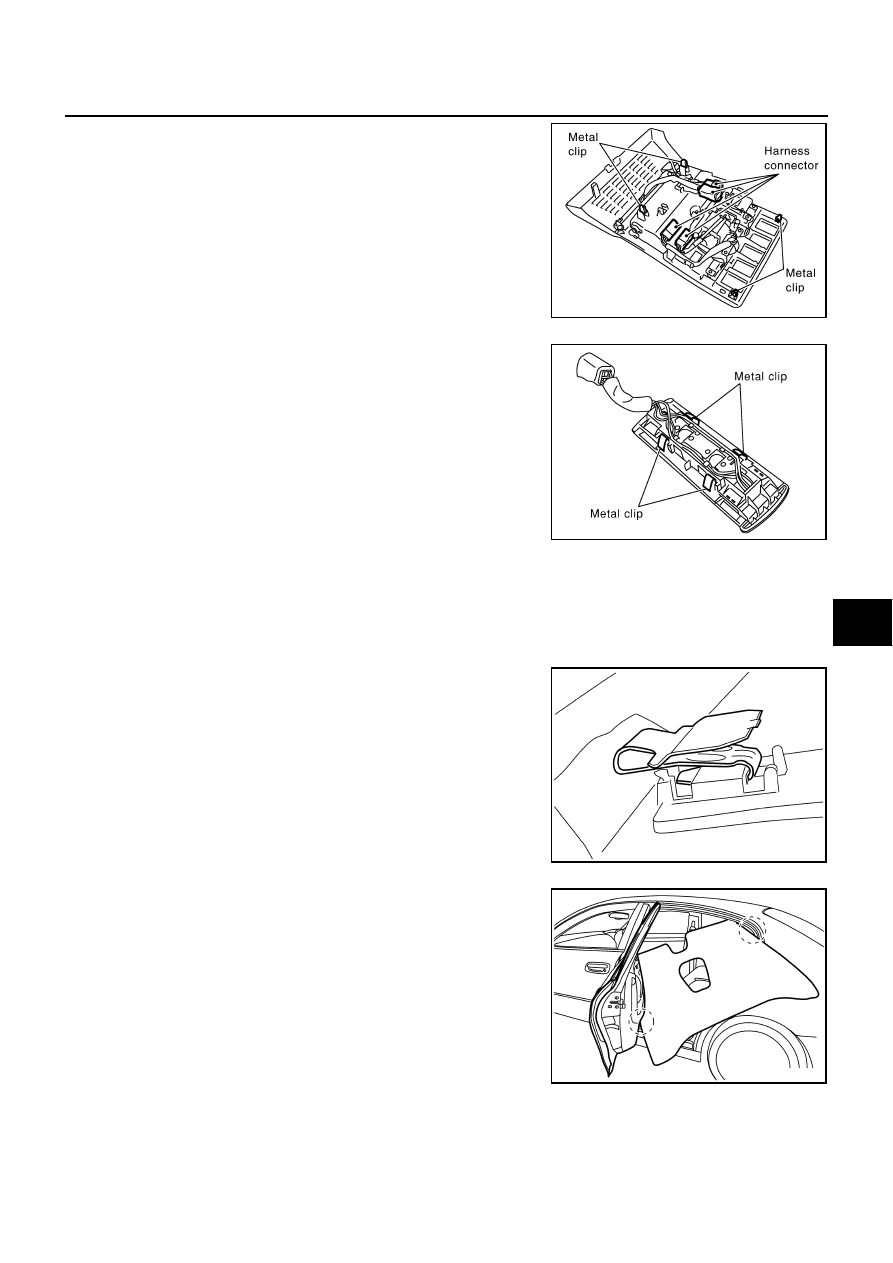
Remove map lamp assembly, and disconnect harness connec-
tor.

6.

Remove personal lamp, and disconnect harness connector.

7.

Remove sun-visor (LH/RH).

8.

Remove sunroof welt. 

9.

Disengage clips at rear of head lining, and remove trim fastener. 

10. Remove holder retainer. 

11. Slide front seat to the front, and set its seat back down backward. 

12. Slide headlining frontward of vehicle, and disconnect hooks (if

equipped with sunroof). 

13. Remove headlining, turn and remove from left rear door.

CAUTION:

Always remove or install in a pair. 

Cover surroundings with waste to avoid scratches or
damages. 

Do not bend headlining too hard. 

INSTALLATION

Install in the reverse order of removal. 

PIIB7405E

SIIA0825E

SIIA0390J

SIIA0367J

EI-60

TRUNK ROOM TRIM & TRUNK LID FINISHER

TRUNK ROOM TRIM & TRUNK LID FINISHER

PFP:84920

Removal and Installation

NIS0011W

TRUNK ROOM TRIM
Removal

1.

Open trunk lid fully.

2.

Remove trunk floor carpet.

3.

Remove spare tire cover.

4.

Remove trunk floor spacer (LH/center/RH).

5.

Remove tool box.

6.

Remove trunk rear plate assembly clips.

7.

Remove trunk rear finisher assembly clips.

8.

Remove trunk front finisher assembly clips.

PIIB1701E

1.

Trunk front finisher

2.

Trunk side finisher (LH)

3.

Trunk floor spacer (LH)

4.

Trunk floor spacer  (center)

5.

Trunk floor spacer (center)

6.

Trunk floor carpet

7.

Tool box

8.

Trunk rear plate

9.

Trunk rear finisher

10.

Trunk hinge cover

11.

Spare tire cover

12.

Trunk side finisher (RH)

TRUNK ROOM TRIM & TRUNK LID FINISHER

EI-61

C

D

E

F

G

H

J

K

L

M

A

B

EI

9.

Remove trunk side finisher assembly clips (LH/RH).

10. Remove trunk hinge cover.

Installation

Install in the reverse order of removal.

TRUNK LID FINISHER (INNER)
Removal

1.

Remove emergency handle assembly.

2.

Remove clips from trunk lid finisher (inner).

3.

Remove trunk lid finisher (inner).

Installation

Install in the reverse order of removal.

PIIB1702E

EI-62

TRUNK ROOM TRIM & TRUNK LID FINISHER


Content   ..  543  544  545  546   ..