Infiniti FX35 / FX45. Manual - part 933


  Index      Infiniti     Infiniti FX35 / FX45 (S50) - service repair manual 2008 year


Search            


Content   ..  931  932  933  934   ..


Infiniti FX35 / FX45. Manual - part 933


SE-90

< SERVICE INFORMATION >

FRONT SEAT

REMOVAL

When removing or installing the seat trim, carefully handle it to keep dirt out and avoid damage.

CAUTION:

• Before removing the front seat, turn ignition switch OFF, disconnect both battery cables and wait at

least 3 minutes.

• When checking the power seat circuit for continuity using a circuit tester, do not confuse its connec-

tor with the side air bag module connector. Such an error may cause the air bag to deploy.

• Do not drop, tilt, or bump the side air bag module installing in the seat. Always handle it with care.
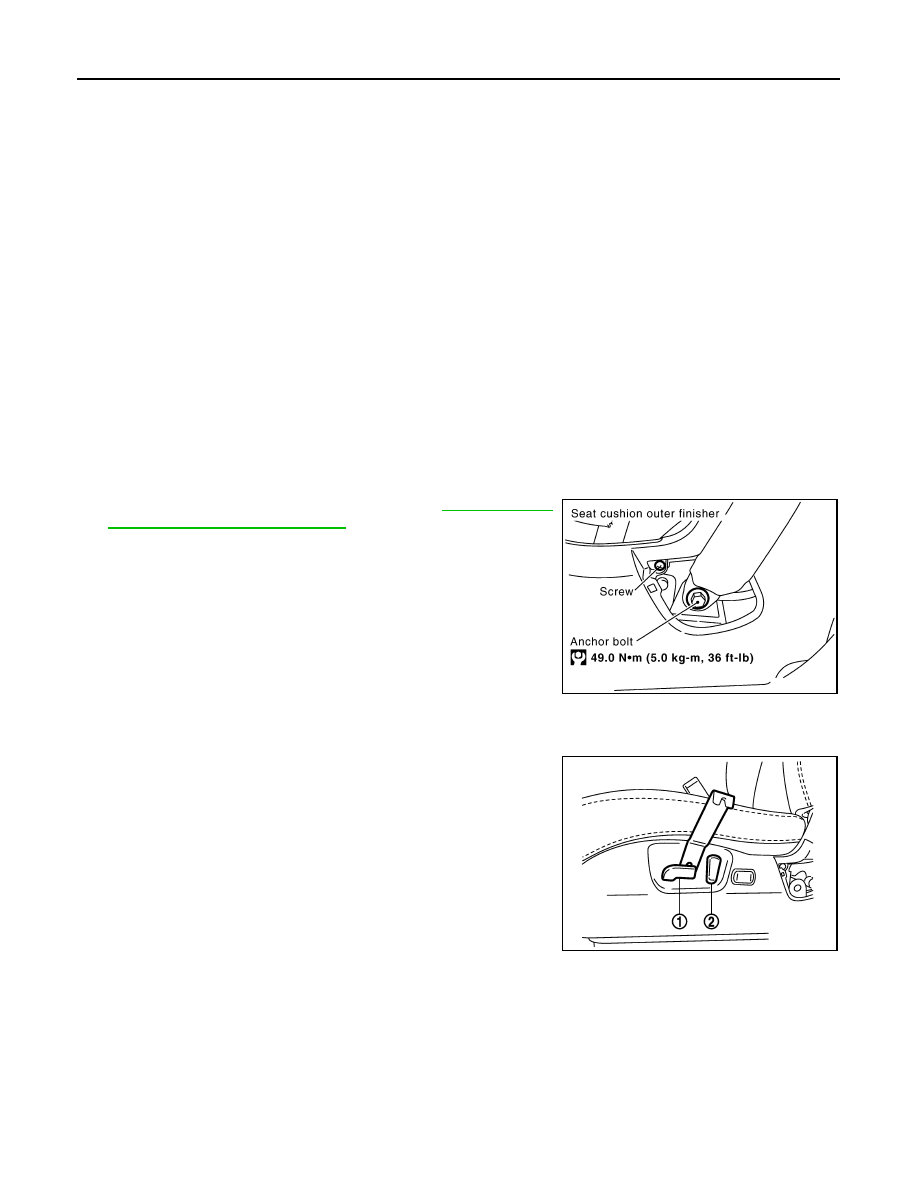
1.

Remove the  seat cushion outer finisher cover.

2.

Remove the front seat belt anchor bolt. Refer to 

SB-3, "Removal

and Installation of Front Seat Belt"

.

CAUTION:

Set the front and rear cushion lifter to the down position.

3.

Remove the screw.

4.

Remove the seat cushion forward finisher lid.

5.

Remove the seat cushion forward finisher. 

6.

Remove the seat slide and lifter switch knob (1) and seat reclin-
ing switch knob (2).

1.

Headrest

2.

Headrest holder (free)

3.

Headrest holder (locked)

4.

Seatback pad

5.

Seatback trim

6.

Seat cushion inner finisher

7.

Screw

8.

Seat cushion trim

9.

Seat cushion pad

10. Seatback garnish

11.

Nut

12. Side air bag module

13. Clip (C101)

14. Inner cloth stay

15. Lumber support device

16. Bolt

17. Seatback frame

18. Reclining device assembly

19. Seat cushion frame

20. Seat harness assembly

21. Seat adjust assembly

22. Clip (C103)

23. Seat adjust assembly cover

24. Seat cushion outer finisher

25. Seat cushion outer finisher cover

26. Lumber support switch assembly

27. Seat reclining switch knob

28. Seat slide and lifter switch knob

29. Seat control switch

30. Seat cushion forward finisher

31. Seat cushion forward finisher lid

PIIA6040E

PIIB8525E

FRONT SEAT

SE-91

< SERVICE INFORMATION >

C

D

E

F

G

H

J

K

L

M

A

B

SE

N

O

P

7.

Remove the seat cushion outer finisher.

8.

Remove the seat control switch assembly.

9.

Remove the lumber  support switch assembly.

10. Remove the front  and rear leg cover (LH and RH).

NOTE:
• Slide the seat backward, and disconnect the front tabs on the

front leg cover. Then move the cover toward the rear of the
vehicle, and pull up to remove.

• Slide the seat forward, then disengage the tabs on the front LH

and RH of the rear leg cover and tabs engaged into the rail.
Then pull the cover toward the rear of the vehicle.

11. Slide the seat until the body mounting bolts are visible and a tool can be inserted.

NOTE:
When disassembling the driver seat after removal, set the front and rear cushion lifter to the top position.

12. Disconnect both battery cables.

13. Remove the harness connector for the side air bag module.

14. Remove the power seat harness connector and vehicle harness fixing clip.
15. Remove the front seat.

NOTE:
When removing and installing, using waste, protect the parts from damage where it may interfere with oth-
ers.

INSTALLATION

Install in the reverse order of removal.
NOTE:

PIIB8526E

1.

Screw

2.

Seat cushion forward finisher

3.

Seat cushion outer finisher

4.

Clip(C101)

5.

Seat control switch

PIIA4984E

SE-92

< SERVICE INFORMATION >

FRONT SEAT

Be sure to insert the rear end tab of the rear leg cover under the rail.

REMOVAL OF SEATBACK TRIM AND PAD

1.

Remove the seatback garnish.

2.

Remove the retainer.

3.

Remove the stay securing the inner cloth.

4.

Remove the headrest.

5.

Remove the headrest holder.
From the back of the seatback, press the headrest holder tab of
the stay pipe hole to disengage. Then pull the headrest holder
up to remove. 
NOTE:
Before installing the headrest holder, check its orientation (front,
rear, left and right). 

PIIA6041E

PIIA6042E

PIIA6048E

PIIA6050E

FRONT SEAT

SE-93

< SERVICE INFORMATION >

C

D

E

F

G

H

J

K

L

M

A

B

SE

N

O

P

6.

Remove the heated seat connector. 

7.

After removing the seatback trim and pad, remove the hog rings to separate the trim, pad, and seatback
heater unit.

INSTALLATION OF SEATBACK TRIM AND PAD

Install in the reverse order of removal.

REMOVAL OF SEAT CUSHION TRIM AND PAD

CAUTION:

Do not disassemble the component parts of only front passenger seat in the dotted lines shown in the
figure. Refer to "Removal and Installation".

1.

Remove the seat cushion inner finisher.

2.

Remove the velcro and retainer.

3.

Remove the seat harness connector.

4.

Remove the seatback frame.

5.

Remove the reclining device assembly.

PIIA6049E

PIIA6052E

PIIA6053E

PIIA6054E


Content   ..  931  932  933  934   ..