Hyundai Matrix (2007 year). Instruction - part 18

1 CONTROLS AND EQUIPMENT
10
B070F02A-EAT
- Other vehicles or objects may be
B070E02HP-GAT
Keyless Entry System
blocking the signal.
Replacing the battery
(Not all models)
- The weather is extremely cold.
When the transmitter's battery becomes
- The transmitter is close to a radio
weak, it may take several pushes on
Locking doors
transmitter such as a radio station
the button to lock or unlock the doors,
1. Close all doors.
or an airport which can interfere
and the LED will not light. Replace the
2. Push the "LOCK" button on the trans-
with normal operation of the trans-
battery as soon as possible.
mitter.
mitter.
3. At the same time all doors lock, the
Battery type : CR2032
turn signal light will blink once to
When the transmitter does not work
indicate that the system is armed.
correctly, open and close the door
Replacement instructions:
with the ignition key. If you have a
Unlocking doors
problem with the transmitter, con-
1. Push the "UNLOCK" button on the
tact an authorized Hyundai Dealer.
transmitter.
2. At the same time all doors unlock,
NOTE:
the turn signal light will blink twice to
Keep the transmitter away from wa-
indicate that the system is disarmed.
ter or any liquid. If the keyless entry
system is inoperative due to expo-
NOTE:
sure to water or liquids, it will not be
Screwdriver
The transmitter will not work if any of
covered by your manufacturer ve-
following occur:
hicle warranty.
MSO-0048-1
- The ignition key is in ignition
switch.
1. Separate the case with a blade screw-
- You exceed the operating distance
driver as shown in the illustration.
limit (10 m).
- The battery in the transmitter is
weak.
fcuk-1.p65
10
12/27/2006, 10:11 AM

CONTROLS AND EQUIPMENT
1
WINDOW
11
SB060A1-E
B060A03E-EAT
Case
MANUAL WINDOWS
POWER WINDOWS
(Not all models)
Close
Open
(1)
Battery
MSO-0048-2
2. Before removing the battery note its
B050A01FC-D
position and ensure the new battery
The front door windows may be opened
B060A01FC-D
is fitted the same + side (positive)
facing down, then insert it into trans-
or closed by turning the window regula-
The power windows operate when the
mitter.
tor handle. Ensure that when the win-
ignition key is in the "ON" position. The
dows are closed, nothing may become
main switches are located on the driver's
trapped between the glass and the door
armrest and control the front and rear
frame.
windows on both sides of the vehicle.
The windows may be opened by de-
pressing the appropriate window switch
!
and closed by pulling up the switch. To
WARNING:
open the window on the driver's side,
When opening or closing the win-
press the switch(1) down. The window
dows, make sure your passenger's
moves as long as the switch is oper-
arms and hands are safely out of the
ated.
way.
fcuk-1.p65
11
12/27/2006, 10:11 AM

1 CONTROLS AND EQUIPMENT
SEAT
12
B080A01FC-EAT
SEAT ADJUSTMENT
!
WARNING:
1) Be careful that someone's head,
!
hands or body are not trapped by
WARNING:
a closing window.
Front seat adjustments must not be
2) Never try to operate the main
undertaken whilst the vehicle is in
switch on the driver's door and the
motion. Loss of control of the ve-
individual door window switch in
hicle may result if seat adjustments
opposing directions at the same
are made whilst the vehicle is in
time. If this is done, the window
motion.
HFC2013-D
will stop and cannot be opened or
In order to prevent operation of the
closed.
passenger front and rear windows, a
3) Always remove the ignition key
window lock switch is provided on the
prior to exiting the car.
armrest of the driver's door. To disable
4) Do not leave children alone in the
the power windows, press the window
car.
lock switch.
To return to normal operation, press the
window lock switch a second time.
Auto-Down Window
(Driver's Side)
The Auto-Down window is moved to its
fwitch. To stop at the desired loction,
the switch must be pulled up.
fcuk-1.p65
12
12/27/2006, 10:11 AM

CONTROLS AND EQUIPMENT
1
13
B080B02FC-EAT
SB070C1-E
SB070D3-E
FRONT SEATS
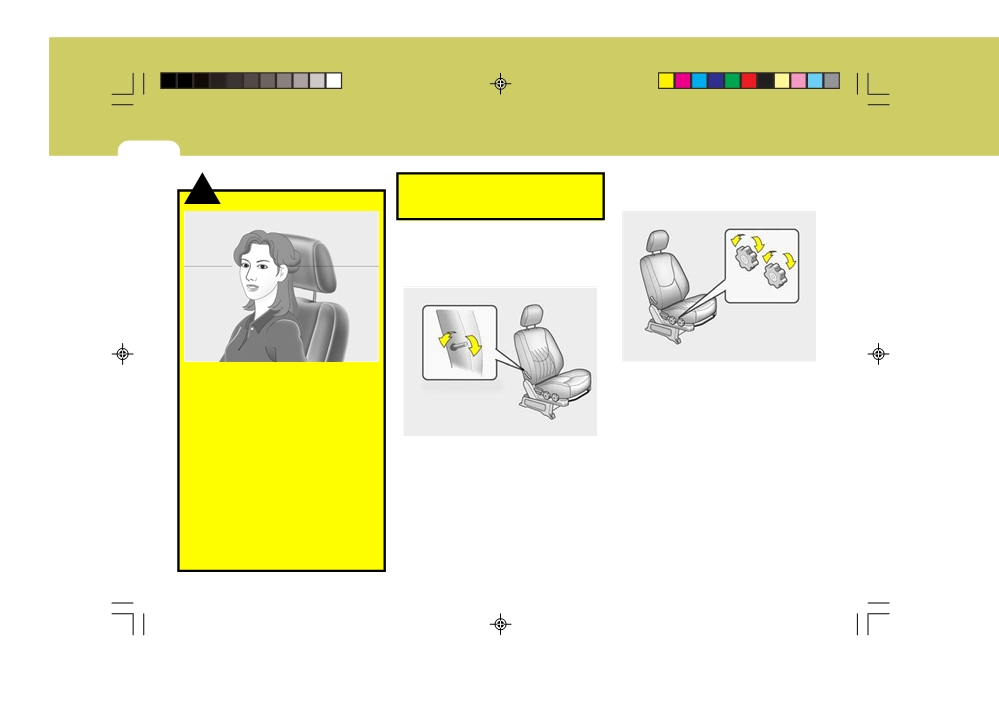
Front Seat Recline Adjustment
Head Restraint Adjustment
Front Seat Rake Adjustment
Lock Knob
HFC2025-D
HFC2028
HFC2024-D
The front seat back recline angle may
To raise the head restraint, pull it up. To
be adjusted by leaning forward slightly
lower it, push it down whilst pressing
The front seat rake adjustment is per-
and raising the recline adjustment lever
the lock knob. For maximum effective-
formed by raising the lever at the front
at the side of the seat. When the
ness in the event of an accident, the
of the seat base and sliding the seat to
seatback is at the desired angle, the
restraint must be adjusted so that the
the desired position. At this position the
lever should be released. Ensure that
restraint is approximately at the level of
lever should be released and the seat
the seatback is locked before driving
the seat occupant's eyes. The restraint
rocked to and fro to ensure that the
the vehicle.
must never be so adjusted that it is
mechanism has locked.
centred about the level of the seat
occupant's neck.
!
WARNING:
To ensure the seat is locked se-
curely, attempt to move the seat for-
ward or rearward without using the
lock release lever.
fcuk-1.p65
13
12/27/2006, 10:11 AM
1 CONTROLS AND EQUIPMENT
14
SB070F1-E
o Do not adjust the head restraint
Seat Cushion Height Adjustment
!
height whilst the vehicle is in
WARNING:
(Driver's seat only)(Not all models)
motion.
SB070E1-E
Lumbar Support Adjustment
(Driver's seat only)(Not all models)
2
1
B080D01JM
HFC2026-D
o For maximum effectiveness in case
To raise or lower the front part of the
of an accident the head restraint
seat cushion, turn the front knob clock-
should be adjusted so the middle
wise or counter-clockwise.
of the head restraint is at the same
To raise or lower the rear part of the seat
height as the top of the occupant's
cushion, turn the rear knob clockwise or
HFC2027-D
eyes. For this reason, the use of a
counter-clockwise.
cushion that holds the body away
Some models are fitted with adjustable
from the seatback should not be
driver seat lumbar support which may
recommended.
be used to increase the amount of
o Do not operate vehicle with the
lumbar support offered by the seat back.
head restraints removed as injury
Adjustment is performed by moving the
to the occupants may occur in the
handle at the side of the backrest in a
event of an accident. Head re-
forward direction to increase the support.
straints may provide protection
against neck injuries when prop-
1. Maximum Support
erly adjusted.
2. Minimum Support
fcuk-1.p65
14
12/27/2006, 10:11 AM

CONTROLS AND EQUIPMENT
1
15
B080G01FC-EAT
B080H01FC-GAT
B080I01FC-BAT
UNDER TRAY (Not all models)
REAR SEAT
Adjusting Seatback Angle
Seat Rake Adjustment
Seatback
folding lever
HFC2059
HFC2061
The tray is located under the front
HFC2060
To recline the seatback, push the
passenger seat. It is opened by up and
The front seat rake adjustment is per-
seatback folding lever toward the head-
pulling forward.
formed by raising the lever at the front
rest, and release it after the desired
of the seat base and sliding the seat to
seatback angle is achieved.
the desired position. At this position the
When you recline the seatback to de-
lever should be released and the seat
sired position, always be sure it has
!
WARNING:
rocked to and fro to ensure that the
locked into position.
To avoid the possibility of injury in
mechanism has locked.
case of an accident or a sudden stop,
the tray should be kept closed when
!
CAUTION:
the car is in motion.
When reclining the seatback, you
should adjust the seatback folding
lever whilst standing.
fcuk-1.p65
15
12/27/2006, 10:11 AM

1 CONTROLS AND EQUIPMENT
16
SB070D3-E
o Do not adjust the head restraint
Head Restraint Adjustment
!
height whilst the vehicle is in
WARNING:
motion.
B090B01FC-GAT
Folding Rear Seatback and Seat
Cushion
For greater convenience, the entire
Lock Knob
seatback anad seat cushion may be
folded down and up.
B090A01FC
To raise the head restraint, pull it up. To
B080D01JM
lower it, push it down whilst pressing
o For maximum effectiveness in case
the lock knob. For maximum effective-
of an accident the head restraint
ness in the event of an accident, the
should be adjusted so the middle
restraint must be adjusted so that the
of the head restraint is at the same
restraint is approximately at the level of
height as the top of the occupant's
the seat occupant's eyes. The restraint
eyes. For this reason, the use of a
must never be so adjusted that it is
cushion that holds the body away
centred about the level of the seat
from the seatback should not be
recommended.
occupant's neck.
o Do not operate vehicle with the
HFC2074
head restraints removed as injury
to the occupants may occur in the
1. Move the rear seat to the rearmost
event of an accident. Head re-
position.
straints may provide protection
2. Remove the head restraints.
against neck injuries when prop-
erly adjusted.
fcuk-1.p65
16
12/27/2006, 10:11 AM

CONTROLS AND EQUIPMENT
1
17
3. To fold down the seatback , push and
hold the seatback folding lever to-
Securing
!
ward the head restraints, then push
strap
WARNING:
down the seatback.
o When you return the folded down
seat back to its upright position,
make sure the seat belts are in
position to be accessible and to
function properly.
o The purpose of the fold down rear
seat back and the fold forward rear
seat cushion is to increase cargo
HFC2076
space. Do not allow passengers to
5. To secure the seat, hook the secur-
sit in the cargo area whilst the car
ing strap under the seat cushion to
is moving. This is not a proper
the headrest stay of front driver and
seating position and no seat belts
Seat cushion release lever
HFC2075
passenger seat.
are available for use when the seat
6. Insert the removed headrests be-
back is folded down. Passengers
4. Pull the seat cushion release lever
tween the seatback and seat cush-
who are not properly seated and
upward, then fold up the seat cushion.
ion, so that they will not be thrown
wearing seat belts could sustain
forward in the case of a sudden stop
serious injuries or death in case of
or an accident.
an accident or a sudden stop.
!
CAUTION:
7. To return the seatback and seat
o Objects should not extend higher
To prevent damage, ensure that the
cushion to its normal position, re-
than the top of the front seatbacks.
rear drinkholder, located in the rear
verse the above procedure.
This could allow cargo to slide
console, is closed before folding the
o
When you return the seatback to its
forward and cause injury or dam-
rear seatback and seat cushion.
upright position, always be sure it is
age during sudden stops.
locked into position by pulling and
pushing on the top of seatback.
fcuk-1.p65
17
12/27/2006, 10:11 AM

1 CONTROLS AND EQUIPMENT
SEAT WARMER
18
B100A02FC-EAT
NOTE:
o When you return the folded down
(Not all models)
The seat warmer will not operate if
seatback to its upright position,
ambient temperature is warm
always be sure to install the head-
enough.
rests in their proper positions.
Head restraints are important to
the safety of occupants in a rear
collision. If the headrests are not
!
WARNING:
installed in their proper position,
Be very careful not to induce injury
serious injury or death could re-
through inappropriate use of the seat
sult if a rear end collision occurs.
warmer to infants, young children,
the elderly and infirm persons suf-
fering the effects of illness and medi-
B100A01FC
cation.
The seat warmer is provided to warm
the front seats during cold weather.
When the engine is running, push either
of the switches to warm the driver's
seat or the passenger's seat.
During mild weather or under conditions
where the operation of the seat warmer
is not needed, keep the switches in the
"OFF" position.
fcuk-1.p65
18
12/27/2006, 10:11 AM

CONTROLS AND EQUIPMENT
1
REAR SEAT WARNING
SEAT BELTS
19
B140A01B-GAT
SB090A1-E
SB090C1-E
SEAT BELT PRECAUTIONS
Larger Children
Seat belts should be worn at all times
Larger children should occupy the rear
by all occupants front and rear. The
seat and be restrained at all times. The
possibility of injury or the severity of
restraint may take the form of a special
injuries suffered in the event of an
safety belt or the original factory fitted
accident will be greatly reduced by the
seat belt used in conjunction with an
wearing of seat belts.
approved booster cushion depending
In addition the following recommenda-
upon the size and weight of the child.
tions should be observed.
Under no circumstances should chil-
dren be allowed to travel standing, kneel-
ing or lying on the seat.
B140A02FC
Never allow children to ride in the front
For the safety of all vehicle occupants,
SB090B1-E
passenger seat.
luggage or other cargo should not be
Babies/Small Children
piled higher than the top of the seatback.
Babies and small children must be
restrained using a restraint system spe-
cifically designed for this purpose. Un-
SB090O1-E
der no circumstances should a child be
Pregnant Women
carried in the vehicle without the use of
The use of a seat belt is recommended
a suitable restraint which meets the
for pregnant women. The seat belt should
regulations in force in the country where
be worn as low and snugly as possible
the vehicle is in operation.
across the hips, not across the abdo-
men. A qualified Medical Practitioner
should be consulted for further informa-
tion.
fcuk-1.p65
19
12/27/2006, 10:11 AM

1 CONTROLS AND EQUIPMENT
20
SB090E1-E
SB090H1-E
SB090K1-E
Injured Persons
CARE OF SEAT BELTS
Replacement of Seat Belts
A seat belt should be used when an
Seat belt assemblies must never be
The entire seat belt assembly or as-
injured person is being transported. For
disassembled or modified in any way.
semblies should be inspected by an
specific recommendations, the advice
In addition, care should be exercised to
authorized repairer if the vehicle has
of a qualified Medical Practioner should
ensure that the belt assemblies do not
been involved in an accident even if no
be sought.
become damaged by being trapped in
damage is evident. Additional ques-
seat mechanisms, door shuts etc.
tions concerning seat belt operation
should be directed to a Hyundai
authorised repairer.
SB090F1-E
SB090I-E
Seat Belt Occupancy
Periodic Inspection
The seat belts are designed to be used
It is recommended that all seat belts be
B170A04A-EAT
by one seat occupant only. The use of
inspected periodically for wear or dam-
HEIGHT ADJUSTABLE FRONT
a seat belt by more than one person
age of any kind. Parts of the system
SEAT SHOULDER BELT
increases the levels of injury which
that are damaged should be replaced
may be sustained in the event of an
(Not all models)
as soon as possible. Under no circum-
accident.
stances must any part of the seat belt
assemblies be dismantled or repaired.
SE090G1-E
Do Not Lie Down
SB090J1-E
To ensure that the maximum level of
Keep Belts Clean and Dry
protection may be afforded by the seat
Seat belts should be kept clean and
belt system, all passengers should be
dry. If belts become dirty, they can be
sitting in an upright position throughout
cleaned using a mild soap solution and
the journey. The seat belt will be unable
warm water. Bleach, dye, strong deter-
to afford maximum protection if the
gents or abrasives should not be used
B170A01E-D
front seats are at or near the fully
since the fabric may become damaged
You can adjust the height of the shoul-
reclined position.
and weakened.
der belt anchor to one of 4 positions.
fcuk-1.p65
20
12/27/2006, 10:11 AM

CONTROLS AND EQUIPMENT
1
21
If the height of the adjusting seat belt is
B180A1A-EAT
The buckle should be firmly pressed
too near your neck, you will not be
SEAT BELTS (3-Point Type)
into the stalk until locked which will be
getting the most effective protection.
To Fasten The Seat Belt
indicated by an audible "click".
The shoulder portion should be ad-
The length of the seat belt webbing will
justed so that it lies across your chest
be automatically adjusted by the seat
and midway over your shoulder nearest
belt mechanism to allow the wearer
the door and not your neck.
maximum freedom of movement whilst
To adjust the height of the seat belt
the belt is being worn. However, in the
anchor, lower or raise the height ad-
event of rapid deceleration or impact,
juster into an appropriate position. To
the belt mechanism will automatically
raise the height adjuster, pull it up. To
lock.
lower it, push it down whilst pressing
The mechanism will also lock if the seat
the height adjuster button.
belt webbing is withdrawn too quickly
Release the button to lock the anchor
when the belt is being fastened or if
B180A01L-R
into position. Try sliding the release
attempts are made to withdraw the
button to make sure that it has locked
The seat belts are fastened by pulling
webbing whilst the vehicle is not on
into position.
the belt buckle towards the seat belt
level ground. Should the seat belt lock
stalk and inserting the metal tongue of
under these conditions, it will be pos-
the buckle into the stalk.
sible to release the mechanism by al-
lowing a small amount of webbing to be
!
NOTE:
retracted and the belt withdrawn again.
WARNING:
When pulling the seat belt buckle
o The height adjuster must be in the
towards the fastening position make
locked position when the vehicle
sure the webbing is not twisted.
is moving.
o The misadjustment of height of
the shoulder belt could reduce the
effectiveness of the seat belt in a
crash.
fcuk-1.p65
21
12/27/2006, 10:11 AM

1 CONTROLS AND EQUIPMENT
22
B200A01S-GAT
SB090R1-F
B220A01FC-EAT
Adjusting Your Seat Belt
To Release the Seat Belt
SEAT BELTS - Centre Rear Seat
3-Point System With Emergency
Locking Retractor
(Not all models)
B200A01L-D
B210A01L-R
You should place the belt as low as
The seat belt is released by pressing the
possible on your hips, not on your
release button in the locking buckle.
waist.
When it is released, the belt should auto-
B220A01FC
If the belt is located too high on your
matically draw back into the retractor.
1. Before fastening the rear seat centre
body, you could slide under it in case of
If this does not happen, check the belt
belt, confirm the metal tab (a) and
accident or a sudden stop. This could
to be sure it is not twisted, then try
buckle (b) are latched together.
result of death, serious injury or prop-
again.
2. After confirming that (a) and (b) are
erty damage. Both arms should not be
latched, pull the seat belt out of the
under or over the belt. Rather, one
retractor and insert the metal tab (c)
should be over and the other under, as
into the buckle (d).
shown in the illustration.
Never wear the seat belt under the arm
nearest to the door.
fcuk-1.p65
22
12/27/2006, 10:11 AM

CONTROLS AND EQUIPMENT
1
23
There will be an audible "click" when the
B220C01A-EAT
tab locks in the buckle. The seat belt
To Release the Seat Belt
!
automatically adjusts to the proper length
WARNING:
only after the lap belt is adjusted manu-
o When using the rear seat centre
ally so that it fits snugly around your
belt, you must lock all metal tabs
hips. If you lean forward in a slow, easy
and buckles. If any metal tab or
motion, the belt will extend and let you
buckle is not locked, it will in-
move around. If there is a sudden stop
crease the chance of injury in the
or impact, the belt will lock into position.
event of collision.
It will also lock if you try to lean forward
o Never unlock the metal tab (a) and
too quickly.
the buckle (b) with the following
exceptions.
(1) In case of folding rear seatbacks
B220C02FC
down.
(2) If transporting an object on the
When you want to release the seat belt,
rear seat may cause damage to
press the button in the locking buckle.
the rear seat centre belt.
o Lock the metal tab (a) and the
buckle (b) immediately after fold-
!
ing rear seatbacks up.
WARNING:
The centre lap belt latching mecha-
nism is different from those for the
B220A02Y-D
rear seat shoulder belts. When fas-
tening the rear seat shoulder belts or
the centre lap belt, make sure they
are inserted into the correct buckles
to obtain maximum protection from
the seat belt system and assure proper
operation.
fcuk-1.p65
23
12/27/2006, 10:11 AM

1 CONTROLS AND EQUIPMENT
CHILD RESTRAINT SYSTEM
24
B230A04P-EAT
Children riding in the car should sit in
o Children who are too large to be in
the rear seat and must always be prop-
!
WARNING:
a child restraint should still sit in
erly restrained to minimise the risk of
the rear seat and be restrained
o A child restraint system must be
injury in an accident, sudden stop or
with the available lap/shoulder
placed in the rear seat. Never in-
sudden maneuver. According to acci-
belts. Never allow children to ride
stall a child or infant seat on the
dent statistics, children are safer when
in the front passenger seat.
front passenger's seat.
properly restrained in the rear seats
o Always make sure that the shoul-
Should an accident occur and
than in the front seat. Larger children
der belt portion of the outboard
cause the passenger side airbag
should use one of the seat belts pro-
lap/shoulder belt is positioned
to deploy, it could severely injure
vided.
midway over the shoulder, never
or kill an infant or child seated in
You are required by law to use safety
across the neck or behind the back.
an infant or child seat. Thus, only
restraints for children. If small children
Moving the child closer to the
use a child restraint in the rear
ride in your vehicle you must put them
centre of the vehicle may help
seat of your vehicle.
in a child restraint system (safety seat).
provide a good shoulder belt fit.
o Since a safety belt or child re-
Children could be injured or killed in a
The lap belt portion of the lap/
straint system can become very
crash if their restraints are not properly
shoulder belt or the centre seat lap
hot if it is left in a closed vehicle,
secured. For small children and babies,
belt must always be positioned as
be sure to check the seat cover
a child seat or infant seat must be used.
low as possible on the child's hips
and buckles before placing a child
Before buying a particular child restraint
and as snug as possible.
there.
system, make sure it fits your car and
o If the seat belt will not properly fit
o When the child restraint system is
seat belts, and fits your child. Follow all
the child, we recommend the use
not in use, fasten it with a safety
the instructions provided by the manu-
of an approved booster seat in the
belt so that it will not be thrown
facturer when installing the child re-
rear seat in order to raise the child's
forward in the case of a sudden
straint system.
seating height so that the seat belt
stop or an accident.
will properly fit the child.
o Never allow a child to stand up or
kneel on the seat.
fcuk-1.p65
24
12/27/2006, 10:11 AM

CONTROLS AND EQUIPMENT
1
25
B230F01A-EAT
B230G01A-GAT
o Never use an infant carrier or child
Installation on Rear Seat Centre
Installation on Outboard Rear
safety seat that "hooks" over a
Position
Seats
seatback; it may not provide ad-
equate security in an accident.
o Never allow a child to be held in a
person's arms whilst they are in a
moving vehicle, as this could re-
sult in serious injury to the child
in the event of an accident or a
sudden stop. Holding a child in a
moving vehicle does not provide
the child with any means of pro-
tection during an accident, even if
the person holding the child is
B235G01FC
B230G01A
wearing a seat belt.
Use the centre seat belt for the rear to
To install a child restraint system in the
o If the child restraint seat is not
secure the child restraint system as
outboard rear seats, extend the shoul-
anchored properly, the risk of a
illustrated. After installation of the child
der/lap belt from its retractor. Install the
child being seriously injured or
restraint system, rock the child seat
child restraint system, buckle the seat
killed in a collision greatly in-
back and forth, and side to side to
belt and allow the seat belt to take up
creases.
ensure that it is properly secured by the
any slack. Make sure that the lap por-
seat belt.
tion of the belt is tight around the child
If the child seat moves, readjust the
restraint system and the shoulder por-
length of the seat belt. Then, if equipped,
tion of the belt is positioned so that it
insert the child restraint tether strap
cannot interfere with the child's head or
hook into the child restraint hook holder
neck. After installation of the child re-
and tighten to secure the seat. Always
straint system, try to move it in all
refer to the child restraint system
directions to be sure the child restraint
manufacturer’s recommendation before
system is securely installed.
installing the child restraint system in
your vehicle.
fcuk-1.p65
25
12/27/2006, 10:11 AM

1 CONTROLS AND EQUIPMENT
26
If you need to tighten the belt, pull more
B230H04A-GAT
webbing toward the retractor. When you
Child Seat Restraint Suitability
!
unbuckle the seat belt and allow it to
WARNING:
For Seat Position using the Seat
retract, the retractor will automatically
Do not install any child restraint sys-
Belt
revert back to its normal seated pas-
tem in the front passenger seat.
Use child safety seats that have been
senger emergency locking usage con-
Should an accident occur and cause
officially approved and are appropriate
dition.
the passenger side airbag to deploy,
for your children. When using the child
it could severely injure or kill an
safety seats, refer to the following table.
NOTE:
infant or child seated in an infant or
o Before installing the child restraint
child seat. Therefore, only use a child
Seating Position
system, read the instructions sup-
restraint system in the rear seat of
Age Group
Front
Rear
Rear
plied by the child restraint system
your vehicle.
Passenger
Outboard
Centre
manufacturer.
0 : Up to 10 kg
o If the seat belt does not operate as
X
U
X
(0 ~ 9 months)
described, have the system
0+ : Up to 13 kg
checked immediately by your
X
U
X
(0 ~ 2 years)
Hyundai authorised repairer.
I : 9kg to 18kg
(9 months ~ 4
X
U, L1
U
years)
II & III : 15kg to
36kg
X
UF
UF
(4 ~ 12 years)
fcuk-1.p65
26
12/27/2006, 10:11 AM