Hyundai Matrix (2007 year). Instruction - part 9
1 FEATURES OF YOUR HYUNDAI
124
H290E01FC-GAT
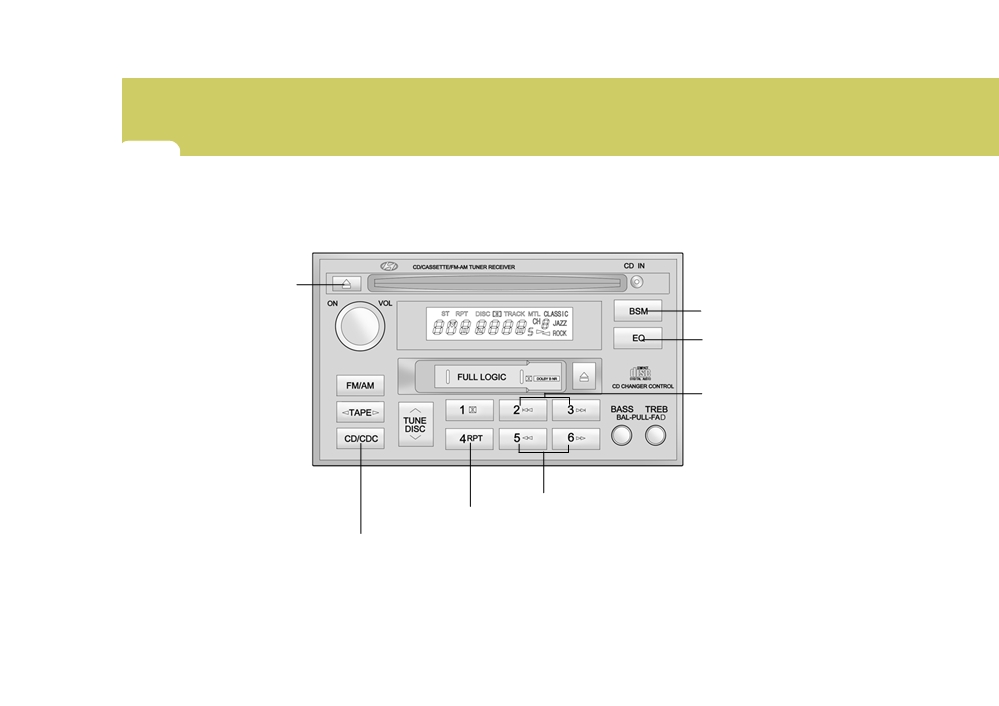
COMPACT DISC PLAYER OPERATION (H280) (If installed)
6.CD EJECT Button
7.SCAN Button
(If installed)
5.EQUALIZER Button
3.TRACK UP/DOWN
2.FF/REW Button
4.REPEAT
1.CD Select Button
H290A01O

FEATURES OF YOUR HYUNDAI
1
125
H290F02O-GAT
3. TRACK UP/DOWN
6. CD EJECT Button
1. CD Select Button
o
The desired track on the disc cur-
When the
button is pressed with
o Insert the CD with the label facing
rently being played can be selected
a CD loaded, the CD will eject.
upward.
using the track number.
o Insert the CD to start CD playback,
o
Press
button once to skip for-
7. SCAN Button (If installed)
during radio operation or cassette
ward to the beginning of the next
tape playing.
o Press the SCAN button to playback
track. Press
button once to skip
o When a disc is in the CD deck, if you
the first 10 seconds of each track.
back to the beginning of the track.
press the CD button the CD player
o Press the SCAN button again within
will begin playing even if the radio or
10 sec. when you have reached the
4. REPEAT
cassette player is being used.
desired track.
o The CD player can be used when the
o
To repeat the track you are currently
ignition switch is in either the "ON" or
listening to, press the RPT button.
NOTE:
"ACC" position.
To cancel , press again.
o To assure proper operation of the
o
If you do not release RPT operation
unit, keep the vehicle interior tem-
2. FF/REW (
/
)
when the track ends, it will automati-
perature within a normal range by
cally be replayed.
using the vehicle's air condition-
If you want to fast forward or reverse
This process will be continued until
ing or heating system.
through the compact disc track, push
you push the button again.
o When replacing the fuse, replace
and hold in the FF (
) or REW (
)
it with a fuse having the correct
button.
5. EQUALIZER Button
capacity.
When you release the button, the com-
o The preset station frequencies are
pact disc player will resume playing.
Press the EQ button to select the
all erased when the car battery is
CLASSIC, JAZZ, ROCK and DEFEAT
disconnected. Therefore, all data
MODE for the desired tone quality.
will have to be set again if this
Each press of the button changes the
should occur.
display as follows;
o Do not add any oil to the rotating
parts. Keep magnets, screwdriv-
CLASSIC JAZZ ROCK DEFEAT
ers and other metallic objects away
from the tape mechanism and head.
1 FEATURES OF YOUR HYUNDAI
126
o This equipment is designed to be
o Avoid using CD-Recordable or CD-
used only in a 12 volt DC battery
!
Rewritable as the player could not
CAUTION:
system with negative ground.
be operated in recording way of
o This unit is made of precision
o Do not insert warped or poor qual-
the CD maker. When using the
parts. Do not attempt to disas-
ity discs into the CD player as
compact disc player, profession-
semble or adjust any parts.
damage to the unit may occur.
ally recorded CDs are recom-
o When driving your vehicle, be sure
o Do not insert anything like coins
mended.
to keep the volume of the unit set
into the player slot as damage to
low enough to allow you to hear
the unit may occur.
sounds coming from the outside.
o Do not place beverages close to
o Do not expose this equipment (in-
the audio system. The playback
cluding the speakers and tape) to
mechanism may be damaged if
water or excessive moisture.
you spill them.
o Do not impact or strike the audio
system, or the playback mecha-
nism could be damaged.
o Driving on the off-roads or other
vibrations may skip your compact
disc.
Do not use the audio system on
off-roads as the discs could be
scratched and damaged.
o Do not grip or pull out the disc
with your hand while the disc is
being pulled into the unit by the
self loading mechanism. These
can cause poor disc scratching to
occur or damage the compact
disc player.

FEATURES OF YOUR HYUNDAI
1
127
H290G02FC-GAT
CD AUTO CHANGER (H280) (If Installed)
6. SCAN Button
(If installed)
7. EQ Button
3. TRACK UP/DOWN
4. FF/REW Button
5. REPEAT
2.DISC Select Button
1. CD CHANGER Select Button
H290A01O

1 FEATURES OF YOUR HYUNDAI
128
B290H03FC-GAT
2. DISC Select Button
5. REPEAT
The CD auto changer is located under
TUNE
the front passenger seat.
To select the CD you want, push
DISC
to
o To repeat the track you are currently
change the disc number.
listening to, press the RPT button.
o To use the CD auto changer.
To cancel , press again.
3. TRACK UP/DOWN
o If you do not release RPT operation
1. Open the sliding lid of the CD auto
when the track ends, it will automati-
o The desired track on the disc cur-
changer.
cally be replayed.
rently being played can be selected
2. To eject the compact disc maga-
This process will be continued until
using the track number.
zine, press the EJECT button lo-
you push the button again.
o Press
once to skip forward to
cated inside the CD auto changer.
the beginning of the next track.
3. Insert the discs into the maga-
6. SCAN Button (If installed)
Press
once to skip back to the
zine.
beginning of the track.
o Press the SCAN button to playback
4. Push the magazine into the CD
the first 10 seconds of each track.
auto changer and close the sliding
4. FF/REW (
/
)
o Press the SCAN button again within
lid.
10 sec. when you have reached the
If you want to fast forward or reverse
desired track.
o The CD auto changer can be used
through the compact disc track, push
when the ignition switch is in either
and hold in the FF (
) or REW (
)
7. EQ Button
"ON" or "ACC" position.
button.
When you release the button, the com-
Press the EQ button to select the CLAS-
1. CD CHANGER Select Button
pact disc player will resume playing.
SIC, JAZZ, ROCK and DEFEAT MODE
for the desired tone quality. Each press
When the CD changer magazine con-
of the button changes the display as
tains discs, press the CD/CDC button
follows;
and the CD changer can be used even
if the radio or cassette player is being
CLASSIC JAZZ ROCK DEFEAT
used. The Hyundai CD changer can
hold up to eight discs. The disc number
will be lit, and the track number, and
elapsed time will be displayed.

FEATURES OF YOUR HYUNDAI
1
129
NOTE:
o Avoid using CD-Recordable or CD-
o When replacing the fuse, replace
!
Rewritable as the changer could
CAUTION:
it with a fuse having the correct
not be operated in recording way
o Do not insert warped or poor qual-
capacity.
of the CD maker. When using the
ity discs into the CD changer as
o This equipment is designed to be
compact disc changer, profes-
damage to the unit may occur.
used only in a 12 volt DC battery
sionally recorded CDs are recom-
o Do not insert anything like coins
system with negative ground.
mended.
into the changer slot as damage to
o This unit is made of precision
the unit may occur.
parts. Do not attempt to disas-
o Do not place beverages close to
semble or adjust any parts.
the audio system. The playback
o When driving your vehicle, be sure
mechanism may be damaged if
to keep the volume of the unit set
!
you spill them.
low enough to allow you to hear
WARNING:
o Do not impact or strike the audio
sounds coming from the outside.
Never attempt to change CDs the
system, or the playback mecha-
already inserted in the CD changer
nism could be damaged.
magazine while the vehicle is mov-
o Driving on the off-roads or other
ing. This could result in loss of con-
vibrations may skip your compact
trol or an accident that may cause
disc.
death, serious insury, or property
Do not use the audio system on
damage.
off-roads as the discs could be
scratched and damaged.
o Do not grip or pull out the disc
with your hand while the disc is
being pulled into the unit by the
self loading mechanism. These
can cause poor disc scratching to
occur or trouble in the compact
disc changer.

1 FEATURES OF YOUR HYUNDAI
130
AUDIO FAULT CODE
B890A01Y-AAT
If you see any error indication in the display while using the system in the CD or Tape mode, find the cause in the chart below.
If you cannot clear the error indication, take the car to your Hyundai dealer.
INDICATION
CAUSE
SOLUTION
CD DECK MECHANICAL ERROR
After resetting the audio system, push the eject button.
Er2
If disc is not ejected, consult your Hyundai dealer.
(EJECT ERROR, LOADING ERROR)
Make sure the disc is not scratched or damaged.
FOCUS ERROR
Er3
Press the eject button and pull out the disc.
DATA READ ERROR
Then insert a normal CD disc.
Check if the disc is inserted correctly in the CD player.
Er6
DISC ERROR
Make sure the disc is not scratched or damaged.
TAPE DECK ERROR
After resetting the audio system, push the eject button.
Er8
TAPE EJECT ERROR
If tape does not eject, consult your Hyundai dealer.
Fault code will reset automatically when the temperature returns
HHH
TEMPERATURE IS TOO HIGH
to normal.
NO DISC IN MAGAZINE
no CD
NO CD MAGAZINE IN THE AUTO
Insert disc in magazine or insert CD magazine in the auto changer.
CHANGER

FEATURES OF YOUR HYUNDAI
1
CARE OF DISC
131
B850A01F-AAT
Damaged Disc
Keep Your Discs Clean
Proper Handling
Do not attempt to play damaged, warped
or cracked discs. These could severely
damage the playback mechanism.
Storage
When not in use, place your discs in
their individual cases and store them in
a cool place away from the sun, heat,
and dust.
Do not grip or pull out the disc with your
hand while the disc is being pulled into
B850A02L
B850A01L
the unit by the self loading mechanism.
Fingerprints, dust, or soil on the surface
Handle your disc as shown. Do not drop
Do not pull the unit from the dash
of a disc could cause the pickup to skip
the disc. Hold the disc so you will not
immediately after a disc is inserted or
signal tracks. Wipe the surface clean
leave fingerprints on the surface. If the
the eject switch has been pressed. If
with a clean soft cloth. If the surface is
surface is scratched, it may cause the
the unit is pulled out before an operation
heavily soiled, dampen a clean soft
pickup to skip signal tracks. Do not
is completed, the disc will be unstable
cloth in a solution of mild neutral deter-
affix tape, paper, or gummed labels on
in the unit and may be damaged.
gent to wipe it clean.
the disc. Do not write on the disc.
Do not attempt to insert a disc into the
unit when the unit is out of the dash or
the power is off.

1 FEATURES OF YOUR HYUNDAI
CARE OF CASSETTE TAPES
132
B860A01A-AAT
o
Never leave a cassette inserted in
o
Be sure that the cassette label is not
the player when not being played.
loose or peeling off or tape ejection
This could damage the tape player
may be difficult.
unit and the cassette tape.
o
Never touch or soil the actual audio
o
We strongly recommend against the
tape surfaces.
use of tapes longer than C-60 (60
o
Keep all magnetized objects, such
minutes total). Tapes such as C-120
as electric motors, speakers or trans-
or C-180 are very thin and do not
formers away from your cassette
perform as well in the automotive
tapes and tape player unit.
environment.
o
Store cassettes in a cool, dry place
with the open side facing down to
prevent dust from setting in the cas-
B860A01L
sette body.
Proper care of your cassette tapes will
o
Avoid repeated fast reverse usage to
extend the tape life and increase your
replay one given tune or tape sec-
listening enjoyment. Always protect
tion. This can cause poor tape wind-
your tapes and cassette cases from
ing to occur, and eventually cause
direct sunlight, severe cold and dusty
excessive internal drag and poor
conditions. When not in use, cassettes
audio quality in the cassette. If this
should always be stored in the protec-
occurs, it can sometimes be cor-
tive cassette case. When the vehicle is
rected by fast winding the tape from
very hot or cold, allow the interior tem-
end to end several times. If this does
B880A02FC
perature to become more comfortable
not correct the problem, do not con-
before listening to your cassettes.
tinue to use the tape in your vehicle.

FEATURES OF YOUR HYUNDAI
1
ANTENNA
133
B870D01FC-GAT
Roof Antenna
Head
Cotton applicator
B860A02L
B860A03L
o The playback head, capstan and
NOTE:
HFC220
pinch rollers will develop a coating of
Look at a tape before you insert it. If
tape residue that can result in dete-
the tape is loose, tighten it by turning
rioration of sound quality, such as a
one of the hubs with a pencil or your
wavering sound. They should be
finger. If the label is peeling off, do
cleaned monthly using a commer-
not put it in the drive mechanism.
cially available head cleaning tape or
Do not leave tapes sitting where they
special solution available from audio
are exposed to hot, warm or, high
specialty shops. Follow the supplier's
humidity, such as on top of the dash-
directions carefully and never oil any
board or in the player.
part of the tape player unit.
If a tape is exposed to excessively
o Always be sure that the tape is tightly
hot or cold, let it reach a moderate
wound on its reel before inserting in
temperature before putting it in the
HFC221
the player. Rotate a pencil in the
player.
drive sprockets to wind up any slack.
Your car uses a roof antenna to receive
both AM and FM broadcast signals.

1 FEATURES OF YOUR HYUNDAI
134
This antenna is a removable type. To
remove the antenna, turn the antenna
counterclockwise. To install the an-
tenna, turn the antenna clockwise.
!
CAUTION:
o Be sure to remove the antenna
before washing the car in an auto-
matic car wash or it may be dam-
aged.
o Before entering a place with a low
height clearance, be sure to adjust
the roof antenna low.
o When reinstalling your antenna, it
is important that it is fully tight-
ened to ensure proper reception.

DRIVING YOUR HYUNDAI
BEFORE STARTING THE ENGINE
2-3
KEY POSITIONS
2-4
STARTING
2-5
2
OPERATING THE MANUAL TRANSAXLE
2-7
AUTOMATIC TRANSAXLE
2-9
ANTI-LOCK BRAKE SYSTEM (ABS)
2-13
BRAKE TRACTION CONTROL SYSTEM (BTCS)
2-14
ELECTRONIC STABILITY PROGRAM (ESP)
2-16
DRIVING FOR ECONOMY
2-18
SMOOTH CORNERING
2-19
WINTER DRIVING
2-20
TRAILER OR VEHICLE TOWING
2-23
2

2 DRIVING YOUR HYUNDAI
2
C010A01O-AAT
WARNING: ENGINE EXHAUST CAN BE DANGEROUS!
!
Engine exhaust fumes can be extremely dangerous. If, at any time, you smell exhaust fumes inside the vehicle,
open the windows immediately.
o Do not inhale exhaust fumes.
Exhaust fumes contain carbon monoxide, a colorless, odorless gas that can cause unconsciousness and death
by asphyxiation.
o Be sure the exhaust system does not leak.
The exhaust system should be checked whenever the vehicle is raised to change the oil or for any other purpose.
If you hear a change in the sound of the exhaust or if you drive over something that strikes the underneath side
of the car, have the exhaust system checked as soon as possible by your Hyundai dealer.
o Do not run the engine in an enclosed area.
Letting the engine idle in your garage, even with the garage door open, is a hazardous practice. Never run the
engine in your garage any longer than it takes to start the engine and back the car out.
o Avoid idling the engine for prolonged periods with people inside the car.
If it is necessary to idle the engine for a prolonged period with people inside the car, be sure to do so only in
an open area with the air intake set at "Fresh" and fan operating at one of the higher speeds so fresh air is drawn
into the interior.
If you must drive with the tail gate open because you are carrying objects that make this necessary:
1. Close all windows.
2. Open side vents.
3. Set the air intake control at "Fresh", the air flow control at "Floor" or "Face" and the fan at one of the higher
speeds.
To assure proper operation of the ventilation system, be sure the ventilation air intakes located just in front of
the windshield are kept clear of snow, ice, leaves or other obstructions.
DRIVING YOUR HYUNDAI
2
BEFORE STARTING THE
TO START THE ENGINE
3
ENGINE
C020A02O-GAT
9. When you turn the ignition switch to
C030A01A-GAT
Before you start the engine, you should
"ON", check that all appropriate
COMBINATION IGNITION
warning lights are operating and
SWITCH
always:
that you have sufficient fuel.
Before starting the engine:
1.
Look around the vehicle to be sure
10.Check the operation of warning
there are no flat tires, puddles of oil,
lights and all bulbs when key is in
o If your Hyundai is equipped with a
water or other indications of pos-
the "ON" position.
manual transaxle, place the shift
sible trouble.
lever in neutral and depress the
2.
After entering the car, check to be
clutch pedal fully.
sure the parking brake is engaged.
!
WARNING:
o If your Hyundai has an automatic
3.
Check that all windows and lights
transaxle, place the shift lever in "P"
(DIESEL ENGINE)
are clean.
(park).
To ensure that sufficient vacuum
4.
Check that the interior and exterior
o To start the engine, insert the igni-
exists within the brake system dur-
mirrors are clean and in position.
tion key and turn it to the "START"
ing cold weather start-up condi-
5.
Check your seat, seatback and
position. Release it as soon as the
tions, it is necessary to run the
headrest to be sure they are in their
engine starts. Do not hold the key in
engine at idle for several seconds
proper positions.
the "START" position for more than
after starting the engine.
6.
Lock all the doors.
15 seconds.
7.
Fasten your seat belt and be sure
that all other occupants have fas-
NOTE:
tened theirs.
For safety, the engine will not start
8.
Turn off all lights and accessories
!
if the shift lever is not in "P" or "N"
that are not needed.
WARNING:
Position (Automatic Transaxle).
Always wear appropriate shoes when
operating your vehicle.
Unsuitable shoes (high heels, ski
boots, etc.) may interfere with your
ability to use the brake and accelera-
tor pedal, and the clutch (if installed).

2 DRIVING YOUR HYUNDAI
KEY POSITIONS
4
C040A02A-AAT
C070C01A-AAT
o "ON"
To remove the ignition key
When the key is in the "ON position,
!
the ignition is on and all accessories
ACC
WARNING:
may be turned on. If the engine is not
The engine should not be turned
LOCK
running, the key should not be left in
ON
off or the key removed from the
the "ON" position. This will discharge
ignition key cylinder while the ve-
the battery and may also damage the
hicle is in motion. The steering
ignition system.
wheel is locked by removing the
key.
o "ACC"
START
With the key in the "ACC" position, the
some electrical accessories (radio, etc.)
ACC
may be operated.
C070C01E
LOCK
ON
1. Turn the ignition key to the "ACC"
o "LOCK"
position.
The key can be removed or inserted in
2. Simultaneously push and turn the
this position.
ignition key counterclockwise from
To protect against theft, the steering
the "ACC" position to the "LOCK"
START
wheel locks by removing the key.
position.
3. The key can be removed in the
NOTE:
"LOCK" position.
If difficulty is experienced in turning
C040A01E
the ignition key to the START posi-
o "START"
tion, turn the steering wheel right
The engine is started in this position. It
and left to release the tension and
will crank until you release the key.
then turn the key.
NOTE:
Do not hold the key in the "START"
position for more than 15 seconds.

DRIVING YOUR HYUNDAI
2
STARTING
5
C050A01A-GAT
C051A01O-GAT
C050B02S-GAT
Starting for the gasoline engine
Starting for the diesel engine
NORMAL CONDITIONS
ENGINE COLD
The Starting Procedure:
o Turn the ignition key to position
1. Insert key, and fasten the seat belt.
"ON" and wait for the pre-heat indi-
2. Depress the clutch pedal fully and
cator light to go out.
place the gearshift lever (manual
o Operate the starter until the engine
transaxle) in neutral or the selector
runs.
lever (automatic transaxle) in "P"
(park) position.
ENGINE WARM
3. After turning the ignition key to the
Operate the starter. If the engine does
"ON" position, make certain all warn-
not respond on the first attempt, wait
ing lights and gauges are function-
several seconds and try again using
C050A01E
ing properly before starting the en-
the pre-heat.
gine.
4. On vehicles equipped with the die-
!
WARNING:
sel preheat indicator light, turn the
ignition key to the "ON" position.
Never run the engine in a closed or
The diesel pre-heat indicator light
poorly ventilated area any longer
will first illuminate in amber, and
than is needed to move your car in
then after a short time, the amber
or out of the area. The carbon mon-
illumination will goes off, indicating
oxide gas emitted is odorless and
that preheating is completed.
can cause serious injury or death.

2 DRIVING YOUR HYUNDAI
6
C055B01B-GAT
STARTING AND STOPPING THE
!
WARNING:
ENGINE FOR TURBO CHARGER
Be sure that the clutch is fully de-
INTERCOOLER
AMBER LAMP ON
pressed when starting a manual
(DIESEL ENGINE)
AMBER LAMP
transaxle vehicle. Otherwise there
OFF
(1) Do not race the engine or sudden
is the potential to cause damage to
accelerate the engine immediately
the vehicle or injury to someone
after start it. If the engine is cold,
inside or outside the vehicle as a
allow the engine to idle for several
result of the forward or backward
seconds before it is driven to en-
movement of the vehicle that will
C050B01HP
sure sufficient lubrication of the
occur if the clutch is not depressed
turbo charger unit.
when the vehicle is started.
(2) After high speed or extended driv-
NOTE:
ing, requiring a heavy engine load,
If the engine was not started 10
the engine should be allowed to idle
5. Turn the ignition key to the "START"
seconds after the preheating is com-
about 1 minute before turning it off.
position and release it when the
pleted, turn the ignition key once
This idle time will allow the turbo
engine starts.
more to the "LOCK" position, and
charger to cool prior to shutting the
then to the "ON" position, in order
engine off.
to preheat again.
!
WARNING:
Do not turn the engine off immedi-
ately after it has been subjected to
a heavy load. Doing so may cause
severe damage to the engine or
turbo charger unit.