Hyundai Elantra Touring (2012 year). Instruction - part 10

Features of your vehicle
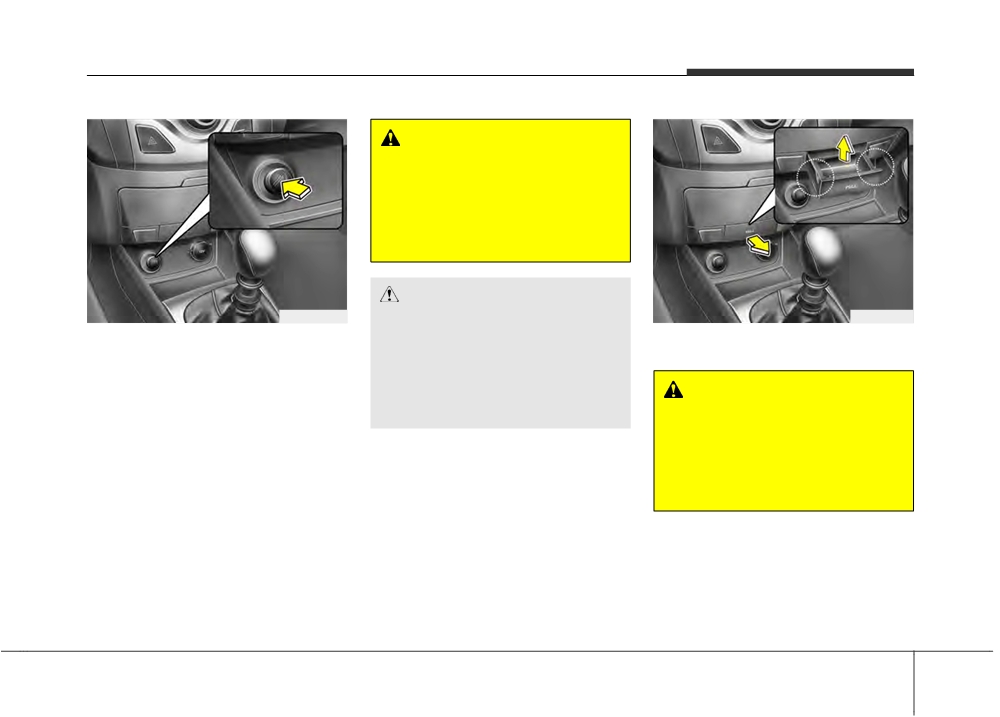
4. Set the temperature control to warm or
cool.
When the cool box is not used, turn the
lever to its closed position.
✽ NOTICE
While using the cooling function, a small
amount of condensed moisture could
damage your pieces of paper.
OFD049209
OFD049210N
Glove box cooling (if equipped)
D270300AUN
You can keep beverage cans or other
Sunglass holder
items warm or cool using the open/close
To open the sunglass holder, press the
lever of the vent installed in the glove
cover and the holder will slowly open.
box.
Place your sunglasses in the compart-
ment door with the lenses facing out.
1. Turn on the fan control switch.
Push to close.
2. Set the air flow control to the face
(
) mode.
3. Turn the open/close lever of the vent
installed in the glove box to the open
position.
(1) OPEN
(2) CLOSE
4 86

Features of your vehicle
(if equipped)
WARNING
•
Do not keep objects except sun-
glass inside the sunglass holder.
Such objects can be thrown from
the holder in the event of a sud-
den stop or an accident, possibly
injuring the passengers in the
vehicle.
•
Do not open the sunglass holder
while the vehicle is moving. The
OFD047211
rear view mirror of the vehicle
can be blocked by an open sun-
OFD047227
glass holder.
D270500AFD
Luggage box (if equipped)
You can place a first aid kit, a reflector tri-
angle, tools, etc. in the box for easy
access.
1. Grasp the handle on the top of the
cover and lift it.
OFD047212
D270400AFD
Multi box
To open the cover, pull the lever or push
the button. It can be used for storing
small items.
4 87

Features of your vehicle
OFD047228
D270501AFD
Luggage side tray
To open the cover, pull up the handle and
lift the cover (if equipped). It can be used
for storing small items.
4 88
Features of your vehicle
INTERIOR FEATURES
WARNING
• Do not hold the lighter in after it
is already heated because it will
overheat.
• If the lighter does not pop out
within 30 seconds, remove it to
prevent overheating.
CAUTION
OFD047200
Only a genuine HYUNDAI lighter
OFD047201
D280100AFD
should be used in the cigarette
D280200AFD
lighter socket. The use of plug-in
Cigarette lighter (if equipped)
Ashtray (if equipped)
accessories
(shavers, hand-held
For the cigarette lighter to work, the igni-
vacuums, and coffee pots, etc.) may
tion switch must be in the ACC position
damage the socket or cause electri-
WARNING - Ashtray use
or the ON position.
cal failure.
• Do not use the vehicle’s ashtrays
To use the cigarette lighter, push it all the
as waste receptacles.
way into its socket. When the element
• Putting lit cigarettes or matches
has heated, the lighter will pop out to the
in an ashtray with other com-
"ready" position.
bustible materials may cause a
Do not hold the cigarette lighter pressed
fire.
in. This can damage the heating element
and create a fire hazard.
The front ashtray may be opened by
If it is necessary to replace the cigarette
pulling the ashtray lid. To clean the ash-
lighter, use only a genuine HYUNDAI
tray, the plastic receptacle should be
replacement or its approved equivalent.
removed by lifting the plastic ash recep-
tacle upward and pulling it out.
4 89

Features of your vehicle
D280300AUN
Front
Cup holder
WARNING - Hot liquids
• Do not place uncovered cups of
hot liquid in the cup holder while
the vehicle is in motion. If the hot
liquid spills, you could be burned.
Such a burn to the driver could
lead to loss of control of the vehi-
cle.
OFD047202
• To reduce the risk of personal
Rear (if equipped)
OFD049204
injury in the event of sudden stop
D280400AFD
or collision, do not place uncov-
ered or unsecured bottles, glass-
Sunvisor
es, cans, etc., in the cup holder
Use the sunvisor to shield direct light
while the vehicle is in motion.
through the front or side windows.
To use a sunvisor, pull it downward.
To use a sunvisor for a side window, pull
it downward, unsnap it from the bracket
WARNING
(1) and swing it to the side (2).
Keep cans or bottles out of direct
OFD047203
Adjust the sunvisor by sliding in and out
sun light and do not put them in a
vehicle that is heated up. It may
D280301AFD
(3) (if equipped).
explode
Front
To use the vanity mirror, pull down the
visor and pull up the mirror cover (4).
Cups or small beverage cans may be
placed in the cup holders.
Rear (if equipped)
Cups may be placed in the cup holders.
4 90

Features of your vehicle
Front
CAUTION - Vanity mirror
CAUTION
lamp (if equipped)
•
Use the power outlet only when
Close the vanity mirror cover
the engine is running and remove
securely and return the sunvisor to
the accessory plug after use.
its original position after use. If the
Using the accessory plug for pro-
vanity mirror is not closed securely,
longed periods of time with the
the lamp will stay on and could
engine off could cause the bat-
result in battery discharge.
tery to discharge.
•
Only use 12V electric accessories
which are less than 10A in elec-
OFD047205
tric capacity.
WARNING
Rear (if equipped)
•
Adjust the air-conditioner or
For your safety, do not obstruct your
heater to the lowest operating
vision when using the sunvisor.
level when using the power outlet.
•
Close the cover when not in use.
•
Some electronic devices can
cause electronic interference
when plugged into a vehicle’s
power outlet. These devices may
cause excessive audio static and
malfunctions in other electronic
OFD047229
systems or devices used in your
D280500AEN
vehicle.
Power outlet
The power outlet is designed to provide
power for mobile telephones or other
WARNING
devices designed to operate with vehicle
Do not put a finger or a foreign ele-
electrical systems. The devices should
ment (pin, etc.) into a power outlet
draw less than 10 amps with the engine
and do not touch with a wet hand.
running.
You may get an electric shock.
4 91

Features of your vehicle
D280601AUN
D280604AUN
• HOUR:
• Display conversion:
Pressing the “H” button (2) with your
To change the 12 hour format to the 24
finger, a pencil or similar object will
hour format, press the “R” button (1) for
advance the time displayed by one
more than 4 seconds.
hour.
For example, if the
“R” button is
pressed for more than 4 seconds while
D280602AUN
the time is 10:15 p.m., the display will
be changed to 22:15.
• MINUTE:
Pressing the “M” button (3) with your
finger, a pencil or similar object will
advance the time displayed by one
OFD047217
minute.
D280600AEN
Digital clock (if equipped)
D280603AUN
• RESET:
WARNING
To clear away minutes, press the “R”
Do not adjust the clock while driv-
button (1) with your finger, a pencil or
ing. You may lose your steering
similar object. Then the clock will be
control and cause an accident that
set precisely on the hour.
results in severe personal injury or
For example, if the
“R” button is
death.
pressed while the time is between 9:01
and 9:29, the display will be reset to
9:00.
Whenever the battery terminals or relat-
9:01 ~ 9:29 display changed to 9:00
ed fuses are disconnected, you must
reset the time.
9:30 ~ 9:59 display changed to 10:00
When the ignition switch is in the ACC or
ON position, the clock buttons operate as
follows:
4 92

Features of your vehicle
✽ NOTICE
When using a portable audio device
connected to the power outlet, noise may
occur during playback. If this happens,
use the power source of the portable
audio device.
❈ iPod® is a trademark of Apple Inc.
OFD047215
OFD047230
D281400AFD
D280700AFD
Aux, USB and iPod®
Shopping bag holder (if equipped)
(if equipped)
If your vehicle has an aux and/or
CAUTION
USB(universal serial bus) port or iPod
Do not hang a bag weighing more
port, you can use an aux port to connect
than 3 kg (7 lbs.). It may cause dam-
audio devices, a USB port to plug in a
age to the shopping bag holder.
USB, and an iPod port to plug in an iPod.
When using an iPod® through the vehi-
cle's Audio System, a Hyundai adapter
cable is required in order to receive all
functions, which can be purchased at
your local Hyundai dealership.
4 93

Features of your vehicle
Type A
Type B
WARNING
The following must be observed
when installing ANY floor mat to
the vehicle.
• Ensure that the floor mats are
securely attached to the vehicle's
floor mat anchor(s) before driving
the vehicle.
• Do not use ANY floor mat that
cannot be firmly attached to the
vehicle's floor mat anchors.
OUN026348
OXM049228
• Do not stack floor mats on top of
D280800AUN
Floor mat anchor(s) (if equipped)
one another (e.g. all-weather rubber
Clothes hanger
mat on top of a carpeted floor mat).
When using a floor mat on the front floor
To use the hanger, pull down the upper
carpet, make sure it attaches to the floor
Only a single floor mat should be
portion of hanger.
mat anchor(s) in your vehicle. This keeps
installed in each position.
the floor mat from sliding forward.
IMPORTANT - Your vehicle was man-
ufactured with driver's side floor
CAUTION
mat anchors that are designed to
Do not hang heavy clothes, since
securely hold the floor mat in
those may damage the hook.
place. To avoid any interference
with pedal operation, Hyundai rec-
ommends that only the Hyundai
floor mat designed for use in your
vehicle be installed.
4 94

Features of your vehicle
CAUTION
To prevent damage to the goods or
the vehicle, care should be taken
when carrying fragile or bulky
objects in the luggage compart-
ment.
WARNING
Avoid eye injury. DO NOT over-
OFD047219
stretch. The luggage net ALWAYS
OFD047231
keep your face and body out of the
D281000AFD
D281100AFD
luggage net’s recoil path. DO NOT
Luggage net (holder)
Cargo security screen
use when the strap has visible
(if equipped)
(if equipped)
signs of wear or damage.
To keep items from shifting in the cargo
Use the cargo security screen to hide
area, you can use the four holders locat-
items stored in the cargo area.
ed in the cargo area to attach the lug-
gage net.
If necessary, contact your authorized
HYUNDAI dealer to obtain a luggage net.
4 95

Features of your vehicle
WARNING
• Do not place objects on the cargo
security screen. Such objects
may be thrown about inside the
vehicle and possibly injure vehi-
cle occupants during an accident
or when braking.
• Never allow anyone to ride in the
luggage compartment. It is
designed for luggage only.
• Maintain the balance of the vehi-
OFD047232
OFD047233
cle and locate the weight as far
•
To use the cargo security screen, pull
When not in use, place the cargo securi-
forward as possible.
the handle backward and insert the
ty screen on the lower portion of the
edges into the slots.
cargo area.
CAUTION
Since the cargo security screen
may be damaged or malformed, do
not put the luggage on it when it is
used.
4 96

Features of your vehicle
EXTERIOR FEATURES
OED046090
OED046091
OFD049240N
D290300AFD
2. Rotate the cover half way and insert
D290100AFD
Mounting bracket for roof carrier
the cover on the roof hole as the illus-
Roof rack (if equipped)
(if equipped)
tration.
If the vehicle has a roof rack, you can
To install or remove a roof carrier, you
load cargo on top of your vehicle.
can use the mounting bracket and cover
✽ NOTICE
on the roof.
To prevent loosing the roof carrier
When you install a roof carrier, use the
cover, install the cover on the roof before
following procedure.
you install the roof carrier.
1. Insert a slim tool(coin or flat blade driv-
3. After using the roof carrier, install the
er) into the slot and slide the cover
toward the arrow on the cover.
cover back on the roof in the reverse
order.
WARNING
Use a coin or flat blade driver when
you remove the roof carrier cover.
If you use your fingernail, it may
damage your fingernail.
4 97

Features of your vehicle
AUDIO SYSTEM
✽ NOTICE
✽ NOTICE
(Continued)
If the vehicle is equipped with a sunroof,
If you install an aftermarket HID head
•
The vehicle center of gravity will
be sure not to position cargo onto the
lamp, your vehicle’s audio and electron-
be higher when items are loaded
roof rack in such a way that it could
ic device may malfunction.
onto the roof rack. Avoid sudden
interfere with sunroof operation.
starts, braking, sharp turns,
abrupt maneuvers or high speeds
CAUTION
that may result in loss of vehicle
•
When carrying cargo on the roof
control or rollover resulting in an
rack, take the necessary precau-
accident.
tions to make sure the cargo does
•
Always drive slowly and turn cor-
not damage the roof of the vehicle.
ners carefully when carrying
•
When carrying large objects on
items on the roof rack. Severe
the roof rack, make sure they do
wind updrafts, caused by passing
not exceed the overall roof length
vehicles or natural causes, can
or width.
cause sudden upward pressure
on items loaded on the roof rack.
This is especially true when car-
OFD049241
WARNING
rying large, flat items such as
Antenna
•
The following specification is the
wood panels or mattresses. This
maximum weight that can be
could cause the items to fall off
D300102AFD
loaded onto the roof rack.
the roof rack and cause damage
Roof antenna
Distribute the load as evenly as
to your vehicle or others around
Your car uses a roof antenna to receive
possible onto the roof rack and
you.
both AM and FM broadcast signals. This
secure the load firmly.
•
To prevent damage or loss of
antenna is a removable type. To remove
ROOF
176 lbs. (80 kg)
cargo while driving, check fre-
the antenna, turn it counterclockwise. To
RACK
EVENLY DISTRIBUTED
quently before or while driving to
install the antenna, turn it clockwise.
make sure the items on the roof
Loading cargo or luggage in
rack are securely fastened.
excess of the specified weight
limit on the roof rack may dam-
age your vehicle.
(Continued)
4 98

Features of your vehicle
D300104AFD-EU
CAUTION
Satellite Antenna (if equipped)
•
Before entering a place with a low
The satellite antenna is installed on the
height clearance or a car wash,
roof of your car to listen to a satellite
remove the antenna by rotating it
radio broadcast. This antenna is perma-
counter-clockwise. If not, the
nently attached and can not be removed.
antenna may be damaged.
•
When reinstalling your antenna, it
✽ NOTICE
is important that it is fully tight-
In places such as tunnels, the satellite
ened to ensure proper reception.
broadcast signal is not available.
But it could be removed when
parking the vehicle or when load-
ing cargo on the roof rack.
OFD047214
•
When cargo is loaded on the roof
D300200AFD-EU
rack, do not place the cargo near
Audio remote control
the antenna pole to ensure proper
(if equipped)
reception.
The steering wheel audio remote control
button is installed to promote safe driv-
ing.
CAUTION
Do not operate audio remote con-
trol buttons simultaneously.
4 99

Features of your vehicle
VOL (▲/▼) (1)
If the SEEK button is pressed for less
FM reception
• Press the up button (▲) to increase
than 0.8 second, it will work as follows in
volume.
each mode.
• Press the down button (▼) to decease
volume.
RADIO mode
It will function as the PRESET STATION
MODE (2)
select buttons.
Press the button to select Radio
(AM/FM), XM, Tape (if equipped), CD
CDP mode
(compact disc), or AUX.
It will function as the TRACK UP/DOWN
Tape and CD will function if it is loaded.
button.
AUX will only function if it is connected.
JBM001
CDC mode
D300800AFD
SEEK (▲/▼) (3)
It will function as the TRACK UP/DOWN
How car audio works
If the SEEK button is pressed for 0.8 sec-
button.
AM and FM radio signals are broadcast
ond or more, it will work as follows in
from transmitter towers located around your
each mode.
Detailed information for audio control
city.They are intercepted by the radio anten-
buttons is included in the following pages
na on your car. This signal is then received
RADIO mode
in this section.
by the radio and sent to your car speakers.
It will function as the AUTO SEEK select
When a strong radio signal has reached
button. It will SEEK until you release the
your vehicle, the precise engineering of
button.
your audio system ensures the best pos-
sible quality reproduction. However, in
CDP mode
some cases the signal coming to your
It will function as the FF/REW button.
vehicle may not be strong and clear. This
can be due to factors such as the dis-
CDC mode
tance from the radio station, closeness of
It will function as the DISC UP/DOWN
other strong radio stations or the pres-
button.
ence of buildings, bridges or other large
obstructions in the area.
4 100

Features of your vehicle
AM reception
FM radio station
JBM002
JBM003
JBM004
AM broadcasts can be received at
FM broadcasts are transmitted at high
• Fading - As your car moves away from
greater distances than FM broadcasts.
frequencies and do not bend to follow the
the radio station, the signal will weaken
This is because AM radio waves are
earth's surface. Because of this, FM
and sound will begin to fade. When this
transmitted at low frequencies. These
broadcasts generally begin to fade at
occurs, we suggest that you select
long, low frequency radio waves can fol-
short distances from the station. Also,
another stronger station.
FM signals are easily affected by build-
low the curvature of the earth rather than
• Flutter/Static
- Weak FM signals or
ings, mountains, or other obstructions.
travelling straight out into the atmos-
large obstructions between the trans-
These can result in certain listening con-
phere. In addition, they curve around
mitter and your radio can disturb the
ditions which might lead you to believe a
obstructions so that they can provide bet-
signal causing static or fluttering nois-
problem exists with your radio. The fol-
ter signal coverage.
es to occur. Reducing the treble level
lowing conditions are normal and do not
may lessen this effect until the distur-
indicate radio trouble:
bance clears.
4 101

Features of your vehicle
Using a cellular phone or a two-
Satellite radio reception
way radio
You may experience problems in receiv-
When a cellular phone is used inside the
ing XMTM satellite radio signals in the fol-
vehicle, noise may be produced from the
lowing situations.
audio equipment. This does not mean
that something is wrong with the audio
equipment. In such a case, use the cellu-
lar phone at a place as far as possible
from the audio equipment.
CAUTION
JBM005
When using a communication sys-
•
Station Swapping - As a FM signal
tem such a cellular phone or a radio
weakens, another more powerful sig-
set inside the vehicle, a separate
external antenna must be fitted.
nal near the same frequency may
When a cellular phone or a radio set
begin to play. This is because your
SATELITE1
is used with an internal antenna
radio is designed to lock onto the clear-
alone, it may interfere with the vehi-
est signal. If this occurs, select anoth-
cle's electrical system and adverse-
•
If you are driving in a tunnel or a cov-
er station with a stronger signal.
ly affect safe operation of the vehi-
ered parking area.
•
Multi-Path Cancellation - Radio signals
cle.
•
If you are driving beneath the top level
being received from several directions
of a multi-level freeway.
can cause distortion or fluttering. This
•
If you drive under a bridge.
can be caused by a direct and reflect-
•
If you are driving next to a tall vechi-
ed signal from the same station, or by
WARNING
signals from two stations with close
Don't use a cellular phone when
cle(such as a truck or a bus) that block
frequencies. If this occurs, select
you are driving. You must stop at a
the signal.
another station until the condition has
safe place to use a cellular phone.
•
If you are driving in a valley where the
passed.
surrounding hills or peaks block the sig-
nal from the satellite.
4 102