Honda Clarity Plug-in Hybrid (2018 year). Instruction - part 34


  Index      Honda     Honda Clarity Plug-in Hybrid - instruction 2018 year in english


Search            


Content   ..  32  33  34  35   ..


Honda Clarity Plug-in Hybrid (2018 year). Instruction - part 34


529

uu

If a Tire Goes Flat

u

Temporarily Repairing a Flat Tire

Continued

Han

d

lin
g the U

n

expected

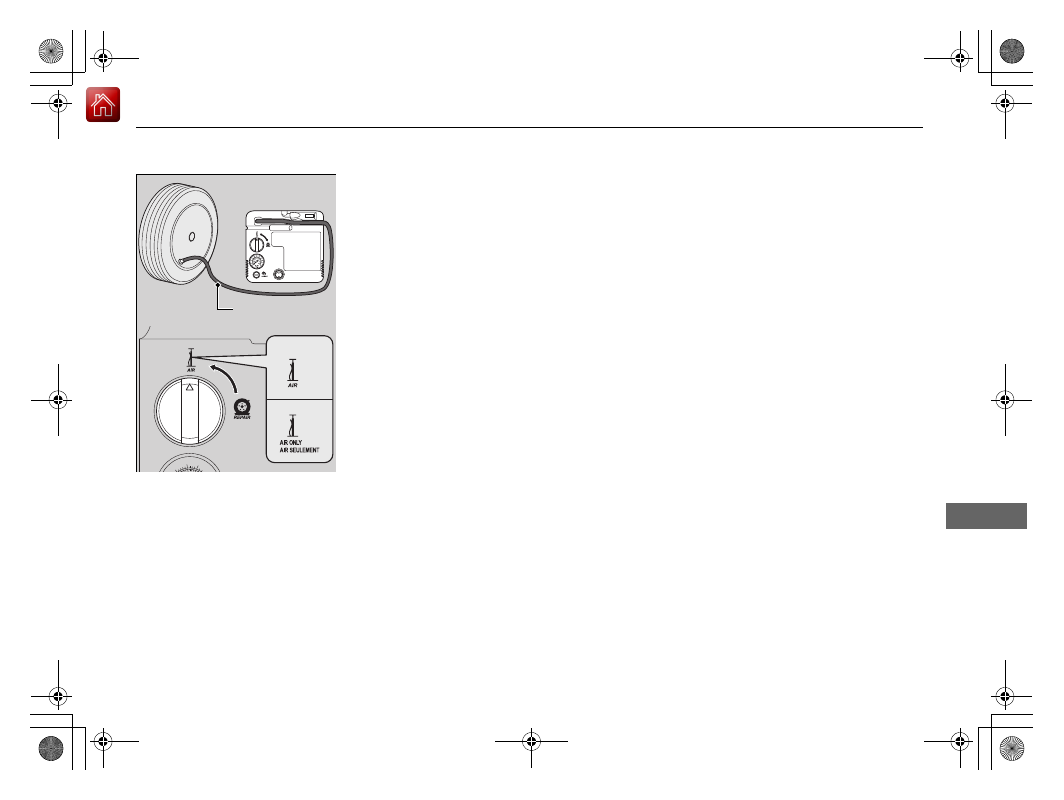
4. Recheck the air pressure using the sealant/

air hose on the compressor.

5. Turn the selector knob to AIR

*1

AIR 

ONLY

*2

AIR SEULEMENT

*2

.

u

Do not turn the air compressor on to 
check the pressure.

Inflating an Under-inflated Tire P. 531

6. If the air pressure is

• Less than 25 psi (175 kPa):

Do not add air or continue driving. The 
leak is too severe. Call for help and have 
your vehicle towed.

Emergency Towing P. 561

• 36 psi (250 kPa) or more:

Continue driving for another 10 minutes 
or until you reach the nearest service 
station, whichever is sooner. Do not 
exceed 50 mph (80 km/h). If you have not 
reached a service station after 10 minutes, 
stop in a safe place and check the tire 
pressure.

u

If the air pressure does not go down 
after the 10 minute driving, you do not 
need to check the pressure any more.

*1: U.S. models
*2: Canadian models

U.S.

Canada

Sealant/Air Hose

uu

If a Tire Goes Flat

u

Temporarily Repairing a Flat Tire

530

Han

d

lin
g the U

n

expected

• Greater than 25 psi (175 kPa), but less 

than 36 psi (250 kPa):

Turn the air compressor on to inflate the 
tire until the tire pressure reaches 36 psi 
(250 kPa).

Inflating an Under-inflated Tire P. 531

Then drive carefully for 10 more minutes 
or until you reach the nearest service 
station, whichever is sooner. Do not 
exceed 50 mph (80 km/h). If you have not 
reached a service station after 10 minutes, 
stop in a safe place and check the tire 
pressure.

u

You should repeat this procedure as 
long as the air pressure is within this 
range.

7. Unplug the kit from the accessory power 

socket.

8. Unscrew the air only hose from the tire 

valve stem. Reinstall the valve cap.

9. Press the pressure relief button until the 

gauge returns to 0 psi (0 kPa).

10. Repackage and properly stow the kit.

Pressure Relief Button

1

Distributing the Sealant in the Tire

3

WARNING

Running the engine with the vehicle in an 
enclosed or even partly enclosed area can 
cause a rapid build-up of toxic carbon 
monoxide.

Breathing this colorless, odorless gas can 
cause unconsciousness and even death. 
Only run the engine to power the air 
compressor with the vehicle outdoors.

Continued

531

uu

If a Tire Goes Flat

u

Temporarily Repairing a Flat Tire

Han

d

lin
g the U

n

expected

You can use the kit to inflate a non-punctured under-inflated tire.

1. Open the trunk floor lid.

Getting Ready to Temporarily Repair 

the Flat Tire P. 523

2. Remove the kit from the case.
3. Place the kit, face up, on flat ground near 

the flat tire, away from traffic. Do not 
place the kit on its side.

4. Remove the air only hose from the kit.

5. Remove the valve cap.

6. Attach the sealant/air hose onto the tire 

valve stem. Screw it until it is tight.

Inflating an Under-inflated Tire

1

Inflating an Under-inflated Tire

NOTICE

Do not operate the temporary tire repair kit 
compressor for more than 15 minutes. The 
compressor can overheat and become permanently 
damaged.

Sealant/Air Hose

Valve Cap

Valve Stem

Sealant/Air Hose

uu

If a Tire Goes Flat

u

Temporarily Repairing a Flat Tire

532

Han

d

lin
g the U

n

expected

7. Plug in the kit to the accessory power 

socket.

u

Be careful not to pinch the cord in a 
door or window.

u

Do not plug any other electronic 
devices into other accessory power 
sockets.

Accessory Power Sockets P. 189

8. Turn the power system on.

u

Keep the power system on while 
injecting air.

9. Turn the selector knob to AIR

*1

AIR 

ONLY

*2

AIR SEULEMENT

*2

.

10. Press the inflator switch to turn on the kit.

u

The compressor starts to inject air into 
the tire.

11. Inflate the tire to the specified air pressure.

*1: U.S. models
*2: Canadian models

1

Inflating an Under-inflated Tire

3

WARNING

Running the engine with the vehicle in an 
enclosed or even partly enclosed area can 
cause a rapid build-up of toxic carbon 
monoxide.

Breathing this colorless, odorless gas can 
cause unconsciousness and even death. 
Only run the engine to power the air 
compressor with the vehicle outdoors.

U.S.

Canada

533

uu

If a Tire Goes Flat

u

Temporarily Repairing a Flat Tire

Han

d

lin
g the U

n

expected

12. Turn off the kit.

u

Check the pressure gauge on the air 
compressor.

u

If overinflated, press the pressure relief 
button.

13. Unplug the kit from the accessory power 

socket.

14. Unscrew the sealant/air hose from the tire 

valve stem. Reinstall the valve cap.

15. Press the pressure relief button until the 

gauge returns to 0 psi (0 kPa).

16. Repackage and properly stow the kit.

Pressure Relief Button

534

Han

d

lin
g the U

n

expected

Handling of the Jack

Your vehicle has jacking points as shown.
When replacing your tires, consult an authorized Honda Clarity Plug-In Hybrid 
dealer.

Jacking Points

535

Continued

Han

d

lin
g the U

n

expected

Power System Won’t Start

Checking the Procedure

When the READY indicator does not come on and the Ready To Drive message 
does not appear on the driver information interface, check the following items and 
take appropriate action.

Checklist

Condition

What to Do

Check if the related 
indicator or driver 
information interface 
messages come on.

The Remove Charger Connector message appears

Removing a charge connector. Set the power 
mode to ACCESSORY, then to ON.

The Low Battery Charge. Power Reduced. message appears Charge the High Voltage battery.

Charging P. 454

The Temperature Is Too Cold For Vehicle To Operate 
message appears.

Driver Information Interface Warning and 

Information Messages P. 103

The To Start, Hold Remote Near Start Button message 
appears.

u

Make sure the smart entry remote is in its operating range.

POWER Button Operating Range P. 158

If the Smart Entry Remote Battery is Weak 

P. 537

The POWER SYSTEM indicator comes on.

Have your vehicle checked by an authorized 
Honda Clarity Plug-In Hybrid dealer.

The transmission system indicator blinks and Transmission 
Problem Apply Parking Brake When Parked
 message 
appears.

The power system can be activated as a 
temporary measure.

If the Transmission System Indicator Blinks 

along with the Warning Message P. 552

Check the brightness 
of the interior lights.

The interior lights are dim or do not come on at all.

Have the 12-volt battery checked by an 
authorized Honda Clarity Plug-In Hybrid dealer.

The interior lights come on normally.

Check all fuses, or have your vehicle checked by 
an authorized Honda Clarity Plug-In Hybrid 
dealer.

Inspecting and Changing Fuses P. 560

1

Checking the Procedure

If you must start the vehicle immediately, use an 
assisting vehicle or booster battery to jump start it.

Jump Starting P. 539

536

uu

Power System Won’t Start

u

Checking the Procedure

Han

d

lin
g the U

n

expected

Checklist

Condition

What to Do

Check the Security 
System Alarm 
indicator.

When the Security System Alarm indicator is blinking, the power 
system cannot be turned on.

Security System Alarm P. 153

537

uu

Power System Won’t Start

u

If the Smart Entry Remote Battery is Weak

Han

d

lin
g the U

n

expected

If the Smart Entry Remote Battery is Weak

If the beeper sounds, the To Start, Hold Remote Near Start Button message 
appears on the driver information interface, and the POWER button flashes, the 
READY indicator does not come on.

Turn on the power system as follows:

1. Touch the center of the POWER button 

with the H logo on the smart entry remote 
while the indicator on the POWER button is 
flashing. The buttons on the smart entry 
remote should be facing you.

u

The POWER button flashes for about 30 
seconds.

2. Depress the brake pedal and press the 

POWER button within 10 seconds after the 
beeper sounds and the POWER button 
changes from flashing to on.

u

If you do not depress the pedal, the 
mode will change to ACCESSORY.

538

uu

Power System Won’t Start

u

Emergency Power System Off

Han

d

lin
g the U

n

expected

Emergency Power System Off

The POWER button may be used to turn the power system off due to an emergency 
situation even while driving. If you must turn the power system off, do either of the 
following operations:
• Press and hold the POWER button for about two seconds.
• Firmly press the POWER button three times.

The steering wheel will not lock. However, because turning off the power system 
disables the power assist the power system provides to the steering and braking 
systems, it will require significantly more physical effort and time to steer and slow 
the vehicle. Use both feet on the brake pedal to slow down the vehicle and stop 
immediately in a safe place.

The gear position automatically changes to 

(

P after the vehicle comes to a complete 

stop. Then, the power mode changes to VEHICLE OFF.

1

Emergency Power System Off

Do not press the button while driving unless it is 
absolutely necessary for the power system to be 
turned off.

539

Continued

Han

d

lin
g the U

n

expected

Jump Starting

Turn off the power to electric devices, such as the audio and lights. Turn off the 
power system, then open the hood.

1. Open the battery terminal cover.

2. Connect the first jumper cable to your 

vehicle’s 12-volt battery + terminal.

3. Connect the other end of the first jumper 

cable to the booster battery + terminal.

u

If you use a booster battery, only use a 
12-volt booster battery.

u

When using an automotive battery 
charger, select a charging voltage lower 
than 15-volts. Check the charger manual 
for the proper setting.

4. Connect the second jumper cable to the 

booster battery - terminal.

Jump Starting Procedure

1

Jump Starting

Securely attach the jumper cable clips so that they do 
not come off when the power system vibrates. Also 
be careful not to tangle the jumper cables or allow 
the cable ends to touch each other while attaching or 
detaching the jumper cables.

12-volt Battery performance degrades in cold 
conditions and may prevent the power system from 
starting.

3

WARNING

A 12-volt battery can explode if you do not 
follow the correct procedure, seriously 
injuring anyone nearby.

Keep all sparks, open flames, and smoking 
materials away from the 12-volt battery.

Battery Terminal Cover

Booster Battery

540

uu

Jump Starting

u

Han

d

lin
g the U

n

expected

5. Connect the other end of the second 

jumper cable to the power system 
mounting bolt as shown. Do not connect 
this jumper cable to any other part of the 
vehicle.

6. If your vehicle is connected to another 

vehicle, start the assisting vehicle’s engine, 
and increase its rpm slightly.

7. Attempt to start your vehicle’s power 

system. If it does not turn on, check that the 
jumper cables have good metal-to-metal 
contact.

541

uu

Jump Starting

u

Han

d

lin
g the U

n

expected

Once your vehicle’s power system has started, remove the jumper cables in the 
following order:

1. Disconnect the jumper cable from your vehicle’s ground.
2. Disconnect the other end of the jumper cable from the booster battery - 

terminal.

3. Disconnect the jumper cable from your vehicle’s 12-volt battery + terminal.
4. Disconnect the other end of the jumper cable from the booster battery + 

terminal.

Have your vehicle inspected by a nearby service station or an authorized Honda 
Clarity Plug-In Hybrid dealer.

What to Do After the Power System Starts

1

What to Do After the Power System Starts

The indicators for the Vehicle Stability Assist (VSA®) 
system, VSA® OFF, Collision Mitigation Braking 
System

TM

 (CMBS

TM

), and low tire pressure/Tire 

Pressure Monitoring System (TPMS) may come on 
along with a message in the driver information 
interface when you turn the power system on after 
reconnecting the battery.
Drive a short distance at 12 mph (20 km/h). The 
indicator should go off. If it does not, have your 
vehicle checked by an authorized Honda Clarity Plug-
In Hybrid dealer.

542

Han

d

lin
g the U

n

expected

Overheating

How to Handle Overheating

Overheating symptoms are as follows:
• The High Temperature. Power Reduced. message appears on the multi-

information display.

• The Stop Driving When Safe. Engine Temperature Too Hot message appears 

on the multi-information display.

• Steam or spray comes out of the engine compartment.

The High Temperature. Power Reduced. message appears on the multi-
information display when the power system temperature is high.

Driver Information Interface Warning and Information Messages P. 103

1. Immediately park the vehicle in a safe place.

u

Change the gear position to 

(

P, and set the parking brake. Turn off all 

accessories and turn on the hazard warning lights.

2. Keep the power mode in ON, and wait until the message disappears.

u

If the message does not disappear, have the vehicle inspected at an authorized 
Honda Clarity Plug-In Hybrid dealer.

The High Temperature. Power Reduced. Message Appears 
on the Multi-Information Display

Continued

543

uu

Overheating

u

How to Handle Overheating

Han

d

lin
g the U

n

expected

First thing to do

1. Immediately park the vehicle in a safe place.
2. Turn off all accessories and turn on the hazard warning lights.

u

No steam or spray present: Keep the power system on and open the hood.

u

Steam or spray is present: Turn off the power system and wait until it 
subsides. Then open the hood.

The Stop Driving When Safe. Engine Temperature Too Hot 
Message Appears on the Multi-Information Display

1

The Stop Driving When Safe. Engine Temperature Too 
Hot Message Appears on the Multi-Information Display

NOTICE

Continuing to drive with the Stop Driving When 
Safe. Engine Temperature Too Hot
 message on 
the multi-information display may damage the 
engine.

3

WARNING

Steam and spray from an overheated 
engine can seriously scald you.

Do not open the hood if steam is coming 
out.

uu

Overheating

u

How to Handle Overheating

544

Han

d

lin
g the U

n

expected

Next thing to do

1. Check that the cooling fan is operating and 

turn the power system off once the Stop 
Driving When Safe. Engine 
Temperature Too Hot
 message 
disappears.

u

If the cooling fan is not operating, 
immediately turn the power system off.

2. Once the engine has cooled down, inspect 

the coolant level and check the cooling 
system components for leaks.

u

If the coolant level in the reserve tank is 
low, add coolant until it reaches the 
MAX mark.

u

If there is no coolant in the reserve tank, 
check that the radiator is cool. Cover the 
radiator cap with a heavy cloth and open 
the cap. If necessary, add coolant up to 
the base of the filler neck, and put the 
cap back on.

Last thing to do

Once the engine has cooled sufficiently, turn the power system on.
If the Stop Driving When Safe. Engine Temperature Too Hot message does not 
appear, resume driving. If it appears again, contact an authorized Honda Clarity 
Plug-In Hybrid dealer for repairs.

1

The Stop Driving When Safe. Engine Temperature Too 
Hot Message Appears on the Multi-Information Display

If the coolant is leaking, contact an authorized Honda 
Clarity Plug-In Hybrid dealer for repairs.

Use water as an emergency/temporary measure only. 
Have an authorized Honda Clarity Plug-In Hybrid 
dealer flush the system with proper antifreeze as 
soon as possible.

3

WARNING

Removing the radiator cap while the 
engine is hot can cause the coolant to spray 
out, seriously scalding you.

Always let the engine and radiator cool 
down before removing the radiator cap.

Reserve Tank

MAX

MIN


Content   ..  32  33  34  35   ..