Honda Clarity Plug-in Hybrid (2018 year). Instruction - part 32


  Index      Honda     Honda Clarity Plug-in Hybrid - instruction 2018 year in english


Search            


Content   ..  30  31  32  33   ..


Honda Clarity Plug-in Hybrid (2018 year). Instruction - part 32


496

Main

tenan

ce

Checking and Maintaining Wiper Blades

Checking Wiper Blades

If the wiper blade rubber has deteriorated, it will leave streaks and the hard surfaces 
of the blade may scratch the window glass.

Changing the Wiper Blade Rubber

1. Set the power mode to VEHICLE OFF 

(LOCK).

2. While holding the wiper switch in the 

MIST position, set the power mode to ON, 
then to VEHICLE OFF (LOCK).

u

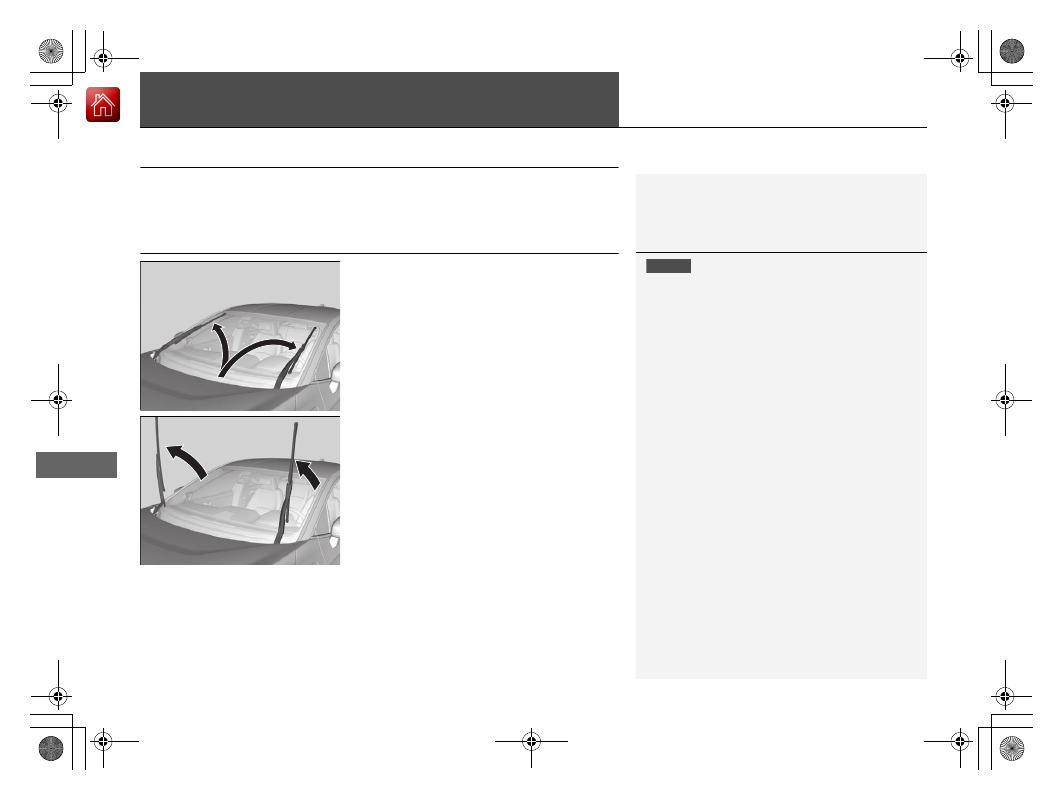
Both wiper arms are set to the 
maintenance position as shown in the 
image.

3. Lift both wiper arms.

1

Changing the Wiper Blade Rubber

NOTICE

Avoid dropping the wiper arm onto the windshield, it 
may damage the wiper arm and/or the windshield. 

When you raise a wiper arm, you may inadvertently 
alter the position of the arm by applying undue force.
If you notice that an arm is not in its proper return 
position, active the wipers once and they will 
automatically reset.

Wipers and Washers P. 166

497

uu

Checking and Maintaining Wiper Blades

u

Changing the Wiper Blade Rubber

Continued

Main

tenan

ce

4. Press and hold the tab, then slide the 

holder off the wiper arm.

5. Pull the end of the wiper blade in the 

direction of the arrow in the image until it 
is out of the holder’s end cap.

6. Pull the wiper blade in the opposite 

direction to slide it out of the holder.

Tab

Holder

Wiper Arm

Wiper 
Blade

End Cap at 
the bottom

Holder

498

uu

Checking and Maintaining Wiper Blades

u

Changing the Wiper Blade Rubber

Main

tenan

ce

7. Insert the flat side of the new wiper blade 

onto the bottom part of the holder. Insert 
the blade all the way.

8. Install the end of the wiper blade into the 

cap.

9. Slide the holder onto the wiper arm until it 

locks.

10. Lower both wiper arms.
11. Set the power mode to ON and hold the 

wiper switch in the MIST position until 
both wiper arms return to the standard 
position.

Cap

Wiper 
Blade

Holder

499

Main

tenan

ce

Checking and Maintaining Tires

Checking Tires

To safely operate your vehicle, your tires must be of the proper type and size, in 
good condition with adequate tread, and properly inflated.

Inflation guidelines

Properly inflated tires provide the best combination of handling, tread life, and comfort. 
Refer to the driver’s doorjamb label or specifications page for the specified pressure.

Underinflated tires wear unevenly, adversely affect handling and fuel economy, and 
are more likely to fail from overheating.

Overinflated tires make your vehicle ride harshly, are more prone to road hazards, 
and wear unevenly.

Every day before you drive, look at each of the tires. If one looks lower than the 
others, check the pressure with a tire gauge.

At least once a month or before long trips, use a gauge to measure the pressure in 
all tires. Even tires in good condition can lose 1–2 psi (10–20 kPa, 0.1–0.2 kgf/cm

2

per month.

Inspection guidelines

Every time you check inflation, also examine the tires and valve stems.
Look for:
• Bumps or bulges on the side or in the tread. Replace the tire if you find any cuts, 

splits, or cracks in the side of the tire. Replace it if you see fabric or cord.

• Remove any foreign objects and inspect for air leaks.
• Uneven tread wear. Have an authorized Honda Clarity Plug-In Hybrid dealer check 

the wheel alignment.

• Excessive tread wear.

Wear Indicators P. 504

• Cracks or other damage around valve stem.

1

Checking Tires

Measure the air pressure when tires are cold. This 
means the vehicle has been parked for at least three 
hours, or driven less than 1 mile (1.6 km). If 
necessary, add or release air until the specified 
pressure is reached.

If checked when hot, tire pressure can be as much as 
4–6 psi (30–40 kPa, 0.3–0.4 kgf/cm

2

) higher than if 

checked when cold.

Whenever tire pressure is adjusted, you must 
calibrate the TPMS.

TPMS Calibration P. 425

Have an authorized Honda Clarity Plug-In Hybrid 
dealer check the tires if you feel a consistent vibration 
while driving. New tires and any that have been 
removed and reinstalled should be properly balanced.

3

WARNING

Using tires that are excessively worn or 
improperly inflated can cause a crash in 
which you can be seriously hurt or killed.

Follow all instructions in this owner’s 
manual regarding tire inflation and 
maintenance.

500

uu

Checking and Maintaining Tires

u

Tire and Loading Information Label

Main

tenan

ce

Tire and Loading Information Label

The label attached to the driver’s doorjamb provides necessary tire and loading 
information.

Tire Labeling

The tires that came on your vehicle have a 
number of markings. Those you should be 
aware of are described as shown.

Whenever tires are replaced, they should be replaced with tires of the same size.

1

Tire and Loading Information Label

The tire and loading information label attached to the 
driver’s doorjamb contains:

a

The number of people your vehicle can carry.

b

The total weight your vehicle can carry. Do not 
exceed this weight.

c

The original tire sizes for front, rear, and spare, if 
equipped.

d

The proper cold tire pressure for front, rear, and 
spare, if equipped.

Label 
Example

Example

Tire Size

Tire 
Identification 
Number (TIN)

Maximum 
Tire Load

Maximum 
Tire Pressure

Tire Size

Tire Sizes

1

Tire Sizes

Following is an example of tire size with an 
explanation of what each component means.
235/45R18 94V
235: Tire width in millimeters.
45: Aspect ratio (the tire’s section height as a 
percentage of its width).
R: Tire construction code (R indicates radial).
18: Rim diameter in inches.
94: Load index (a numerical code associated with the 
maximum load the tire can carry).
V: Speed symbol (an alphabetical code indicating the 
maximum speed rating).

501

uu

Checking and Maintaining Tires

u

Tire Labeling

Main

tenan

ce

The tire identification number (TIN) is a group of numbers and letters that look like 
the example in the side column. TIN is located on the sidewall of the tire.

Cold Tire Pressure – The tire air pressure when the vehicle has been parked for at 
least three hours or driven less than 1 mile (1.6 km).
Load Rating – Means the maximum load that a tire is rated to carry for a given 
inflation pressure.
Maximum Inflation Pressure – The maximum tire air pressure that the tire can 
hold.
Maximum Load Rating – Means the load rating for a tire at the maximum 
permissible inflation pressure for that tire.
Recommended Inflation Pressure – The cold tire inflation pressure recommended 
by the manufacturer.
Treadwear Indicators (TWI) – Means the projections within the principal grooves 
designed to give a visual indication of the degrees of wear of the tread.

Tire Identification Number (TIN)

Glossary of Tire Terminology

1

Tire Identification Number (TIN)

DOT B97R FW6X 2209
DOT: This indicates that the tire meets all 
requirements of the U.S. Department of 
Transportation.
B97R: Manufacturer’s identification mark.
FW6X: Tire type code.
22 09: Date of manufacture.

Year
Week

502

uu

Checking and Maintaining Tires

u

DOT Tire Quality Grading (U.S. Vehicles)

Main

tenan

ce

DOT Tire Quality Grading (U.S. Vehicles)

The tires on your vehicle meet all U.S. Federal Safety 
Requirements. All tires are also graded for treadwear, traction, 
and temperature performance according to Department of 
Transportation (DOT) standards. The following explains these 
gradings.

Quality grades can be found where applicable on the tire sidewall 
between tread shoulder and maximum section width.

The treadwear grade is a comparative rating based on the wear 
rate of the tire when tested under controlled conditions on a 
specified government test course. For example, a tire graded 150 
would wear one and one-half (1 1/2) times as well on the 
government course as a tire graded 100. The relative performance 
of tires depends upon the actual conditions of their use, however, 
and may depart significantly from the norm due to variations in 
driving habits, service practices and differences in road 
characteristics and climate.

Uniform Tire Quality Grading

Treadwear

1

Uniform Tire Quality Grading

For example:
Treadwear 200
Traction AA
Temperature A

All passenger car tires must conform 
to Federal Safety Requirements in 
addition to these grades.

503

uu

Checking and Maintaining Tires

u

DOT Tire Quality Grading (U.S. Vehicles)

Main

tenan

ce

The traction grades, from highest to lowest, are AA, A, B, and C. 
Those grades represent the tire’s ability to stop on wet pavement 
as measured under controlled conditions on specified 
government test surfaces of asphalt and concrete. A tire marked 
C may have poor traction performance.

The temperature grades are A (the highest), B, and C, 
representing the tire’s resistance to the generation of heat and its 
ability to dissipate heat when tested under controlled conditions 
on a specified indoor laboratory test wheel. Sustained high 
temperature can cause the material of the tire to degenerate and 
reduce tire life, and excessive temperature can lead to sudden tire 
failure. The grade C corresponds to a level of performance which 
all passenger car tires must meet under the Federal Motor Vehicle 
Safety Standard No. 109. Grades B and A represent higher levels 
of performance on the laboratory test wheel than the minimum 
required by law.

Traction

Temperature

1

Traction

Warning: The traction grade 
assigned to this tire is based on 
straight-ahead braking traction tests, 
and does not include acceleration, 
cornering, hydroplaning, or peak 
traction characteristics.

1

Temperature

Warning: The temperature grade for 
this tire is established for a tire that is 
properly inflated and not 
overloaded. Excessive speed, 
underinflation, or excessive loading, 
either separately or in combination, 
can cause heat buildup and possible 
tire failure.

504

uu

Checking and Maintaining Tires

u

Wear Indicators

Main

tenan

ce

Wear Indicators

The groove where the wear indicator is 
located is 1/16 inch (1.6 mm) shallower than 
elsewhere on the tire. If the tread has worn so 
that the indicator is exposed, replace the tire. 
Worn out tires have poor traction on wet 
roads.

Tire Service Life

The life of your tires is dependent on many factors, including driving habits, road 
conditions, vehicle loading, inflation pressure, maintenance history, speed, and 
environmental conditions (even when the tires are not in use).

In addition to regular inspections and inflation pressure maintenance, it is 
recommended that you have annual inspections performed once the tires reach five 
years old. All tires should be removed from service after 10 years from the date of 
manufacture, regardless of their condition or state of wear.

Example of a Wear 
Indicator mark

505

uu

Checking and Maintaining Tires

u

Tire and Wheel Replacement

Main

tenan

ce

Tire and Wheel Replacement

Replace your tires with radials of the same size, load range, speed rating, and 
maximum cold tire pressure rating (as shown on the tire’s sidewall). Using tires of a 
different size or construction can cause certain vehicle systems such as the ABS and 
Vehicle Stability Assist (VSA®) system to work incorrectly.

It is best to replace all four tires at the same time. If that isn’t possible, replace the 
front or rear tires in pairs.

Make sure that the wheel’s specifications match those of the original wheels.

1

Tire and Wheel Replacement

3

WARNING

Installing improper tires on your vehicle can 
affect handling and stability. This can cause 
a crash in which you can be seriously hurt or 
killed.

Always use the size and type of tires 
recommended in this owner’s manual.

506

uu

Checking and Maintaining Tires

u

Tire Rotation

Main

tenan

ce

Tire Rotation

Rotating tires according to the maintenance messages on the driver information 
interface helps to distribute wear more evenly and increase tire life.

Tires without rotation marks

Rotate the tires as shown here.

Tires with rotation marks

Rotate the tires as shown here.

1

Tire Rotation

Tires with directional tread patterns should only be 
rotated front to back (not from one side to the other).
Directional tires should be mounted with the rotation 
indication mark facing forward, as shown below.

Whenever tires are rotated, you must calibrate the 
TPMS.

TPMS Calibration P. 425

Front

Direction Mark

Front

Front

507

uu

Checking and Maintaining Tires

u

Winter Tires

Main

tenan

ce

Winter Tires

If driving on snowy or frozen roads, mount all season marked M+S tires, snow tires, 
or tire chains; reduce speed; and maintain sufficient distance between vehicles when 
driving.

Be particularly careful when operating the steering wheel or brakes to prevent 
skidding.

Use tire chains, snow tires, or all season tires when necessary or according to the law.

When mounting, refer to the following points.

For winter tires:
• Select the size and load ranges that are the same as the original tires.
• Mount the tires to all four wheels.
For tire chains:
• Install them on the front tires only.
• Because your vehicle has limited tire clearance, we strongly recommend using the 

chains listed below:

• Follow the chain manufacturer’s instruction when installing. Mount them as 

tightly as you can.

• Check that the chains do not touch the brake lines or suspension.
• Drive slowly.

Cable-type: SCC Radial Chain SC1040

1

Winter Tires

NOTICE

Traction devices that are the wrong size or improperly 
installed can damage your vehicle’s brake lines, 
suspension, body, and wheels. Stop driving if they are 
hitting any part of the vehicle.

When tire chains are mounted, follow the chain 
manufacturer’s instructions regarding vehicle 
operational limits.

If your vehicle is equipped with summer tires, be 
aware that these tires are not designed for winter 
driving conditions. For more information, contact an 
authorized Honda Clarity Plug-In Hybrid dealer.

3

WARNING

Using the wrong chains, or not properly 
installing chains, can damage the brake 
lines and cause a crash in which you can be 
seriously injured or killed.

Follow all instructions in this owner’s 
manual regarding the selection and use of 
tire chains.

508

Main

tenan

ce

12-Volt Battery

Checking the 12-Volt Battery

Check the battery condition monthly. Look at 
the test indicator window and check the 
terminals for corrosion.

The battery condition is monitored by the 
sensor on the negative terminal. If there is a 
problem with the sensor, the warning 
message on the driver information interface 
will let you know. Have your vehicle checked 
by an authorized Honda Clarity Plug-In Hybrid 
dealer.

If your vehicle’s battery is disconnected or goes dead:
• The audio system is disabled.

Reactivating the audio system P. 206

• The clock resets.

Clock P. 136

• The vehicle cannot be charged. After reconnecting the battery, turn the power 

system on, then turn it off.
Confirm that charging is possible.

Turning on the Power P. 376
Charging P. 454

The immobilizer system needs to be reset.

Immobilizer System Indicator P. 97

1

12-Volt Battery

WARNING: Battery post, terminals, 
and related accessories contain lead 
and lead compounds.
Wash your hands after handling.

The test indicator’s color information is on the battery.

When you find corrosion, clean the battery terminals 
by applying a baking powder and water solution. 
Clean the terminals with a damp towel. Cloth/towel 
dry the battery. Coat the terminals with grease to 
help prevent future corrosion.

3

WARNING

The battery gives off explosive hydrogen 
gas during normal operation.

A spark or flame can cause the battery to 
explode with enough force to kill or 
seriously hurt you.

When conducting any battery 
maintenance, wear protective clothing and 
a face shield, or have a skilled technician do 
it.

Test Indicator Window

Canadian models only

509

uu

12-Volt Battery

u

Charging the 12-Volt Battery

Main

tenan

ce

Charging the 12-Volt Battery

Disconnect both battery cables to prevent damaging your vehicle’s electrical system. 
Always disconnect the negative (–) cable first, and reconnect it last.

1

12-Volt Battery

When replacing the battery, the replacement must be 
of the same specifications.
Consult an authorized Honda Clarity Plug-In Hybrid 
dealer for more information.

The indicators for the Vehicle Stability Assist (VSA®) 
system, VSA® OFF, Collision Mitigation Braking 
System

TM

 (CMBS

TM

), and low tire pressure/Tire 

Pressure Monitoring System (TPMS) may come on 
along with a message in the driver information 
interface when you turn the power system on after 
reconnecting the battery.
Drive a short distance at 12 mph (20 km/h). The 
indicator should go off. If it does not, have your 
vehicle checked by an authorized Honda Clarity Plug-
In Hybrid dealer.

510

Main

tenan

ce

Remote Transmitter Care

Replacing the Button Battery

If the indicator does not come on when the button is pressed, replace the battery.

1. Remove the built-in key.

2. Remove the upper half of the cover by 

carefully prying on the edge with a coin.

u

Remove carefully to avoid losing the 
buttons.

u

Wrap a coin with a cloth to prevent 
scratching the smart entry remote.

3. Make sure to replace the battery with the 

correct polarity.

1

Replacing the Button Battery

NOTICE

An improperly disposed of battery can damage the 
environment. Always confirm local regulations for 
battery disposal.

Replacement batteries are commercially available or 
at an authorized Honda Clarity Plug-In Hybrid dealer.

3

WARNING

CHEMICAL BURN HAZARD
The battery that powers the remote 
transmitter can cause severe internal burns 
and can even lead to death if swallowed.
Keep new and used batteries away from 
children.
If you suspect that a child has swallowed 
the battery, seek medical attention 
immediately.

Battery type: CR2032

Battery

511

Main

tenan

ce

Climate Control System Maintenance

Air Conditioning

To ensure proper and safe operation, the Society of Automotive Engineers (SAE 
J2845) recommends that the refrigerant system only be serviced by trained and 
certified technicians.

Never repair or replace the air conditioning evaporator (cooling coil) with one 
removed from a used or salvaged vehicle.

New replacement mobile air conditioning evaporators must be certified (and 
labeled) as meeting SAE Standard J2842.

1

Climate Control System Maintenance

NOTICE

Vented refrigerant is harmful to the environment.
To avoid refrigerant from venting, never replace the 
evaporator with one removed from a used or 
salvaged vehicle.

Refrigerant in your vehicle’s air conditioning system is 
flammable and can be ignited during servicing if 
proper procedures are not followed.

The air conditioner label is found under the hood:

Safety Labels P. 83
Specifications P. 566

Canadian models

: Caution

: Flammable 
Refrigerant

: Requires Registered 
Technician to Service

: Air Conditioning 
System


Content   ..  30  31  32  33   ..