Honda Odyssey 2004. Manual - part 396


  Index      Honda     Honda Odyssey 2004 - service repair manual 2004 year


Search            


Content   ..  394  395  396  397   ..


Honda Odyssey 2004. Manual - part 396


01

S0X4A00G10100000000FEAT20

Performance Test

21-60

Heating/Air Conditioning

A/C System Test

A

B

• Compressed air mixed with R-134a forms a

combustible vapor.

• The vapor can burn or explode causing serious

injury.

• Never use compressed air to pressure test

R-134a service equipment or vehicle air
conditioning systems.

• Air conditioning refrigerant or lubricant vapor

can irritate your eyes, nose, or throat.

• Be careful when connecting service equipment.
• Do not breathe refrigerant or vapor.

The performance test will help determine if the air
conditioner system is operating within specifications.

Use only service equipment that is U.L.-listed and is
certified to meet the requirements of SAE J2210 to
remove HFC-134a (R-134a) from the air conditioning
system.

If accidental system discharge occurs, ventilate work
area before resuming service.

R-134a service equipment or vehicle air conditioning
systems should not be pressure tested or leak tested
with compressed air.

Additional health and safety information may be
obtained from the refrigerant and lubricant
manufacturers.

1. Connect a R-134a refrigerant recovery/recycling/

charging station to the high-pressure service port
and the low-pressure service port, as shown,
following the equipment manufacturer’s
instructions.

2. Determine the relative humidity and air

temperature.

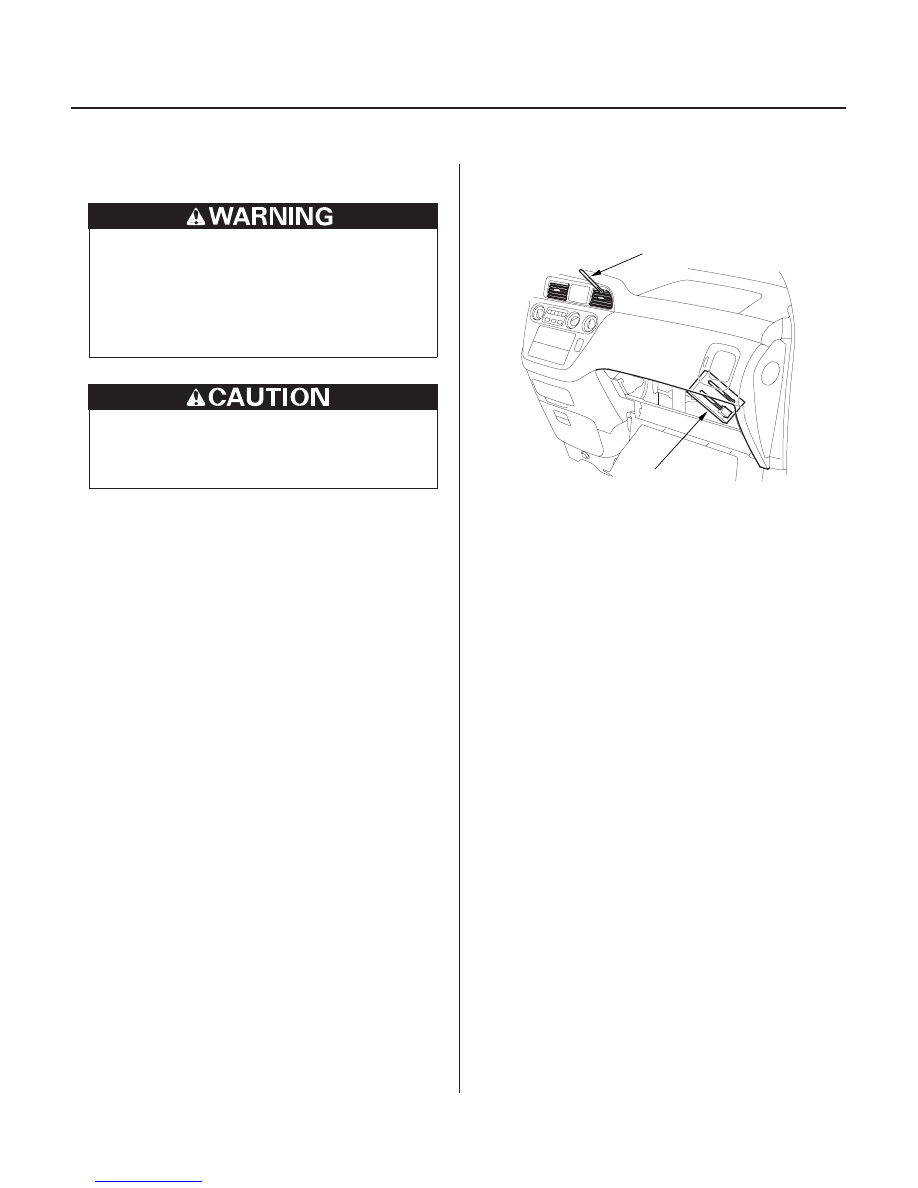
3. Remove the glove box stop, and let the glove box

hang down (see page 20-71).

4. Insert a thermometer (A) in the center vent.

5. Place a thermometer (B) near the blower unit.

6. Test conditions:

• Avoid direct sunlight.
• Open hood.
• Open front doors.
• Set the temperature control dial or button on

Max Cool (60°F or 18°C), the mode control switch
on Vent and the recirculation control switch on
Recirculate.

• Turn the A/C switch on and the fan switch on Max.
• Run the engine at 1,500 rpm.
• No driver or passengers in vehicle.

7. After running the air conditioning for 10 minutes

under the above test conditions, read the delivery
temperature from the thermometer in the center
vent, the intake temperature near the blower unit,
and the high and low system pressure from the A/C
gauges.

03/07/29 10:11:52 61S0X050_210_0061

*01

21-61

Dual A/C:

kPa
(kgf/cm )

psi

DELIVERY
PRESSURE

0

kPa
(kgf/cm )

psi

86
(30)

77
(25)

68
(20)

59
(15)

50
(10)

41
(5)

INTAKE TEMPERATURE

68
(20)

77
(25)

86
(30)

95
(35)

104
(40)

DELIVERY
TEMPERATURE

INTAKE
PRESSURE

DELIVERY
PRESSURE

80%

30%

°F
(°C)

°F
(°C)

80%

80%

30%

30%

INTAKE
PRESSURE

DELIVERY
TEMPERATURE

HUMIDITY
LEVEL

HUMIDITY
LEVEL

HUMIDITY
LEVEL

kPa
(kgf/cm )

psi

86
(30)

77
(25)

68
(20)

59
(15)

50
(10)

41
(5)

INTAKE TEMPERATURE

68
(20)

77
(25)

86
(30)

95
(35)

104
(40)

DELIVERY
TEMPERATURE

INTAKE
PRESSURE

DELIVERY
PRESSURE

80%

30%

80%

80%

30%

INTAKE
PRESSURE

DELIVERY
TEMPERATURE

HUMIDITY
LEVEL

HUMIDITY
LEVEL

HUMIDITY
LEVEL

°F
(°C)

°F
(°C)

30%

Single A/C :

kPa
(kgf/cm )

psi

2900
(30)

2500
(25)

2000
(20)

1500
(15)

980
(10)

DELIVERY
PRESSURE

400
(4)

300
(3)

200
(2)

100
(1)

0

500
(5)

3400
(35)

2900
(30)

2500
(25)

2000
(20)

1500
(15)

980
(10)

400
(4)

300
(3)

200
(2)

100
(1)

500
(5)

3400
(35)

500

430

360

280

210

140

71

57

43

28

14

500

430

360

280

210

140

71

57

43

28

14

2

2

2

2

8. To complete the charts:

• Mark the delivery temperature along the vertical line.
• Mark the intake temperature (ambient air temperature) along the bottom line.
• Draw a line straight up from the air temperature to the humidity.
• Mark a point 10 % above and 10 % below the humidity level.
• From each point, draw a horizontal line across the delivery temperature.
• The delivery temperature should fall between the 2 lines.
• Complete the low-side pressure test and high-side pressure test in the same way.
• Any measurements outside the line may indicate the need for further inspection.

Example

Intake temperature (dry):
Intake temperature (wet):
Intake pressure:
Delivery temperature:
Delivery pressure:

86°F (30°C) Humidity level 70 %
77.9°F (25.5°C)
360 kPa (3.67 kgf/cm ) (52.2 psi)
67.3°F (19.6°C)
2295 kPa (23.4 kgf/cm ) (332.8 psi)

Results:

Within normal range

(cont’d)

2

2

03/07/29 10:11:53 61S0X050_210_0062

Pressure Test

Test results

Related symptoms

Probable cause

Remedy

21-62

Heating/Air Conditioning

A/C System Test (cont’d)


Discharge
(high)
pressure
abnormally
high

After stopping compressor,
pressure drops to about 196 kPa
(2.0 kgf/cm , 28 psi) quickly, and
then falls gradually.

Air in system

Recover, evacuate (see page 21-
57), and recharge with specified
amount (see page 21-58).

Reduced or no airflow through
condenser

Clogged condenser or
radiator fins
Condenser or radiator
fan not working
properly

Clean
Check voltage and fan rpm.
Check fan direction.

Line to condenser is excessively
hot.

Restricted flow of
refrigerant in system

Restricted lines

Discharge
pressure
abnormally
low

High and low pressures are
balanced soon after stopping
compressor. Low side is higher
than normal.

Faulty compressor
discharge valve
Faulty compressor seal

Replace the compressor.

Outlet of expansion valve is not
frosted, low-pressure gauge
indicates vacuum.

Faulty expansion valve
Moisture in system

Replace
Recover, evacuate, and
recharge with specified
amount.

Suction (low)
pressure
abnormally
low

Expansion valve is not frosted,
and low-pressure line is not cold.
Low-pressure gauge indicates
vacuum.

Frozen expansion valve
(Moisture in system)
Faulty expansion valve

Recover, evacuate, and
recharge with specified
amount.
Replace the expansion valve.

Discharge temperature is low, and
the airflow from vents is restricted.

Frozen evaporator

Run the fan with compressor off,
then check evaporator
temperature sensor.

Expansion valve is frosted.

Clogged expansion valve

Clean or replace.

Suction
pressure
abnormally
high

Low-pressure hose and check
joint are cooler than the
temperature around evaporator.

Expansion valve open too
long

Repair or replace.

Suction pressure is lowered when
condenser is cooled by water.

Excessive refrigerant in
system

Recover, evacuate, and
recharge with specified amount.

High and low-pressure are
equalized as soon as the
compressor is stopped, and both
gauges fluctuate while running.

Faulty gasket
Faulty high-pressure
valve
Foreign particle stuck
in high-pressure valve

Replace the compressor.

Suction and
discharge
pressures
abnormally
high

Reduced airflow through
condenser.

Clogged condenser or
radiator fins
Condenser or radiator
fan not working
properly

Clean
Check voltage and fan rpm.
Check fan direction.

Suction and
discharge
pressure
abnormally
low

Low-pressure hose and metal end
areas are cooler than evaporator.

Clogged or kinked low-
pressure hose parts

Repair or replace.

Temperature around expansion
valve is too low compared with
that around receiver/dryer.

Clogged high-pressure
line

Repair or replace.

Refrigerant
leaks

Compressor clutch is dirty.

Compressor shaft seal
leaking

Replace the compressor.

Compressor bolt(s) are dirty.

Leaking around bolt(s)

Tighten bolt(s) or replace
compressor.

Compressor gasket is wet with oil.

Gasket leaking

Replace the compressor.

2

03/07/29 10:11:54 61S0X050_210_0063

S0X4A000000000J2101ZAAT02

21-63

03/07/29 10:11:54 61S0X050_210_0064


Content   ..  394  395  396  397   ..