Honda Odyssey 2004. Manual - part 243


  Index      Honda     Honda Odyssey 2004 - service repair manual 2004 year


Search            


Content   ..  241  242  243  244   ..


Honda Odyssey 2004. Manual - part 243


11

01

02

S0X4AA1E10410613041KBAT00

14-366

Automatic Transmission

ATF Temperature Sensor Replacement

10 x 1.25 mm
38 N·m (3.9 kgf·m,
28 lbf·ft)

10 x 1.25 mm
38 N·m
(3.9 kgf·m, 28 lbf·ft)

6 x 1.0 mm
9.8 N·m (1.0 kgf·m, 7.2 lbf·ft)

A

B

C

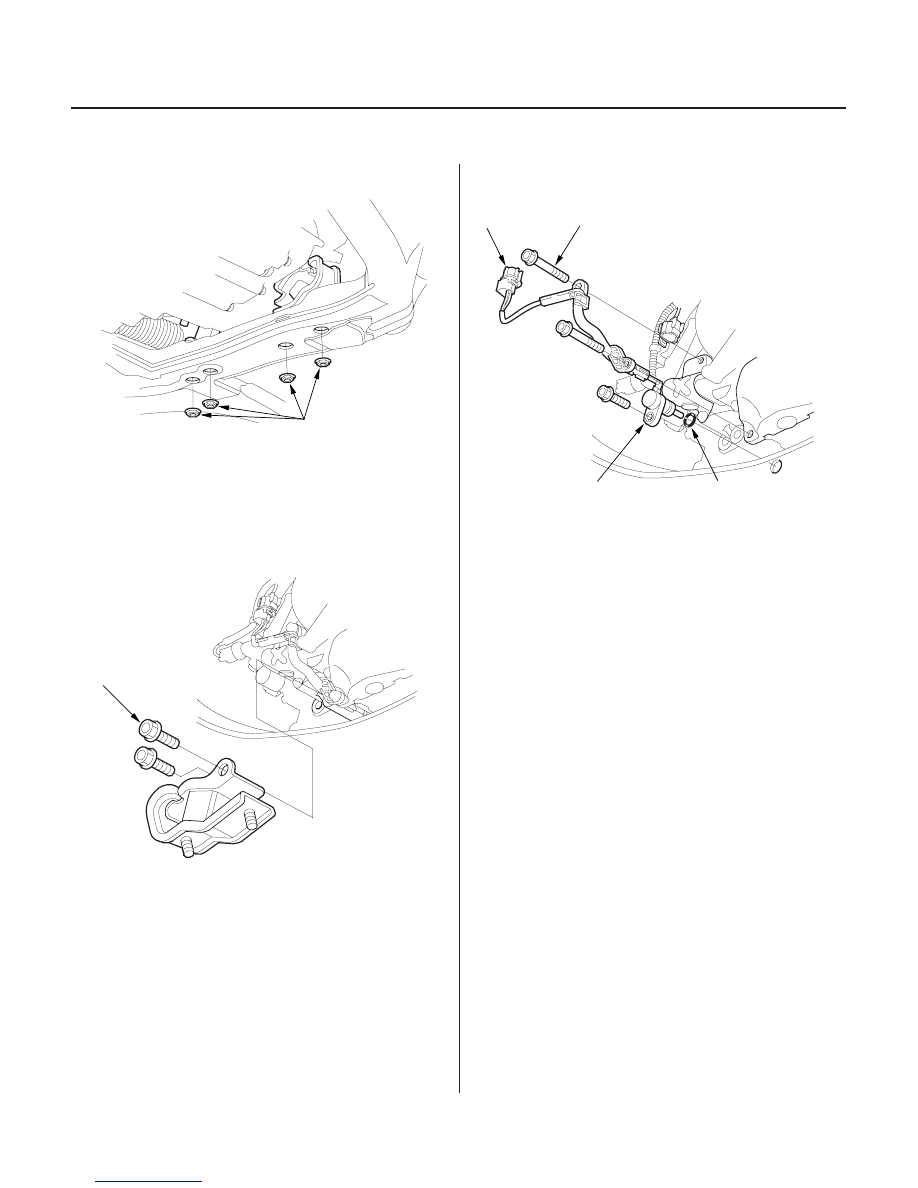
1. Remove the transmission lower mount nuts.

2. Place the transmission jack under the transmission,

and lift it up until the studs of the transmission
lower front mount clear the subframe.

3. Remove the transmission lower front mount.

4. Disconnect the connector (A) from the ATF

temperature sensor.

5. Remove the bolts securing the sensor harness

clamp and ATF temperature sensor, then remove
the ATF temperature sensor (B).

6. Install the new ATF temperature sensor with a new

O-ring (C).

7. Install the harness clamp, then connect the

connector.

8. Install the transmission lower front mount.

9. Lower the transmission, then install the

transmission lower mount nuts.

10. Remove the transmission jack.

03/07/29 09:40:18 61S0X050_140_0369

01

*01

01

S0X4AA1E10400013001MAAT00

14-367

ATF Level Check

A

B

C

B
24 x 1.5 mm
44 N·m
(4.5 kgf·m,
33 lbf·ft)

C

A

NOTE: Keep all foreign particles out of the transmission.

1. Warm up the engine to normal operating

temperature (the radiator fan comes on).

2. Park the vehicle on the level ground. Turn off the

engine.

NOTE: Check the fluid level within 60

90 seconds

after turning the engine off.

3. Remove the dipstick (yellow loop) (A) from the

transmission, and wipe it with a clean cloth.

4. Insert the dipstick into the transmission.

5. Remove the dipstick and check the fluid level. It

should be between the upper mark (B) and lower
mark (C).

6. If the level is below the lower mark, check for fluid

leaks at the transmission, hose and line joints. If a
problem is found, fix it before filling the
transmission.

7. If necessary, fill the transmission into the filler hole

(A) to bring the fluid level up to the upper mark.
Always use Honda ATF-Z1 Automatic Transmission
Fluid (ATF). Using a non-Honda ATF can affect shift
quality.

8. If the level is above the upper mark, drain the ATF

to proper level (see step 3 on page 14-368).

9. Install the ATF filler bolt (B) with a new sealing

washer (C).

10. Insert the dipstick back into the transmission.

03/07/29 09:40:19 61S0X050_140_0370

01

02

S0X4AA1E10400013001KBAT00

Automatic Transmission Fluid Capacity:
3.3

(3.5 US qt) at changing

7.9

(8.3 US qt) at overhaul

14-368

Automatic Transmission

ATF Replacement

A
18 x 1.5 mm
49 N·m (5.0 kgf·m,
36 lbf·ft)

B

B
24 x 1.5 mm
44 N·m
(4.5 kgf·m,
33 lbf·ft)

C

A

NOTE: Keep all foreign particles out of the transmission.

1. Bring the transmission up to operating temperature

(the radiator fan comes on) by driving the vehicle.

2. Park the vehicle on the level ground, and turn the

engine off.

3. Remove the ATF filler bolt and the drain plug (A),

and drain the automatic transmission fluid (ATF).

NOTE: If a cooler flusher is used, refer to ATF
Cooler Flushing (see page 14-388).

4. Reinstall the drain plug with a new sealing washer

(B).

5. Refill the transmission with the recommended fluid

into the filler hole (A) to the upper mark on the
dipstick. Always use Honda ATF-Z1 Automatic
Transmission Fluid (ATF). Using a non-Honda ATF
can affect shift quality.

6. Install the ATF filler bolt (B) with a new sealing

washer (C).

03/07/29 09:40:20 61S0X050_140_0371

01

13

02

S0X4AA1E10410400000KAAT00

Special Tools Required

14-369

Transmission Removal

A
18 x 1.5 mm
49 N·m (5.0 kgf·m,
36 lbf·ft)

B

A

B

C

• Engine support hanger 07XAA-001030A
• Engine hanger balance bar VSB02C000019
• Subframe adapter EQS07AODSY0

(Available through the Honda Tool and Equipment
Program, 888-424-6857)

1. Before disconnecting the battery, make sure you

have the anti-theft code for the radio, then write
down the frequencies for the radio’s preset stations.

2. Remove the bolt securing the lower portion of the

windshield washer reservoir opening. Remove the
support rod, then fix the hood in a vertical position
using the support rod.

3. Remove the engine covers.

4. Remove the intake air duct, resonator cover, and air

cleaner housing assembly.

5. Disconnect the battery negative terminal, then

remove the battery positive terminal.

6. Remove the battery hold-down bracket, then

remove the battery and battery tray.

7. Remove the battery cable clamps, connector, and

relay bracket from the battery base.

8. Remove the battery base.

9. Raise the vehicle, and make sure it is securely

supported.

10. Remove the splash shield.

11. Remove the drain plug (A), and drain the automatic

transmission fluid (ATF). Reinstall the drain plug
and a new sealing washer (B).

12. Remove the breather tube (A) from its clamp (B) on

the radiator hose (C).

(cont’d)

03/07/29 09:40:20 61S0X050_140_0372


Content   ..  241  242  243  244   ..