Lincoln Blackwood (2002 year). Manual - part 9


  Index      Lincoln     Lincoln Blackwood (2002 year) - manual in english


Search            copyright infringement  


Content      ..     7      8      9      10     ..


Lincoln Blackwood (2002 year). Manual - part 9


• Do not operate the vehicle with the power steering pump fluid level

below the MIN mark on the reservoir.

If the power steering system breaks down (or if the engine is turned
off), you can steer the vehicle manually, but it takes more effort.

If the steering wanders or pulls, check for:
• Underinflated tire(s) on any wheel(s)
• Uneven vehicle loading
• High crown in center of road
• High crosswinds
• Wheels out of alignment
• Loose or worn suspension components

AIR SUSPENSION SYSTEM

The air suspension system is designed to improve ride, handling and
general vehicle performance for static, on and off-road driving conditions.
• The load leveling feature of the air suspension automatically keeps the

vehicle at a constant level if a load is added or removed from the
vehicle.

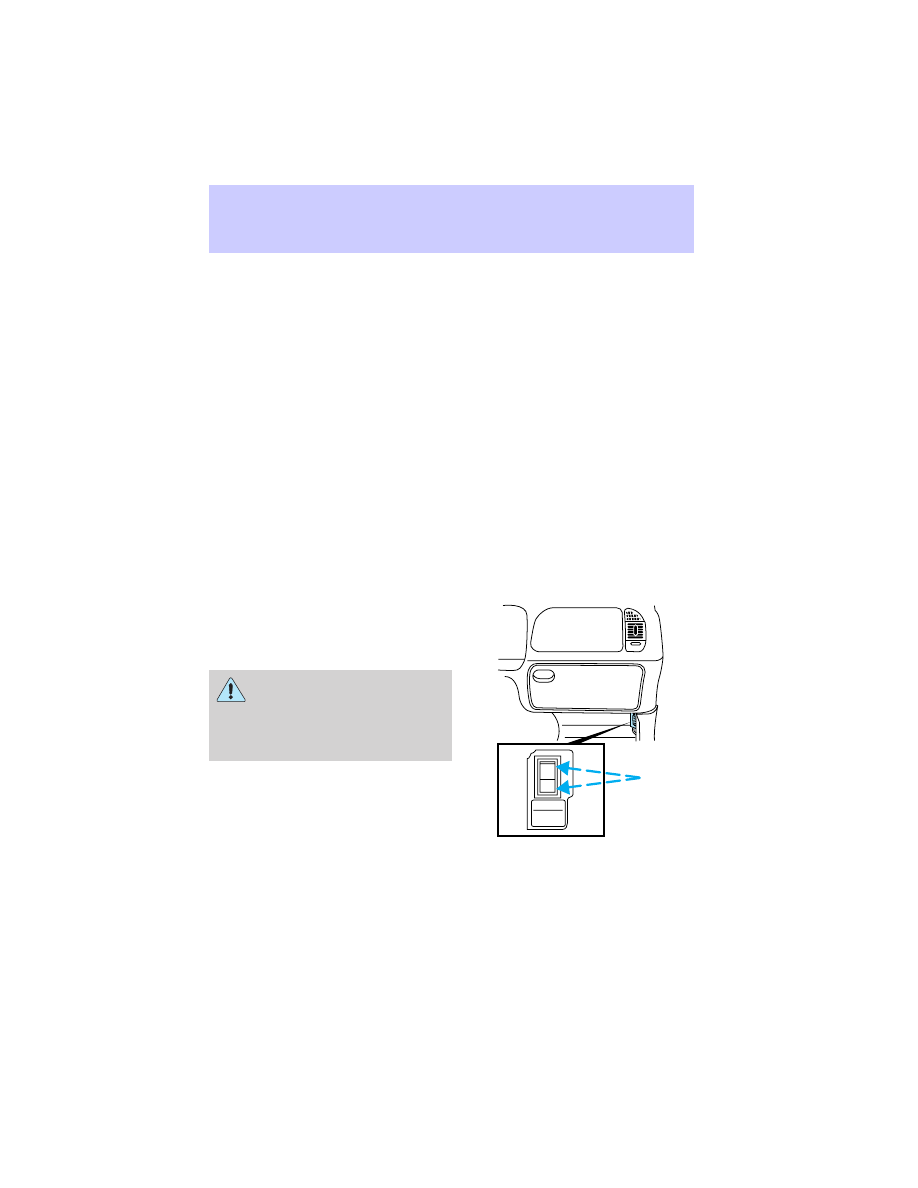
The air suspension shut-off switch is
located behind an access panel
underneath the passenger side
instrument panel.

On vehicles equipped with
Air Suspension, turn OFF

the Air Suspension switch prior to
jacking, hoisting or towing your
vehicle.

Normal vehicle operation does not
require any action by the driver.

Check air suspension indicator light

The warning and indicator light CK SUSP illuminates when the air
suspension switch is turned off or an air suspension system fault has
been detected.

AIR SUSPENSION

SWITCH

INTERRUPTEUR DE

LA SUSPENSION

PNEUMATIQUE

OFF

Driving

131

-------------------------------------------------------------------------------------------------------------------------------------------------------------

If the light is illuminated while driving and the air suspension system
switch is not turned off, safely pull off the road at your earliest
convenience. Turn the ignition switch from 4 (On) to 3 (Off) and 4 (On)
again. If the warning light illuminates again, turn the air suspension
switch off and have the vehicle serviced by a dealer or qualified service
technician.

If the vehicle is loaded beyond the recommended maximum payload, the
CK SUSP light may illuminate. To correct this condition, remove or
redistribute the payload according to the recommended requirements
and follow the procedure outlined above.

TRACTION CONTROL

Your vehicle is equipped with a Traction Control

娂 system. This system

helps you maintain the stability and steerability of your vehicle. It is
especially useful on slippery road surfaces. The system operates by
detecting and controlling wheel spin. The system borrows many of the
electronic elements already present in the anti-lock braking system
(ABS).

Wheel-speed sensors allow excess rear wheel spin to be detected by the
Traction Control

娂 portion of the ABS computer. Excess wheel spin is

controlled through engine torque reduction. This is realized via the fully
electronic spark and fuel injection systems. This process is very sensitive
to driving conditions and very fast acting. The rear wheels “search” for
optimum traction several times a second and adjustments are made
accordingly.

The Traction Control

娂 system will allow your vehicle to make better use

of available traction on slippery surfaces. The system is a driver aid
which makes your vehicle easier to handle primarily on snow and ice
covered roads.

During Traction Control

娂 operation the engine will not “rev-up” when

you push further on the accelerator. This is normal system behavior.

If you should become stuck in deep
snow or on a very slippery road
surface, try switching the Traction
Control

娂 system off. This may allow

excess wheel spin to “dig” the
vehicle out or enable a successful
“rocking” maneuver.

OFF

Driving

132

-------------------------------------------------------------------------------------------------------------------------------------------------------------

TRACTION-LOK AXLE

This axle provides added traction on slippery surfaces, particularly when
one wheel is on a poor traction surface. Under normal conditions, the
Traction-Lok axle functions like a standard rear axle.

If a single drive wheel should spin-up, the Traction-Lok axle will transfer
torque to the other wheel if it has traction.

Extended use of other than the manufacturer’s specified size tires on a
Traction-Lok rear axle could result in a permanent reduction in
effectiveness. This loss of effectiveness does not affect normal driving
and should not be noticeable to the driver.

To reduce the risk of injury, never run the engine with one wheel
off the ground, such as when changing a tire.

PREPARING TO DRIVE YOUR VEHICLE

Utility vehicles have a significantly higher rollover rate than
other types of vehicles.

In a rollover crash, an unbelted person is significantly more likely
to die than a person wearing a seat belt.

Your vehicle has special design and equipment features to make it
capable of performing in a wide variety of circumstances. These special
design features, such as larger tires and increased ground clearance, give
the vehicle a higher center of gravity than a passenger car.

Vehicles with a higher center of gravity such as utility and
four-wheel drive vehicles handle differently than vehicles with a

lower center of gravity. Utility and four-wheel drive vehicles are not
designed for cornering at speeds as high as passenger cars any more
than low-slung sports cars are designed to perform satisfactorily under
off-road conditions. Avoid sharp turns, excessive speed and abrupt
maneuvers in these vehicles. Failure to drive cautiously could result in
an increased risk of loss of vehicle control, vehicle rollover, personal
injury and death.

Driving

133

-------------------------------------------------------------------------------------------------------------------------------------------------------------

Loaded vehicles, with a higher center of gravity, may handle
differently than unloaded vehicles. Extra precautions, such as

slower speeds and increased stopping distance, should be taken when
driving a heavily loaded vehicle.

Your vehicle has the capability to haul more cargo and people than most
passenger cars. Depending upon the type and placement of the load,
hauling people and cargo may raise the center of gravity of the vehicle.

Use extra caution while becoming familiar with your vehicle. Know the
capabilities and limitations of both you as a driver and your vehicle.

AUTOMATIC TRANSMISSION OPERATION

Brake-shift interlock

This vehicle is equipped with a brake-shift interlock feature that prevents
the gearshift lever from being moved from P (Park) when the ignition is
in the ON position unless the brake pedal is depressed.

If you cannot move the gearshift lever out of P (Park) with ignition in
the ON position and the brake pedal depressed:

1. Apply the parking brake, turn ignition key to LOCK, then remove the
key.

2. Insert the key and turn it to OFF. Apply the brake pedal and shift
to N (Neutral)
.

In the ignition OFF position, the automatic transmission shift
lever can be moved from the P (Park) position without the brake

pedal depressed. To avoid unwanted vehicle movement, always set the
parking brake.

3. Start the vehicle.

If it is necessary to use the above procedure to move the gearshift lever,
it is possible that a fuse has blown or the vehicle’s brakelamps are not
operating properly. Refer to Fuses and relays in the Roadside
emergencies 
chapter.

Do not drive your vehicle until you verify that the brakelamps
are working.

If your vehicle gets stuck in mud or snow it may be rocked out by
shifting from forward and reverse gears, stopping between shifts, in a
steady pattern. Press lightly on the accelerator in each gear.

Driving

134

-------------------------------------------------------------------------------------------------------------------------------------------------------------

Do not rock the vehicle if the engine is not at normal operating
temperature or damage to the transmission may occur.

Do not rock the vehicle for more than a few minutes or damage
to the transmission and tires may occur or the engine may
overheat.

Always set the parking brake fully and make sure the gearshift is
latched in P (Park). Turn the ignition to the LOCK position and

remove the key whenever you leave your vehicle.

If the parking brake is fully released, but the brake warning lamp
remains illuminated, the brakes may not be working properly.

See your dealer or a qualified service technician.

Driving with a 4–speed automatic transmission

Understanding gearshift positions

To put your vehicle in gear, start the engine, depress the brake pedal,
then move gearshift lever out of P (Park).

Hold the brake pedal down while you move the gearshift lever
from P (Park) to another position. If you do not hold the brake

pedal down, your vehicle may move unexpectedly and injure someone.

P (Park)

Always come to a complete stop
before shifting into P (Park). Make
sure the gearshift lever is securely
latched in P (Park). This position
locks the transmission and prevents
the rear wheels from turning.

Always set the parking brake fully and make sure the gearshift
lever is latched in P (Park). Turn off the ignition whenever you

leave your vehicle.

Driving

135

-------------------------------------------------------------------------------------------------------------------------------------------------------------

R (Reverse)

With the gearshift lever in R
(Reverse), the vehicle will move
backward. Always come to a
complete stop before shifting into
and out of R (Reverse).

N (Neutral)

With the gearshift lever in N
(Neutral), the vehicle can be started
and is free to roll. Hold the brake
pedal down while in this gear.

(Overdrive)

The normal driving position for the
best fuel economy. Transmission
operates in gears one through four.

(Overdrive) can be deactivated

by pressing the transmission control
switch (TCS) on the end of the
gearshift lever.

The transmission control indicator
light (TCIL) (the word OFF) on the
end of the gearshift lever will
illuminate.

Drive – Not shown on the display. Activate by pressing the transmission
control switch (TCS) on the end of the gearshift lever with the gearshift
in the

position. The TCIL (the word OFF) will illuminate on the

gearshift lever. Transmission operates in gears one through three.
(Drive) provides more engine braking than

(Overdrive) and is useful

when:
• driving with a heavy load.
• towing a trailer up or down steep hills.
• additional engine downhill braking is desired. If towing a trailer, refer

to Driving while you tow in the Trailer towing section.

To return to

(Overdrive) mode, press the transmission control switch

(TCS). The TCIL (the word OFF) will no longer be illuminated.

OVERDRIVE

OFF

OVERDRIVE

Driving

136

-------------------------------------------------------------------------------------------------------------------------------------------------------------

Each time the vehicle is started, the transmission will automatically
return to normal overdrive mode.

Every time the vehicle is shut off and restarted, you must press the
transmission control switch to cancel overdrive operation if driving in
overdrive is not desired.

2 (Second)

Use 2 (Second) to start-up on
slippery roads or to provide
additional engine braking on
downgrades.

1 (First)

Use 1 (Low) to provide maximum
engine braking on steep
downgrades. Upshifts can be made
by shifting to 2 (Second) or to
(Overdrive). Selecting 1 (Low) at higher speeds causes the transmission
to shift to a lower gear, and will shift to 1 (Low) after vehicle decelerates
to the proper speed.

Forced Downshifts

To gain acceleration in

(Overdrive) or Drive (O/D OFF) when

passing another vehicle, push the accelerator to the floor. The
transmission will downshift to the appropriate gear: third, second or first
gear.

VEHICLE LOADING

Before loading a vehicle, familiarize yourself with the following terms:
• Base Curb Weight: Weight of the vehicle including any standard

equipment, fluids, lubricants, etc. It does not include occupants or
aftermarket equipment.

• Payload: Combined maximum allowable weight of cargo, occupants

and optional equipment. The payload equals the gross vehicle weight
rating minus base curb weight.

• GVW (Gross Vehicle Weight): Base curb weight plus payload

weight. The GVW is not a limit or a specification.

• GVWR (Gross Vehicle Weight Rating): Maximum permissible total

weight of the base vehicle, occupants, optional equipment and cargo.
The GVWR is specific to each vehicle and is listed on the Safety
Certification Label on the driver’s door pillar.

Driving

137

-------------------------------------------------------------------------------------------------------------------------------------------------------------

• GAWR (Gross Axle Weight Rating): Carrying capacity for each axle

system. The GAWR is specific to each vehicle and is listed on the
Safety Certification Label on the driver’s door pillar.

• GCW (Gross Combined Weight): The combined weight of the

towing vehicle (including occupants and cargo) and the loaded trailer.

• GCWR (Gross Combined Weight Rating): Maximum permissible

combined weight of towing vehicle (including occupants and cargo)
and the loaded trailer

• Maximum Trailer Weight Rating: Maximum weight of a trailer the

vehicle is permitted to tow. The maximum trailer weight rating is
determined by subtracting the vehicle curb weight for each
engine/transmission combination, any required option weight for trailer
towing and the weight of the driver from the GCWR for the towing
vehicle.

• Maximum Trailer Weight: Maximum weight of a trailer the loaded

vehicle (including occupants and cargo) is permitted to tow. It is
determined by subtracting the weight of the loaded trailer towing
vehicle from the GCWR for the towing vehicle.

• Trailer Weight Range: Specified weight range that the trailer must

fall within that ranges from zero to the maximum trailer weight rating.

Remember to figure in the tongue load of your loaded trailer when
figuring the total weight.

Do not exceed the GVWR or the GAWR specified on the
certification label.

Do not use replacement tires with lower load carrying capacities than the
originals because they may lower the vehicle’s GVWR and GAWR
limitations. Replacement tires with a higher limit than the originals do
not increase the GVWR and GAWR limitations.

The Safety Certification Label, found on the driver’s door pillar, lists
several important vehicle weight rating limitations. Before adding any
additional equipment, refer to these limitations. If you are adding weight
to the front of your vehicle, (potentially including weight added to the
cab), the weight added should not exceed the front axle reserve capacity
(FARC). Additional frontal weight may be added to the front axle reserve
capacity provided you limit your payload in other ways (i.e. restrict the
number of occupants or amount of cargo carried).

Always ensure that the weight of occupants, cargo and equipment being
carried is within the weight limitations that have been established for

Driving

138

-------------------------------------------------------------------------------------------------------------------------------------------------------------

your vehicle including both gross vehicle weight and front and rear gross
axle weight rating limits. Under no circumstance should these limitations
be exceeded.

Exceeding any vehicle weight rating limitation could result in
serious damage to the vehicle loss of vehicle control, vehicle

rollover, and/or personal injury.

Special loading instructions for owners of pickup trucks and
utility-type vehicles

For important information regarding safe operation of this type
of vehicle, see the Preparing to drive your vehicle section in

this chapter.

Loaded vehicles, with a higher center of gravity, may handle
differently than unloaded vehicles. Extra precautions, such as

slower speeds and increased stopping distance, should be taken when
driving a heavily loaded vehicle.

Your vehicle has the capability to haul more cargo and people than most
passenger cars. Depending upon the type and placement of the load,
hauling cargo and people may raise the center of gravity of the vehicle.

Calculating the load your vehicle can carry/tow

1. Use the appropriate maximum gross combined weight rating (GCWR)
chart (in the Trailer Towing section) to find the maximum GCWR for
your type engine and rear axle ratio.

2. Weigh your vehicle as you customarily operate the vehicle without
cargo. To obtain correct weights, try taking your vehicle to a shipping
company or an inspection station for trucks.

3. Subtract your loaded vehicle weight from the maximum GCWR on the
following charts. This is the maximum trailer weight your vehicle can tow
and must fall below the maximum shown under maximum trailer weight
on the chart.

TRAILER TOWING

Trailer towing puts additional loads on your vehicle’s engine,
transmission, axle, brakes, tires, and suspension. For your safety and to
maximize vehicle performance, be sure to use the proper equipment
while towing.

Driving

139

-------------------------------------------------------------------------------------------------------------------------------------------------------------

Follow these guidelines to ensure safe towing procedure:
• Stay within your vehicle’s load limits. If exceeded, cargo should be

removed from the trailer and/or the vehicle until all weights are within
specified limits.

• Thoroughly prepare your vehicle for towing. Refer to Preparing to

tow in this chapter.

• Use extra caution when driving while trailer towing. Refer to Driving

while you tow in this chapter.

• Service your vehicle more frequently if you tow a trailer. Refer to the

severe duty schedule in the scheduled maintenance guide.

• Do not tow a trailer until your vehicle has been driven at least 800 km

(500 miles).

• Refer to the instructions included with towing accessories for the

proper installation and adjustment specifications.

Your vehicle is pre-wired for trailer towing. An electrical connector is
provided under the instrument panel for installing a customer-supplied
electric brake controller. Another electrical connector is provided at the
hitch. This connector provides power to the trailer for taillamps, stop
and turn lamps, back up lamps, battery charge, electric brakes (when a
customer provided controller is installed) and ground. The kit included
with your vehicle provides you with adaptors to attach the brake
controller and convert the hitch connector for Class I trailer usage.

Engine

Rear axle

ratio

Maximum GCWR -

kg (lbs.)

Trailer weight

range (0 -

maximum) kg

(lbs.)

5.4L 4V-V8

3.73

6577

(14500)

0-4309

(0-9500)

Maximum frontal area of trailer is 5.6 square meters (60 square feet)

Do not exceed the maximum loads listed on the Safety Compliance
Certification label. For load specification terms found on the label, refer
to Vehicle loading in this chapter. Remember to figure in the tongue
load of your loaded trailer when figuring the total weight.

Towing trailers beyond the maximum recommended gross trailer
weight exceeds the limit of the vehicle and could result in

engine damage, transmission damage, structural damage, loss of vehicle
control, vehicle rollover and personal injury.

Driving

140

-------------------------------------------------------------------------------------------------------------------------------------------------------------

Towing trailers beyond the maximum recommended gross trailer
weight exceeds the limit of the vehicle and could result in

engine damage, transmission damage, structural damage, loss of control
and personal injury.

Preparing to tow

Use the proper equipment for towing a trailer and make sure it is
properly attached to your vehicle. See your dealer or a reliable trailer
dealer if you require assistance.

Hitches

Do not use hitches that clamp onto the vehicle’s bumper or attach to the
axle. You must distribute the load in your trailer so that 10%–15% of the
total weight of the trailer is on the tongue.

Load equalizing hitch

When hooking up a trailer using a load equalizing hitch, always use the
following procedure:

1. Park the unloaded vehicle on a level surface. With the ignition in the
ON position, apply the brake and place the gearshift lever in
(Overdrive) for 10 seconds, then return the gearshift lever to P (Park)
and release the brake. With the ignition still in the ON position, and all
doors closed, allow the vehicle to stand (without passengers) for several
minutes so that it can level.

2. Turn the air suspension (if equipped) control to OFF.

3. Measure the height of a reference point on the front and rear bumpers
at the center of the vehicle.

4. Attach the trailer to the vehicle and adjust the hitch equalizers so that
the front bumper height is within 0–13 mm (0.5 in) of the reference
point. After proper adjustment, the rear bumper should be no higher
than in Step 3.

5. Turn the air suspension (if equipped) control to ON.

Note: Adjusting an equalizing hitch so the rear bumper of the vehicle is
higher than it was unloaded will defeat the function of the load
equalizing hitch and may cause unpredictable handling.

Safety chains

Always connect the trailer’s safety chains to the frame or hook retainers
of the vehicle hitch. To connect the trailer’s safety chains, cross the
chains under the trailer tongue and allow slack for turning corners.

Driving

141

-------------------------------------------------------------------------------------------------------------------------------------------------------------

If you use a rental trailer, follow the instructions that the rental agency
gives to you.

Do not attach safety chains to the bumper.

Trailer brakes

Electric brakes and manual, automatic or surge-type trailer brakes are
safe if installed properly and adjusted to the manufacturer’s
specifications. The trailer brakes must meet local and Federal
regulations.

Do not connect a trailer’s hydraulic brake system directly to your
vehicle’s brake system. Your vehicle may not have enough

braking power and your chances of having a collision greatly increase.

The braking system of the tow vehicle is rated for operation at the
GVWR not GCWR.

Trailer lamps

Trailer lamps are required on most towed vehicles. Make sure your
trailer lamps conform to local and Federal regulations. See your dealer or
trailer rental agency for proper instructions and equipment for hooking
up trailer lamps.

Driving while you tow

When towing a trailer:
• Turn off the speed control. The speed control may shut off

automatically when you are towing on long, steep grades.

• Consult your local motor vehicle speed regulations for towing a trailer.
• To eliminate excessive shifting, use a lower gear. This will also assist

in transmission cooling. (For additional information, refer to the
Driving with a 4–speed automatic transmission section in this
chapter.

• Anticipate stops and brake gradually.
• Do not exceed the GCWR rating or transmission damage may occur.
Servicing after towing

If you tow a trailer for long distances, your vehicle will require more
frequent service intervals. Refer to your scheduled maintenance guide for
more information.

Driving

142

-------------------------------------------------------------------------------------------------------------------------------------------------------------

Trailer towing tips
• Practice turning, stopping and backing up before starting on a trip to

get the feel of the vehicle trailer combination. When turning, make
wider turns so the trailer wheels will clear curbs and other obstacles.

• Allow more distance for stopping with a trailer attached.
• If you are driving down a long or steep hill, shift to a lower gear. Do

not apply the brakes continuously, as they may overheat and become
less effective.

• The trailer tongue weight should be 10–15% of the loaded trailer

weight.

• After you have traveled 80 km (50 miles), thoroughly check your

hitch, electrical connections and trailer wheel lug nuts.

• To aid in engine/transmission cooling and A/C efficiency during hot

weather while stopped in traffic, place the gearshift lever in P (Park).

• Vehicles with trailers should not be parked on a grade. If you must

park on a grade, place wheel chocks under the trailer’s wheels.

Launching or retrieving a boat

When backing down a ramp during boat launching or retrieval,
• You may need to disengage the traction control system if excessive

wheel spin is required to move up the boat ramp.

• Do not allow the static water level to rise above the bottom edge of

the rear bumper.

• Do not allow waves to break higher than 15 cm (6 inches) above the

bottom edge of the rear bumper.

Exceeding these limits may allow water to enter critical vehicle
components, adversely affecting driveability, emissions, reliability and
causing internal transmission damage.

Replace the rear axle lubricant any time the axle has been submerged in
water. Rear axle lubricant quantities are not to be checked or changed
unless a leak is suspected or repair required.

Disconnect the wiring to the trailer before backing the trailer into the
water. Reconnect the wiring to the trailer after the trailer is removed
from the water.

Recreational towing (all wheels on the ground)

Follow these guidelines for your specific powertrain combination to tow
your vehicle with all four wheels on the ground (such as behind a
recreational vehicle).

Driving

143

-------------------------------------------------------------------------------------------------------------------------------------------------------------

These guidelines are designed to ensure that your transmission is not
damaged due to insufficient lubrication.

All Rear Wheel Drive (RWD) vehicles:

This applies to all cars and 4x2 trucks/sport utilities with rear wheel
drive capability.
• Place the transmission in N (Neutral)
• Maximum speed is 56 km/h (35 mph)
• Maximum distance is 80 km (50 miles)
If a distance of 80 km (50 miles) or a speed of 56 km/h (35 mph) must
be exceeded, you must disconnect the driveshaft. Ford recommends the
driveshaft be removed/installed only by a qualified technician. See your
local dealer for driveshaft removal/installation.

Improper removal/installation of the driveshaft can cause
transmission fluid loss, damage to the driveshaft and internal
transmission components.

DRIVING THROUGH WATER

Do not drive quickly through standing water, especially if the depth is
unknown. Traction or brake capability may be limited and if the ignition
system gets wet, your engine may stall. Water may also enter your
engine’s air intake and severely damage your engine.

If driving through deep or standing water is unavoidable, proceed very
slowly. Never drive through water that is higher than the bottom of the
hubs (for trucks) or the bottom of the wheel rims (for cars).

Once through the water, always try the brakes. Wet brakes do not stop
the vehicle as effectively as dry brakes. Drying can be improved by
moving your vehicle slowly while applying light pressure on the brake
pedal.

Driving through deep water where the transmission vent tube is
submerged may allow water into the transmission and cause
internal transmission damage. Have the fluid checked and, if
water is found, replace the fluid.

Driving through deep water where the axle vent tube is
submerged may allow water into the rear axle and cause internal
axle damage.

Driving

144

-------------------------------------------------------------------------------------------------------------------------------------------------------------

Getting roadside assistance

To fully assist you should you have a vehicle concern, Ford Motor
Company offers a complimentary roadside assistance program. This
program is separate from the New Vehicle Limited Warranty. The service
is available:
• 24–hours, seven days a week
• for the New Vehicle Limited Warranty period of three years or

60,000 km (36,000 miles), whichever occurs first on Ford and Mercury
vehicles, and four years or 80,000 km (50,000 miles) on Lincoln
vehicles.

Roadside assistance will cover:
• changing a flat tire
• jump-starts
• lock-out assistance
• limited fuel delivery
• towing of your disabled vehicle to the nearest Ford Motor Company

dealership, or your selling dealer if within 56.3 km (35 miles) of the
nearest Ford Motor Company dealership (one tow per disablement).
Even non-warranty related tows, like accidents or getting stuck in the
mud or snow, are covered (some exclusions apply, such as impound
towing or repossession).

Canadian customers refer to your Owner Information Guide for
information on:
• coverage period
• exact fuel amounts
• towing of your disabled vehicle
• emergency travel expense reimbursement
• travel planning benefits

Using roadside assistance

Complete the roadside assistance identification card and place it in your
wallet for quick reference. In the United States, this card is found in the
Owner Guide portfolio in the glove compartment in Ford vehicles and is
mailed to you if you own a Mercury or Lincoln. In Canada, the card is
found in the Owner Information Guide in the glove compartment.

U.S. Ford or Mercury vehicle customers who require roadside assistance,
call 1–800–241–3673; Lincoln vehicle customers call 1–800–521–4140.

Roadside emergencies

145

-------------------------------------------------------------------------------------------------------------------------------------------------------------

Canadian customers who require roadside assistance, call
1–800–665–2006.

If you need to arrange roadside assistance for yourself, Ford Motor
Company will reimburse a reasonable amount. To obtain reimbursement
information, U.S. Ford or Mercury vehicles customers call
1-800-241-3673; Lincoln vehicle customers call 1–800–521–4140.

Canadian customers who need to obtain reimbursement information, call
1–800–665–2006.

Roadside coverage beyond basic warranty

In the United States, you may purchase additional roadside assistance
coverage beyond this period through the Ford Auto Club by contacting
your Ford or Lincoln Mercury dealer.

Similarly in Canada, for uninterrupted Roadside Assistance coverage, you
may purchase extended coverage prior to your Basic Warranty’s Roadside
Assistance expiring. For more information and enrollment, contact
1–877–294–2582 or visit our website at www.ford.ca.

HAZARD FLASHER

Use only in an emergency to warn traffic of vehicle breakdown,
approaching danger, etc. The hazard flashers can be operated when the
ignition is off.
• The hazard lights control is

located on top of the steering
column.

• Depress hazard lights control to

activate all hazard flashers
simultaneously.

• Depress control again to turn the

flashers off.

FUEL PUMP SHUT-OFF SWITCH

FUEL

RESET

The fuel pump shut-off switch is a device intended to stop the electric
fuel pump when your vehicle has been involved in a substantial jolt.

After a collision, if the engine cranks but does not start, the fuel pump
shut-off switch may have been activated.

Roadside emergencies

146

-------------------------------------------------------------------------------------------------------------------------------------------------------------


Content      ..     7      8      9      10     ..