Dodge Caliber. Manual - part 493


  Index      Dodge     Dodge Caliber - service repair manual 2007 year


Search            


Content   ..  491  492  493  494   ..


Dodge Caliber. Manual - part 493


quickly deflates by venting the inert gas towards the instrument panel through vent holes within the fabric used to
construct the back (steering wheel side) panel of the airbag cushion.

Some of the chemicals used to create the inert gas may be considered hazardous while in their solid state before
they are burned, but they are securely sealed within the airbag inflator. Typically, both initiators are used and all
potentially hazardous chemicals are burned during an airbag deployment event.

The inert gas that is produced when the chemicals are burned is harmless. However, a small amount of residue
from the burned chemicals may cause some temporary discomfort if it contacts the skin, eyes, or breathing pas-
sages. If skin or eye irritation is noted, rinse the affected area with plenty of cool, clean water. If breathing passages
are irritated, move to another area where there is plenty of clean, fresh air to breath. If the irritation is not alleviated
by these actions, contact a physician.

REMOVAL

1. Open hood.

2. Disconnect and isolate the battery negative cable.

WARNING: Wait two minutes for the system
reserve capacitor to discharge before servicing
any airbag components.

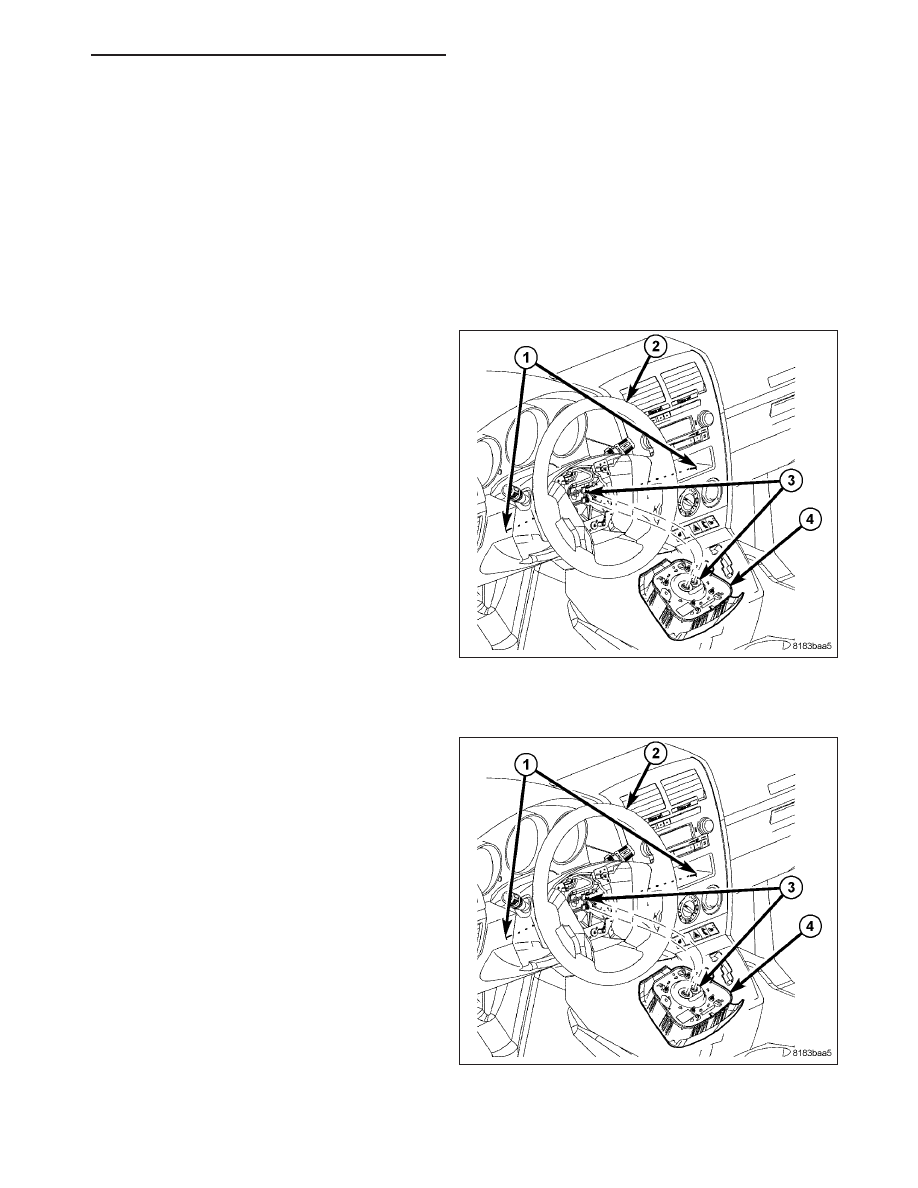
3. From behind the steering wheel (2), gently pry off

the driver airbag bolt covers.

4. Remove the two driver airbag attaching bolts (1).

5. Pull airbag rearward and disconnect the two airbag

squib connectors (3).

6. Remove airbag (4) from vehicle.

WARNING: When replacing a deployed driver air-
bag, the clockspring must also be replaced (Refer
to 8 - ELECTRICAL/RESTRAINTS/CLOCKSPRING -
REMOVAL).

INSTALLATION

1. Connect the squib wires (3) to the driver airbag (4).

Make airbag connection by pressing straight in on
the connector. The connector should be fully
seated. Feel for positive snap to assure positive
connection.

2. Position the driver airbag (4) in the steering wheel

(2) and push forward.

NOTE: Make sure not to pinch any wires under-
neath the driver airbag.

3. Install the two airbag retaining bolts (1). Tighten

bolts to 10 N·m (89 in. lbs.).

4. Install the airbag bolt access covers.

WARNING: Do not connect the battery negative
cable (REFER TO 8 - ELECTRICAL/RESTRAINTS -
DIAGNOSIS AND TESTING - AIRBAG SYSTEM).
Personal injury or death may result if the system
test is not performed first.

PM

RESTRAINTS - SERVICE INFORMATION

8O - 369

DRIVER AIRBAG COVER

REMOVAL

1. Open hood.

2. Disconnect and isolate the battery negative cable.

WARNING: Wait two minutes for the system
reserve capacitor to discharge before servicing
any airbag components.

3. Remove the driver airbag (Refer to 8 - ELECTRI-

CAL/RESTRAINTS/DRIVER AIRBAG - REMOVAL).

4. With driver airbag removed, pick a corner and push

down on the inflator or latch hook mounting plate
(1) until the latch hooks (2) push out of the driver
airbag cover (3).

5. Starting at a point on the airbag, work your way

around the airbag until all the hooks have been
released.

6. Remove driver airbag trim cover from driver airbag.

8O - 370

RESTRAINTS - SERVICE INFORMATION

PM

INSTALLATION

1. Place driver airbag into new driver airbag cover.

WARNING: Be careful not to pinch airbag cushion
between latch hook mounting plate and cover.

2. Push down on the latch hook mounting plate (1)

and guide the latch hooks (2) into the slots on the
driver airbag cover (3).

3. Once all the latch hooks have been started, pull

the driver airbag cover away from the driver airbag
to fully seat the latch hooks.

4. Install the driver airbag (Refer to 8 - ELECTRICAL/

RESTRAINTS/DRIVER AIRBAG - INSTALLATION).

WARNING: Do not connect the battery negative
cable (REFER TO 8 - ELECTRICAL/RESTRAINTS -
DIAGNOSIS AND TESTING - AIRBAG SYSTEM).
Personal injury or death may result if the system
test is not performed first.

PM

RESTRAINTS - SERVICE INFORMATION

8O - 371

FRONT SEAT BELT AND RETRACTOR

REMOVAL

WARNING: Due to the integral tensioners, the front
seat belt retractor assemblies must be replaced
following a collision where the airbags were
deployed.

1. Disconnect and isolate the battery negative cable.

WARNING: Wait two minutes for the system
reserve capacitor to discharge before servicing
any airbag components.

2. Using a trim stick or equivalent, gently pry off the

trim cover (1) to the retractor lower anchor bolt (2).

3. Remove the lower anchor bolt (2).

4. Using a trim stick or equivalent, gently pry off the

plastic turning loop cover (2) from the height
adjuster (1).

8O - 372

RESTRAINTS - SERVICE INFORMATION

PM


Content   ..  491  492  493  494   ..