Dodge Caliber. Manual - part 1422


  Index      Dodge     Dodge Caliber - service repair manual 2007 year


Search            


Content   ..  1420  1421  1422  1423   ..


Dodge Caliber. Manual - part 1422


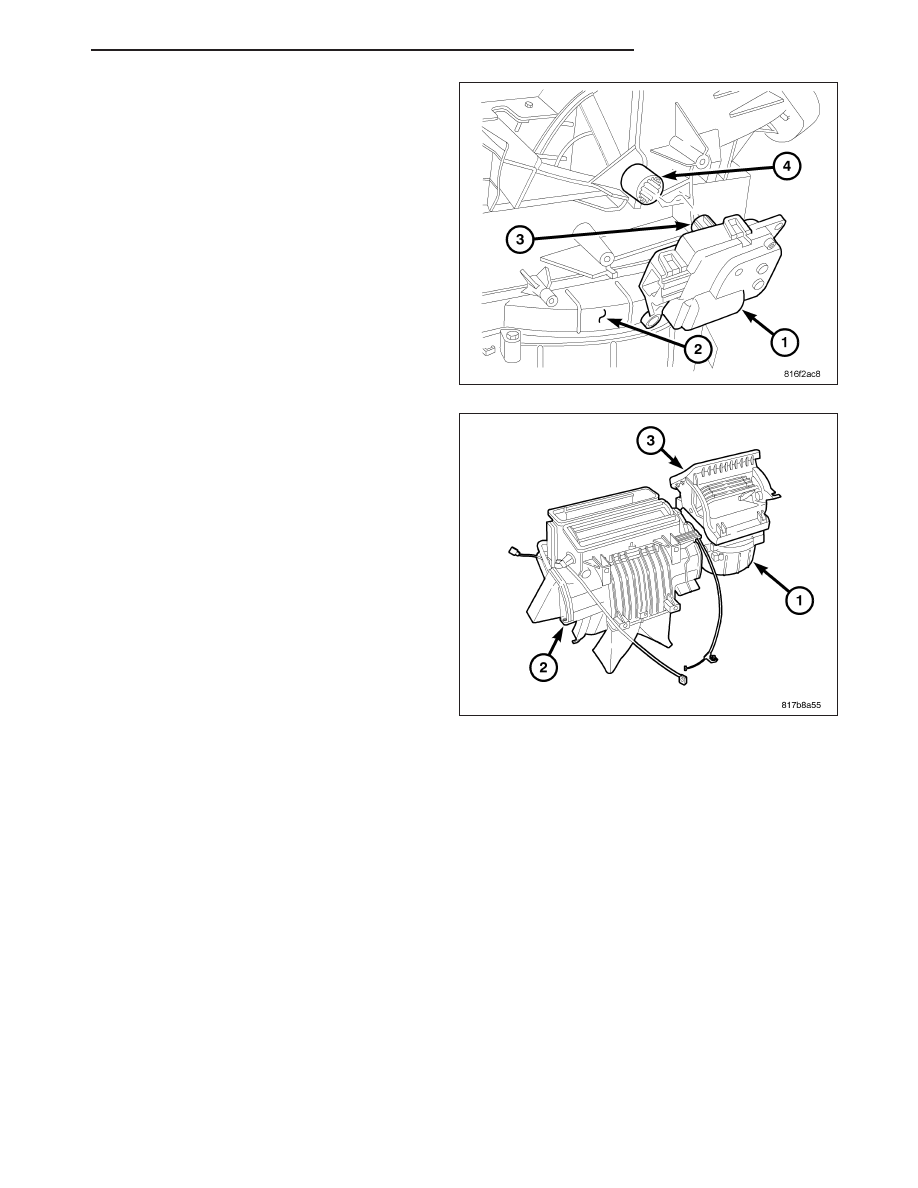
3. Install the recirculation door actuator (1) onto the

right side of the air inlet housing (2). If necessary,
rotate the actuator slightly to align the splines of
the actuator output shaft (3) with those on the recir-
culation door pivot shaft adapter (4).

4. Install the air inlet housing (3) onto the HVAC hous-

ing (1) (refer to 24 - HEATING & AIR CONDITION-
ING/DISTRIBUTION/HOUSING-HVAC - HOUSING-
AIR INLET - INSTALLATION).

5. Install the HVAC housing assembly (refer to 24 -

HEATING & AIR CONDITIONING/DISTRIBUTION/
HOUSING-HVAC - HOUSING-HVAC ASSEMBLY -
INSTALLATION).

INSTALLATION

HOUSING-HVAC

NOTE: LHD model shown in illustrations. RHD model similar.

PM

DISTRIBUTION

24 - 105

1. Position the HVAC housing assembly (2) to the

dash panel (3). Be certain that the passenger side
of the HVAC housing is correctly located over the
dash panel mounting stud.

2. Install the nut (1) that secures the HVAC housing to

the passenger compartment side of dash panel.
Tighten the nut to 4.5 N·m (40 in. lbs.).

3. Install the condensation drain tube (refer to 24 -

HEATING

&

AIR

CONDITIONING/PLUMBING/

TUBE-CONDENSATION DRAIN - INSTALLATION).

4. Install the rear floor ducts (refer to 24 - HEATING &

AIR

CONDITIONING/DISTRIBUTION/DUCTS-

FLOOR DISTRIBUTION - INSTALLATION).

5. Install the instrument panel (refer to 23 - BODY/IN-

STRUMENT

PANEL/ASSEMBLY-INSTRUMENT

PANEL - INSTALLATION).

6. Remove the previously installed plugs or caps and

connect the heater hoses (4) to the heater core
tubes.

7. Remove the tape or plugs from the refrigerant line

fittings and the evaporator ports.

8. Lubricate the rubber O-rings on new dual-plan

seals with clean refrigerant oil and install the seals
onto the liquid and suction line fittings. Use only
the specified seals as they are made of special
materials compatible to the R-134a system. Use
only refrigerant oil of the type recommended for the
A/C compressor in the vehicle.

9. Connect the A/C liquid and suction line assembly

(2) to the A/C evaporator (3).

10. Install the bolt (1) that secures the A/C liquid and

suction line assembly to the A/C evaporator.
Tighten the bolt to 12 N·m (105 in. lbs.).

11. Position the heat shield (3) onto the studs (2)

located on the dash panel in the engine compart-
ment.

12. Install the three nuts (1) that secure the heat

shield to the dash panel. Tighten the nuts to 1
N·m (10 in. lbs.).

13. Reconnect the negative battery cable.

14. If the heater core is being replaced, flush the

cooling system (refer to 7 - COOLING - STAN-
DARD

PROCEDURE

-

COOLING

SYSTEM

CLEANING/REVERSE FLUSHING).

15. Refill the engine cooling system (refer to 7 -

COOLING/ENGINE - STANDARD PROCEDURE -
COOLING SYSTEM FILL).

16. Evacuate the refrigerant system (refer to 24 -

HEATING & AIR CONDITIONING - STANDARD
PROCEDURE - REFRIGERANT SYSTEM EVAC-
UATE).

17. Charge the refrigerant system (refer to 24 - HEAT-

ING & AIR CONDITIONING - STANDARD PROCEDURE - REFRIGERANT SYSTEM CHARGE).

24 - 106

DISTRIBUTION

PM

HOUSING-AIR DISTRIBUTION

NOTE: LHD model with A/C shown in illustrations. RHD and heater-only models similar.

NOTE: Illustration shown with heater core and
tubes removed from view for clarity.

1. Position the air distribution housing (2) onto the

rear of the HVAC housing (4).

2. Install the two metal retaining clips (3) that secure

the bottom of the air distribution housing to the
HVAC housing.

3. Install the seven screws (1) that secure the air dis-

tribution housing to the HVAC housing. Tighten the
screws to 1.2 N·m (10 in. lbs.).

4. Carefully install the heater core (6) into the left side

of the air distribution housing (5).

5. On RHD models, install the air distribution housing

onto the HVAC housing (9) (refer to 24 - HEATING
& AIR CONDITIONING/DISTRIBUTION/HOUSING-
HVAC - HOUSING-AIR DISTRIBUTION - INSTAL-
LATION).

6. Install the retaining bracket (4) and screw (3) that

secure the heater core tubes (8). Tighten the screw
to 1.2 N·m (10 in. lbs.)

7. Install the flange (2) that secures the heater core

tubes to the front of the HVAC housing.

8. Install the screw (10) that secures the flange to the

HVAC housing. Tighten the screw to 1.2 N·m (10
in. lbs.).

NOTE: If the foam seal for the flange is deformed
or damaged, it must be replaced.

9. Install the foam seal (1) onto the flange.

10. Install all of the floor distribution ducts onto the air distribution housing (refer to 24 - HEATING & AIR CONDI-

TIONING/DISTRIBUTION/DUCTS-FLOOR DISTRIBUTION - INSTALLATION).

NOTE: If the heater core is being replaced, flush the cooling system (refer to 7 - COOLING - STANDARD
PROCEDURE - COOLING SYSTEM CLEANING/REVERSE FLUSHING).

11. Install the HVAC housing assembly (refer to 24 - HEATING & AIR CONDITIONING/DISTRIBUTION/HOUSING-

HVAC - HOUSING-HVAC ASSEMBLY - INSTALLATION).

HOUSING-AIR INLET

NOTE: LHD model with A/C shown. RHD and heater-only models similar.

PM

DISTRIBUTION

24 - 107

1. Install the air inlet housing (2) onto the top of the

HVAC housing (3) and engage the two plastic
retaining tabs (4). Make sure the retaining tabs are
fully engaged.

2. Install the four screws (1) that secure the air inlet

housing to the HVAC housing. Tighten the screws
to 1.2 N·m (10 in. lbs.).

3. If equipped, install the particulate air filter (refer to

24 - HEATING & AIR CONDITIONING/DISTRIBU-
TION/FILTER-PARTICULATE

AIR

-

INSTALLA-

TION).

4. Install the HVAC housing assembly (refer to 24 -

HEATING & AIR CONDITIONING/DISTRIBUTION/
HOUSING-HVAC - HOUSING-HVAC ASSEMBLY -
INSTALLATION).

SCREEN-AIR INLET

NOTE: LHD model shown. RHD model similar.

1. Position the HVAC housing air inlet screen (2) to

the cowl panel (3) and fully engage the three
push-in retainers (1) that secure the screen to the
panel.

2. Install the cowl grille screen (refer to 23 - BODY/

EXTERIOR/SCREEN-COWL

GRILLE

-

INSTALLATION).

24 - 108

DISTRIBUTION

PM


Content   ..  1420  1421  1422  1423   ..