Dodge Caliber. Manual - part 1363


  Index      Dodge     Dodge Caliber - service repair manual 2007 year


Search            


Content   ..  1361  1362  1363  1364   ..


Dodge Caliber. Manual - part 1363


WARNING: Do not use solvent based glass clean-
ers to clean the windshield before applying glass
prep and primer or poor glass adhesion may
result.

9. Clean the inside of the windshield with an ammonia

based glass cleaner and a lint-free cloth.

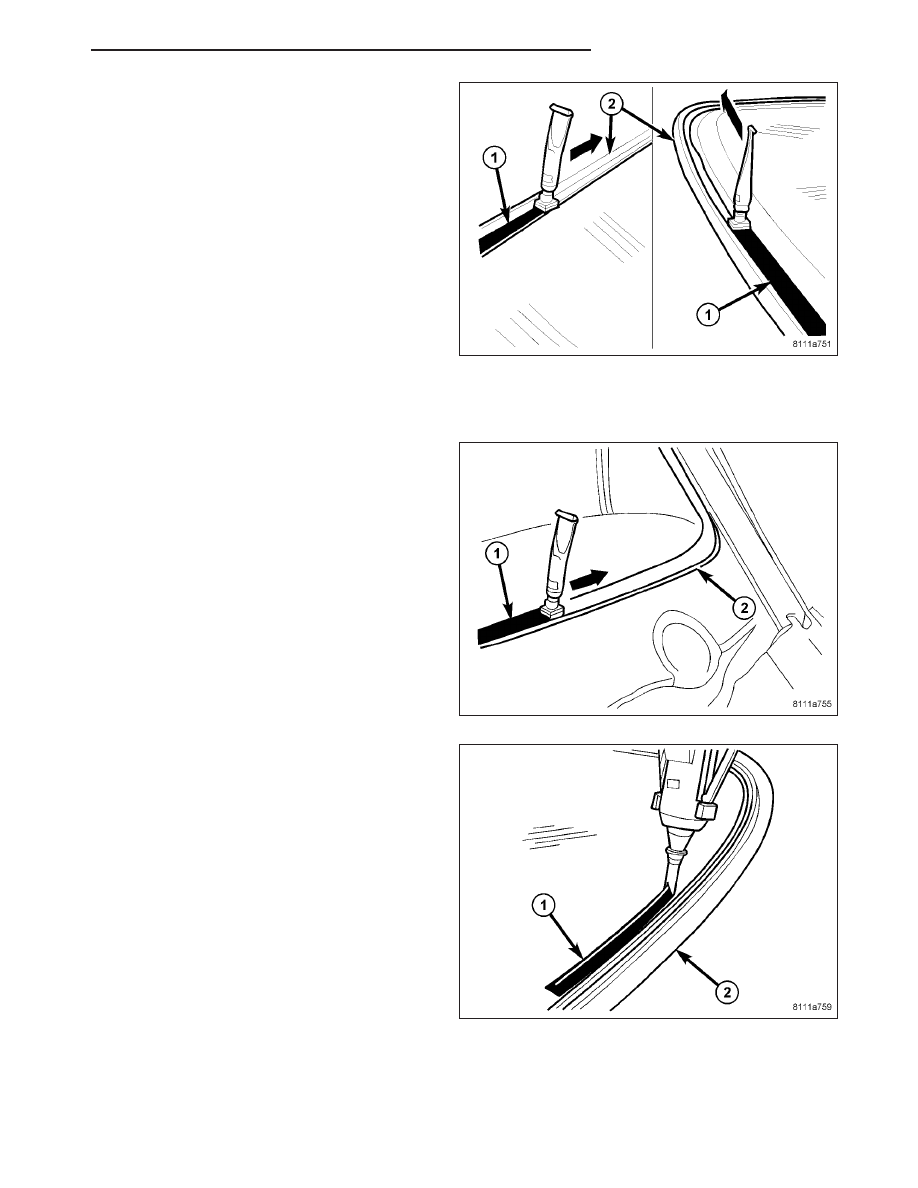
10. Apply glass prep adhesion promoter 25 mm (1 in.)

wide (1) around the perimeter of the windshield
(2) and 5 mm (0.2 in.) from the edge of the glass
and wipe dry with a clean lint-free cloth until no
streaks are visible.

11. Apply glass primer 25 mm (1 in.) wide (1) around

the perimeter of the windshield (2) and 5 mm (0.2
in.) from the edge of the glass. Allow at least three
minutes drying time.

12. Using a flashlight, verify that the primer is completely and evenly installed along the perimeter of the windshield.

13. Re-prime any area that is not fully and evenly primed.

14. Clean the windshield fence with an ammonia

based glass cleaner and a lint-free cloth.

15. Apply pinch weld primer 15 mm (0.75 in.) wide (1)

around the windshield fence (2). Allow at least
three minutes drying time.

16. Using a flashlight, verify that the primer is com-

pletely and evenly installed along the windshield
fence.

17. Re-prime any area that is not fully and evenly

primed.

CAUTION: Always apply the bead of adhesive to
the

windshield. Always

install

the

windshield

within 5 minutes after applying the adhesive.

NOTE: If the original urethane adhesive has been
exposed for more than 12 hours, the entire adhe-
sive area will need to be re-primed prior to install-
ing new adhesive.

18. Apply approximately a 10 mm (0.4 in.) wide bead

of adhesive (1) with a triangular nozzle approxi-
mately 6 mm (0.230 in.) from the edge of the
glass (2) starting at the bottom center of the
windshield.

PM

STATIONARY GLASS

23 - 189

19. Run the end of the adhesive bead (1) on the

windshield (2) parallel to the start of the bead and
smooth the ends flush.

20. Using an assistant, position the windshield (1)

over the windshield opening.

21. Using the grease pencil marks or tape as refer-

ence points, align the windshield to the windshield
opening.

22. Carefully lower the windshield into the windshield

opening. Guide the windshield and the rubber
seal (2) at the top the windshield into its proper
location.

CAUTION: It is not possible to move the wind-
shield after installation. The windshield should
never be pressed into place by more than one per-
son, because the windshield can break if pressed
simultaneously on both sides.

23. Push the windshield inward until the windshield

comes into contact with the spacers located on
each side and the bottom of the windshield fence.

24. Install the cowl grill (Refer to 23 - BODY/EXTERI-

OR/COWL GRILLE - REMOVAL).

25. Install the rear view mirror onto the windshield (Refer to 23 - BODY/INTERIOR/REAR VIEW MIRROR -

INSTALLATION).

26. Install the rain sensor module onto the windshield (Refer to 8 - ELECTRICAL/WIPERS/WASHERS/RAIN SEN-

SOR MODULE - INSTALLATION).

23 - 190

STATIONARY GLASS

PM

SUNROOF

TABLE OF CONTENTS

page

page

SUNROOF

DESCRIPTION . . . . . . . . . . . . . . . . . . . . . . . . . . . . . . . 192
DIAGNOSIS AND TESTING

WATER DRAINAGE AND WIND NOISE

DIAGNOSIS . . . . . . . . . . . . . . . . . . . . . . . . . . . . . . 194

DIAGNOSTIC PROCEDURES . . . . . . . . . . . . . . . 194

CONTROL SWITCH

DESCRIPTION . . . . . . . . . . . . . . . . . . . . . . . . . . . . . . . 196
OPERATION . . . . . . . . . . . . . . . . . . . . . . . . . . . . . . . . . 196
DIAGNOSIS AND TESTING

CONTROL SWITCH . . . . . . . . . . . . . . . . . . . . . . . . 196

REMOVAL . . . . . . . . . . . . . . . . . . . . . . . . . . . . . . . . . . . 196
INSTALLATION . . . . . . . . . . . . . . . . . . . . . . . . . . . . . . 196

DEFLECTOR-WIND

REMOVAL . . . . . . . . . . . . . . . . . . . . . . . . . . . . . . . . . . . 197
INSTALLATION . . . . . . . . . . . . . . . . . . . . . . . . . . . . . . 197

GLASS

REMOVAL . . . . . . . . . . . . . . . . . . . . . . . . . . . . . . . . . . . 199
INSTALLATION . . . . . . . . . . . . . . . . . . . . . . . . . . . . . . 199
ADJUSTMENTS

SUNROOF GLASS PANEL ADJUSTMENT . . . . 200

HOSE-DRAIN

REMOVAL . . . . . . . . . . . . . . . . . . . . . . . . . . . . . . . . . . . 202
INSTALLATION . . . . . . . . . . . . . . . . . . . . . . . . . . . . . . 203

MODULE/FRAME ASSEMBLY

REMOVAL . . . . . . . . . . . . . . . . . . . . . . . . . . . . . . . . . . . 205
INSTALLATION . . . . . . . . . . . . . . . . . . . . . . . . . . . . . . 206

MOTOR-SUNROOF - W/CONTROL UNIT

STANDARD PROCEDURE

DRIVE MOTOR TEACH PROCEDURE . . . . . . . 209

REMOVAL . . . . . . . . . . . . . . . . . . . . . . . . . . . . . . . . . . . 209
INSTALLATION . . . . . . . . . . . . . . . . . . . . . . . . . . . . . . 210

SEAL-SUNROOF GLASS

REMOVAL . . . . . . . . . . . . . . . . . . . . . . . . . . . . . . . . . . . 211
INSTALLATION . . . . . . . . . . . . . . . . . . . . . . . . . . . . . . 211

SUNSHADE

REMOVAL . . . . . . . . . . . . . . . . . . . . . . . . . . . . . . . . . . . 212
INSTALLATION . . . . . . . . . . . . . . . . . . . . . . . . . . . . . . 213

TROUGH

REMOVAL . . . . . . . . . . . . . . . . . . . . . . . . . . . . . . . . . . . 214
INSTALLATION . . . . . . . . . . . . . . . . . . . . . . . . . . . . . . 215

PM

SUNROOF

23 - 191

SUNROOF

DESCRIPTION

WARNING: Keep fingers and other body parts out of sunroof opening at all times.

EXPLODED VIEW

1 - DRAIN TROUGH
2 - GLASS ASSEMBLY
3 - SUN SHADE
4 - WIND DEFLECTOR
5 - MOTOR
6 - MOTOR SCREWS (3) 3 N·m (26 in. lbs.)
7 - GLASS ASSEMBLY SCREWS (4) 3.5 N·m (31 in. lbs.)
8 - FRAME ASSEMBLY
9 - BRACKETS
10 - END CAPS

23 - 192

SUNROOF

PM


Content   ..  1361  1362  1363  1364   ..