Dodge Caliber. Manual - part 1076


  Index      Dodge     Dodge Caliber - service repair manual 2007 year


Search            


Content   ..  1074  1075  1076  1077   ..


Dodge Caliber. Manual - part 1076


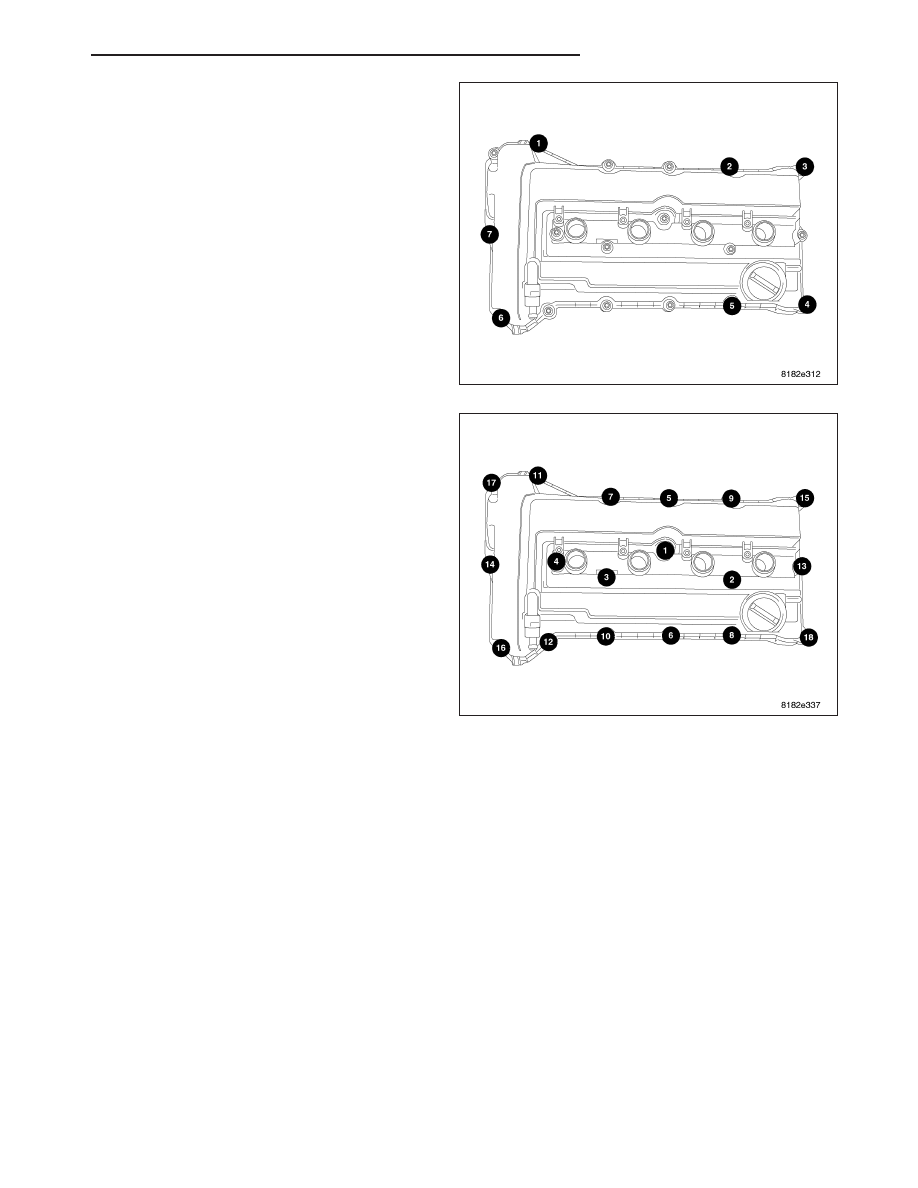
2. Install studs in cover as shown.

3. Clean all RTV from cylinder head.

4. Apply RTV to cylinder head/front cover joint.

5.

Install cylinder head cover assembly to cylinder

head and install all bolts, ensuring the studs are
located as shown.

6. Tighten bolts in sequence shown in Using a 2 step

torque method as follows:

a. Tighten all bolts to 4.5 N·m (40 in. lbs.)

b. Tighten all bolts to 10 N·m (90 in. lbs.).

7. Install ignition coils. Tighten fasteners to 8 N·m (70

in. lbs.).

8. If the PCV valve was removed, tighten PCV valve

to 4.5 N·m (40 in. lbs.).

9. Connect PCV and make-up air hoses to cylinder

head cover.

10. Install engine cover.

PM

ENGINE 2.0L WORLD

9 - 1591

TAPPETS-VALVE

DIAGNOSIS AND TESTING

MECHANICAL VALVE TAPPET NOISE DIAGNOSIS

A tappet-like noise may be produced from several items. Check the following items.

STANDARD PROCEDURE - MEASURING VALVE LASH

1. Remove engine cover.

2. Remove cylinder head cover (Refer to 9 - ENGINE/CYLINDER HEAD/CYLINDER HEAD COVER(S) -

REMOVAL).

3. Rotate camshaft so lobes are vertical.

4. Check clearance using feeler gauges.

5. Repeat for all tappets.

6. If clearance was too small Clearance too Small .

7. If clearance was too large Clearance too Large .

9 - 1592

ENGINE 2.0L WORLD

PM

Clearance too Small

1. Remove camshafts (Refer to 9 - ENGINE/CYLINDER HEAD/CAMSHAFT(S) - REMOVAL).

2. spec – measured = delta

3. Decrease bucket thickness by delta.

4. Install camshafts (Refer to 9 - ENGINE/CYLINDER HEAD/CAMSHAFT(S) - INSTALLATION).

5. Verify that valve lash is correct.

PM

ENGINE 2.0L WORLD

9 - 1593

Clearance too Large

1. Remove camshafts (Refer to 9 - ENGINE/CYLINDER HEAD/CAMSHAFT(S) - REMOVAL).

2. Measured – spec = delta

3. Increase bucket thickness by delta.

4. Install camshafts (Refer to 9 - ENGINE/CYLINDER HEAD/CAMSHAFT(S) - INSTALLATION).

5. Verify that valve lash is correct.

REMOVAL

NOTE: This procedure is for in-vehicle service with camshafts installed.

NOTE: Camshaft buckets must be replaced if cylinder head or camshafts are replaced.

1. Remove cylinder head cover (Refer to 9 - ENGINE/CYLINDER HEAD/CYLINDER HEAD COVER(S) -

REMOVAL).

2. Remove camshafts (Refer to 9 - ENGINE/CYLINDER HEAD/CAMSHAFT(S) - REMOVAL).

3. Remove camshaft buckets.

4. Repeat removal procedure for each camshaft bucket.

5. If reusing, mark each camshaft bucket for reassembly in original position.

INSTALLATION

NOTE: If reinstalling original buckets they must go back in their original location or engine damage could
result.

1. Apply a light coat of clean engine oil to camshafts buckets prior to assembly.

2. Install camshaft bucket into cylinder head.

3. Repeat installation procedure for each camshaft bucket.

NOTE: If installing new buckets, the valve lash procedure must be performed.

9 - 1594

ENGINE 2.0L WORLD

PM


Content   ..  1074  1075  1076  1077   ..