Dodge Caliber. Manual - part 1057


  Index      Dodge     Dodge Caliber - service repair manual 2007 year


Search            


Content   ..  1055  1056  1057  1058   ..


Dodge Caliber. Manual - part 1057
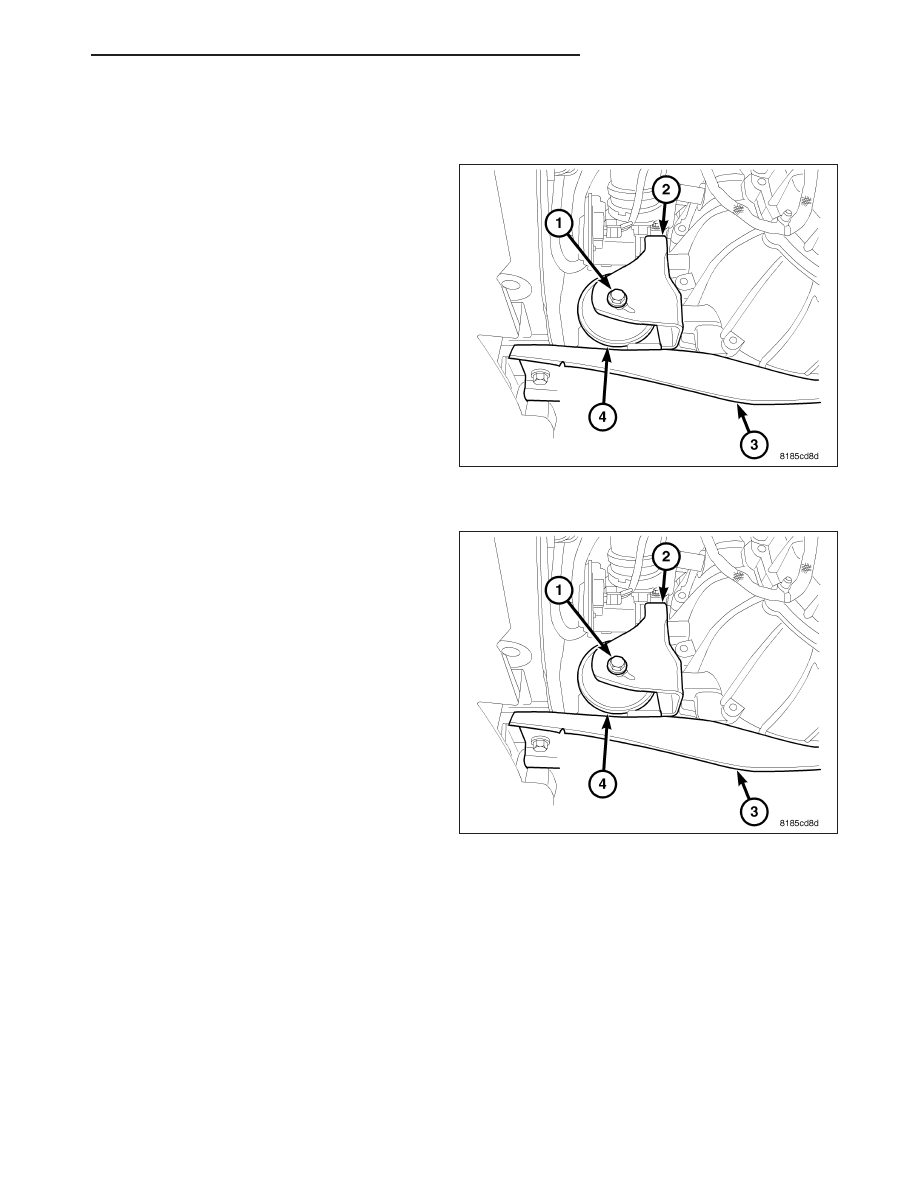


MOUNT-FRONT

REMOVAL

1. Raise vehicle.

2. Remove fore aft member (3) to mount (4) bolts.

3. Remove mount through bolt (1).

4. Remove fore aft member (3) mounting bolts and

remove.

5. Remove front mount (4).

INSTALLATION

1. Install mount (4) and tighten bolts.

2. Install fore aft member (3) and tighten bolts.

3. Install mount through bolt (1) and tighten.

4. Lower vehicle.

PM

ENGINE 1.8L WORLD

9 - 1515

MOUNT-REAR

REMOVAL

1. Remove rear mount retaining bolts (4).

2. Remove rear mount through bolt (1).

3. Remove oxygen sensor connector (2) from mount.

4. Remove rear mount (3).

INSTALLATION

1. Install rear mount (3).

2. Install rear mount retaining bolts (4) and tighten.

3. Install rear mount through bolt (1) and tighten.

4. Install oxygen sensor connector (2) retainer to

mount (3).

9 - 1516

ENGINE 1.8L WORLD

PM

LUBRICATION

DESCRIPTION

The lubrication system is a full-flow filtration, pressure feed type. The oil pump is chain driven by the crankshaft. Oil
pressure is controlled by a relief valve mounted inside the oil pump housing.

OPERATION

Engine oil is drawn up through the pickup tube and is pressurized by the oil pump and routed through the oil filter
to the main oil gallery running the length of the cylinder block. A diagonal hole in each bulkhead feeds oil to each
main bearing. Drilled passages within the crankshaft route oil from the main bearing journals to the connecting rod
journals. The main oil gallery also feeds oil pressure to the timing chain tensioner. A vertical hole at the number
three main bearing area routes pressurized oil through a restrictor up into the cylinder head. The restrictor that is
integral to the cylinder head gasket, provides increased oil flow to the main gallery. Upper engine lubrication is
provided by one main feed to the number three camshaft bearing cap. Oil is then routed through the rocker shafts
to the remaining camshaft bearing caps and rocker arms/hydraulic lash adjusters. Oil returning to the oil pan from
the pressurized components supplies lubrication to the valve stems. The cylinder bores and wrist pins are splash
lubricated from directed slots on the connecting rod thrust collar.

DIAGNOSIS AND TESTING

CHECKING ENGINE OIL PRESSURE

Check oil pressure using a gauge at oil pressure switch location.

1. If equipped with A/C remove accessory drive belt and A/C compressor.

2. Remove pressure sending unit.

3. Install oil pressure test gauge, Special Tool C-3292 with Adapter 8406.

CAUTION: If oil pressure is 0 at idle, Do Not Run engine at 3000 RPM.

4. Warm engine to normal operating temperature.

5. Monitor gauge readings at idle and 3000 rpm. For specifications (Refer to 9 - ENGINE - SPECIFICATIONS).

6. If oil pressure is low (Refer to 9 - ENGINE/LUBRICATION/OIL PUMP - INSPECTION).

PM

ENGINE 1.8L WORLD

9 - 1517

FILTER-OIL

REMOVAL

1. Turn oil filter cap counterclockwise 2

1

2

turns and wait one minute.

NOTE: A drain back valve incorporated into the oil filter cartridge housing allows oil to drain back into the
crankcase as the oil filter cartridge is removed.

2. Continue turning the oil filter cap counterclockwise. Remove cap slowly to avoid spill of oil.

3. Remove oil filter cartridge from the cap.

NOTE: If the center tube separates from the cap and stays inside the filter cartridge, you must remove the
center tube from the filter element and snap it back onto the cap with the spring.

4. Remove and discard o-ring from cap.

INSTALLATION

1. Install new o-ring on cap.

2. Install new oil filter cartridge over center tube of cap.

NOTE: Before installation, make sure no grommet is left on the center post of the oil filter housing from the
previous filter.

3. Align the grommet hole of the oil filter cartridge with the center post of the filter housing.

4. Press in and turn oil filter cap clockwise. Tighten cap to 25 N·m (18 ft. lbs). Cap flange should sit tightly on the

housing flange.

5. Fill oil to proper level.

6. Start engine. Check for leaks.

9 - 1518

ENGINE 1.8L WORLD

PM


Content   ..  1055  1056  1057  1058   ..