DAF CF65, CF75, CF85 Series . Manual - part 338


  Index      DAF     DAF CF65, CF75, CF85 Series - service repair manual


Search            


Content   ..  336  337  338  339   ..


DAF CF65, CF75, CF85 Series . Manual - part 338


3

CF65/75/85 series

Inspection and adjustment

EATON FS/6309A GEARBOX

2-1

2. INSPECTION AND ADJUSTMENT

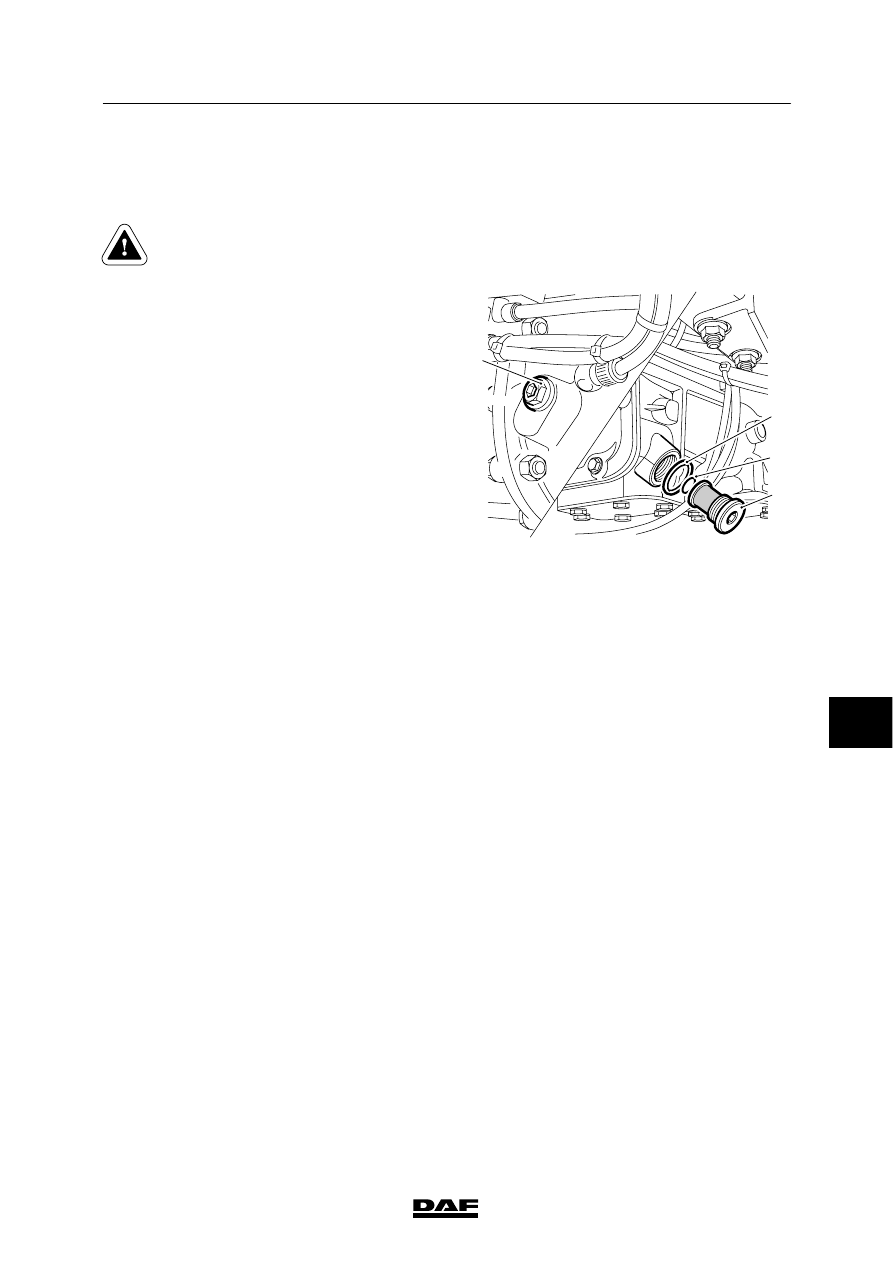
2.1 INSPECTION, GEARBOX OIL LEVEL

To prevent skin injury, avoid
unnecessary contact with the
drained oil.

1.

Position the vehicle on a level surface.

2.

Wait for some minutes for the oil to flow
back.

3.

Remove the level check/filler plug (1) and
check the oil level.

4.

The oil level must reach the rim of the level
check/filler opening (1).

5.

After checking the oil level, tighten the level
check plug to the specified torque. See
“Technical data”.

1

2

3

4

V3 00 376

ᓻ 0111

8

3

EATON FS/6309A GEARBOX

Inspection and adjustment

CF65/75/85 series

2-2

2.2 INSPECTION AND ADJUSTMENT, INPUT SHAFT BEARING AXIAL

CLEARANCE

Inspection, input shaft bearing axial play
1.

Remove the gearbox. See “Removal and
installation”.

2.

Remove the gearbox front cover from the
input shaft. See “Removal and installation”.

3.

Check whether the circlip (1) is flush in the
groove. Check at various places around the
shaft.

4.

If necessary, adjust the axial play by means
of a thicker or thinner adjusting ring (2).

Adjustment, input shaft bearing axial play
1.

Remove the circlip (1) of the input shaft
bearing.

2.

Remove the adjusting ring (2).

3.

Place an adjusting ring (2) of the correct
thickness between the input shaft bearing
and the circlip. See “Technical data”.

4.

Fit the circlip (1) without any play into the
groove. Check at various places around the
shaft.

5.

Fit a new gasket to the gearbox front cover
and install the gearbox front cover. See
“Removal and installation”.

6.

Fit the gearbox. See “Removal and
installation”.

1

2

V3 00 415

ᓻ 0111

8

3

CF65/75/85 series

Removal and installation, gearbox

EATON FS/6309A GEARBOX

3-1

3. REMOVAL AND INSTALLATION, GEARBOX

3.1 REMOVAL AND INSTALLATION , ENTIRE GEARBOX

Removing the entire gearbox
1.

Make sure there are no loose items in the
cab. Tilt the cab.

2.

Disconnect the battery negative terminal.

3.

Remove the attachment bolts of the prop
shaft flange and remove the prop shaft.

4.

Remove the attachment bolt from the
exhaust bracket on the gearbox.

5.

Remove the clamping straps of the
intermediate pipe and remove the same.

6.

Remove the end of the exhaust by
removing the clamping strap and the
attachment bolt of the rubber suspension
point at the end of the exhaust.

7.

Remove the attachment bolts from the
clutch cylinder and remove the clutch
cylinder.

8.

Mark the electrical connectors and
disconnect them.

9.

Remove the compressor pipe bracket.

10. Remove the shift control.

11. Mark the various air pipes and remove

them.

12. Support the gearbox and remove the

attachment bolts around it.

13. Use the jack to pull the gearbox from the

engine and remove the gearbox.

8

ᓻ 0111

3

EATON FS/6309A GEARBOX

Removal and installation, gearbox

CF65/75/85 series

3-2

Installing the gearbox
1.

Engage the highest gear in order to align
the keys of the input shaft with the clutch
plate.

2.

Fit the gearbox to the engine. If necessary,
rotate the drive flange in order to align the
keys.

3.

Fit the gearbox attachment bolts all around
and tighten them to the specified torque.
See “Technical data”.

4.

Fit the shift control.
Tighten the nuts to the specified torque.
See “Technical data”.

5.

Fit the exhaust intermediate pipe.

6.

Fit the exhaust end pipe.

7.

Install the compressor pipe bracket.

8.

Install the electrical connectors to the
gearbox.

9.

Fit the clutch cylinder and tighten the
attachment bolts to the specified torque.
See “Technical data”.

10. Fit the air pipes.

11. Fit the prop shaft flange to the gearbox.

Tighten the attachment bolts to the
specified torque. See “Technical data”.

12. Connect the negative lead to the battery

terminal.

13. Inspect the shift control.

14. Check the oil level after the gearbox has

been installed.

15. If a gearbox of a different type is mounted,

or a gearbox with a different reduction, this
should be reported.
If the correct data are present, they can be
input into the VIC using DAVIE XD.

8

ᓻ 0111


Content   ..  336  337  338  339   ..