DAF CF65, CF75, CF85 Series . Manual - part 126


  Index      DAF     DAF CF65, CF75, CF85 Series - service repair manual


Search            


Content   ..  124  125  126  127   ..


DAF CF65, CF75, CF85 Series . Manual - part 126


©

 200346

4-19

Removal and installation

EXTERNAL CAB COMPONENTS

ΧΦ65/75/85 series

1

4

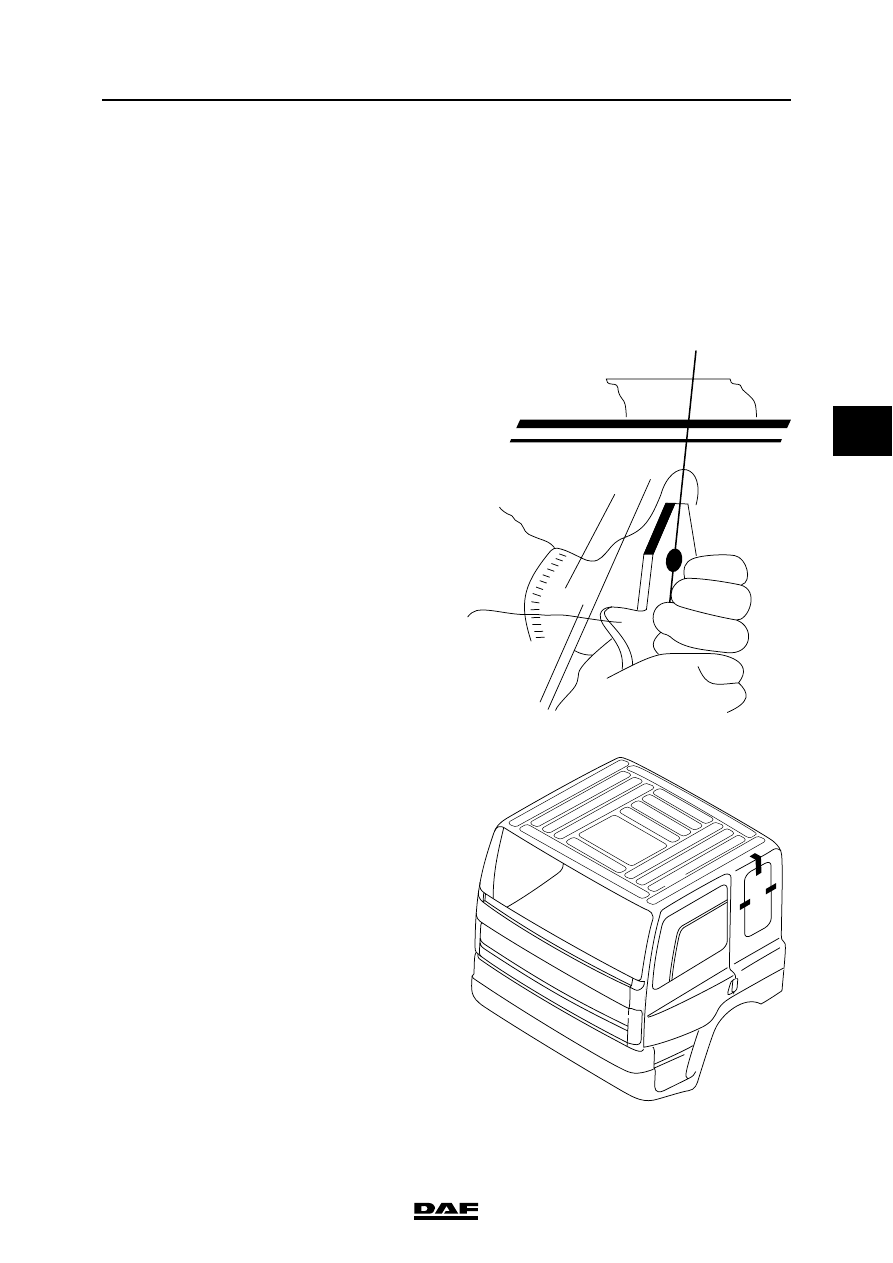
4.12 REMOVAL AND INSTALLATION, SLEEPER CAB SIDE WINDOW/REAR 

WINDOW

Note:
The removal procedure for the rear window is 
identical to that of the side window. Therefore, 
only removal and installation of the side window 
is described here.

Removing sleeper cab side window

Note:
Take care not to damage the paint.

1.

Put the wire, special tool (DAF no. 1329415), 
approximately in the middle of the top edge 
and in the middle of the bottom edge of the 
window frame using pliers or a special pull-
through needle, special tool 
(DAF no. 1240458), through the sealant.

Note:
Remove the wire pull-through needle before 
fitting the wire ends to the handles of the 
cutting wire set.

2.

The length of the cutting wire should be 1.5 
times the height of the window.

3.

Then attach the accessory handles, special 
tool (DAF no. 0499817), to the cutting wire.

4.

Use tape strips to protect the glass from 
falling out accidentally (after the sealant has 
been cut through).

K1 00 715

K1 01 362

EXTERNAL CAB COMPONENTS

4-20

©

 200346

Removal and installation

4

ΧΦ65/75/85 series

1

5.

Start cutting in the middle. Make sure the 
wire is kept moving and tightly stretched all 
the time. If the wire gets twisted, it will 
inevitably break.

6.

Keep the cutting wire as close as possible to 
the edge of the glass.

7.

Make sure the wire ends are crossed before 
the bottom corners are reached.

8.

Remove the glass using a suction pad, 
special tool (DAF no. 0484800), from the 
window frame.

9.

Remove any remaining sealant in the 
window frame with a scraper, special tool 
(DAF no. 1329417). Make sure the 
remaining layer of sealant has a thickness of 
at most 1 - 1.5 mm and that it is flat and 
smooth.

10. Remove frayed pieces and granules of old 

sealant and clean the frame thoroughly.

Important tips
-

If the new glass is fitted at a later time, the 
old, fully cured sealant should be cleaned 
with the specified activator 15 minutes 
before the glass is fitted, to ensure proper 
adhesion, see "Technical data".

-

Immediately remove any spilt activator or 
splashes from painted areas using paper 
towels or tissues.

-

Any damage to the paint on the window 
frame should be repaired immediately with 
the right type of paint, well before the new 
glass is fitted.

-

Always work in a clean area.

-

Wear industrial gloves or use a special hand 
cream.

-

Preferably use paper towels or tissues 
instead of cleaning rags.

Installing sleeper cab side window
1.

Make sure that the guide rail is smooth and 
flat (no major irregularities).

2.

Check the side window for damage.

3.

Attach a rubber suction pad, special tool 
(DAF no. 0484800), to the outside of the 
window.

4.

Put the glass with the suction pads on a 
completely clean workbench.

K1 01 059

©

 200346

4-21

Removal and installation

EXTERNAL CAB COMPONENTS

ΧΦ65/75/85 series

1

4

5.

Fit the rubber trimming to the glass and 
secure it with tape on the outside of the 
glass.

6.

Place the glass in the frame without using 
sealant, starting at the bottom and ensuring 
that it fits exactly in the frame.

7.

Mark the correct position of the glass in the 
frame with strips of tape. Cut through the 
tape in the frame.

8.

Remove the window from the frame and 
place the window on the workbench.

9.

Clean the glass edge where the sealant is to 
be applied using the specified activator, see 
"Technical data". Apply the activator using a 
well moistened ball of crumpled paper towels 
or tissue; swipe it off immediately using a ball 
of crumpled paper towels of tissues so that 
only a thin layer remains. Allow the surface to 
dry for at least the specified time, see 
"Technical data".

10. Clean the cut-back sealant in the frame 

using the specified activator, see "Technical 
data". Apply the activator using a well 
moistened ball of crumpled paper towels or 
tissue; swipe it off immediately using a ball of 
crumpled paper towels or tissues so that only 
a thin layer remains. Allow the surface to dry 
for at least the specified time, see "Technical 
data".

K1 01 347

EXTERNAL CAB COMPONENTS

4-22

©

 200346

Removal and installation

4

ΧΦ65/75/85 series

1

Applying sealant
1.

For hot working the sealant must be 
preheated in an oven, special tool 
(DAF no. 1329416), for 60 minutes at 80

|C.

2.

Give the spraying nozzle the shape shown in 
the drawing.

3.

Take note of the processing time when 
applying the sealant, see "Technical data".

4.

Fit the spraying nozzle to the cartridge and 
apply the sealant to the glass, spraying as 
evenly as possible.

5.

Place the sealant gun with the opening 90

|/

60

| onto the glass and move it evenly to build 

up a good layer.

6.

Avoid air bubbles in the layer of sealant.

Note:
If a pneumatic glue gun is used for sealing, 
special tool (DAF no. 1240444), then before 
beginning adjust the pressure in the gun (by 
spraying several test strips).

Fitting the glass
1.

Pick up the glass and place it in the frame in 
one go. Use the tape strips (1) for 
dimensions.

2.

Use the specified sealant remover to remove 
the excess sealant immediately from the 
painted parts, see "Technical data".

3.

For safety, open the windows to avoid 
undesirable pressure build-up on the side 
window.

12 mm

8 mm

K1 00 721

K1 00 722

1

1

K1 01 349


Content   ..  124  125  126  127   ..