DAF CF65, CF75, CF85 Series . Manual - part 1200


  Index      DAF     DAF CF65, CF75, CF85 Series - service repair manual


Search            


Content   ..  1198  1199  1200  1201   ..


DAF CF65, CF75, CF85 Series . Manual - part 1200


©

 200423

3-39

Inspection and adjustment

EXPLANATORY NOTES ON THE MAINTENANCE ACTIVITIES

ΧΦ85 series

5

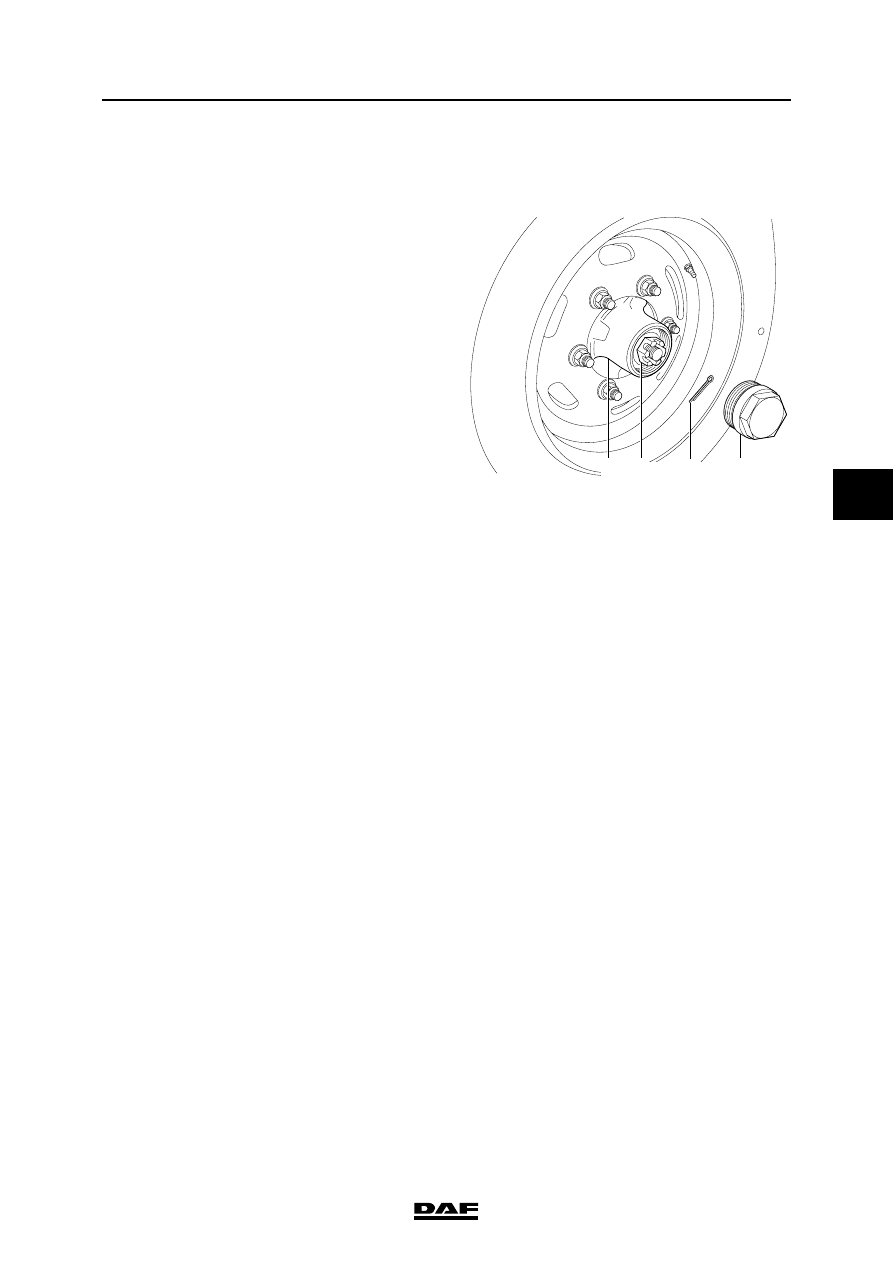
3.44 RETIGHTENING THE HUB NUT OF LEADING REAR AXLE 09N044 

(FTP-TYPE VEHICLES)

1.

Remove the hub cap (4) using special tool 
(DAF no. 1329498).

2.

Lift the leading rear axle.

3.

Release the brakes.

4.

Remove the split pin (3) from the hub nut (2).

5.

Tighten the hub nut to the specified 
tightening torque, see "Technical data". Turn 
the wheel at least 5 revolutions in clockwise 
direction and then 5 revolutions in anti-
clockwise direction when fixing the hub nut. 

6.

Check that the wheel rotates smoothly.

7.

Turn back the hub nut until the split pin can 
be fitted. Fit a new split pin.

Note:
There are 2 split pin holes in the axle journal. 
Select the split pin hole where the hub nut 
needs to be turned back least.

8.

Fit the hub cap. Tighten the hub cap to the 
specified torque using the special tool 
(DAF no. 1329498), see "Technical data".

9.

Adjust the brakes.

S7 00 657

1

2

3

4

EXPLANATORY NOTES ON THE MAINTENANCE ACTIVITIES

3-40

©

 200423

Inspection and adjustment

5

ΧΦ85 series

3.45 INSPECTION AND ADJUSTMENT, WHEEL BEARING PLAY, 09N044 

LEADING REAR AXLE

Checking the wheel bearing play
1.

Remove the hub cap using special tool 
(DAF no. 1329498). 

2.

Lift the leading rear axle and support it 
properly.

3.

Release the brakes.

4.

Fit a dial gauge; let the stylus rest against the 
axle journal.

5.

Push and pull on the wheel. Read the value 
off the gauge. Compare this reading to the 
specified value. See "Technical data". If the 
reading falls outside the tolerance range, the 
wheel bearing play should be re-adjusted.

6.

Fit the hub cap. Tighten the hub cap to the 
specified torque using the special tool 
(DAF no. 1329498), see "Technical data"'. 

7.

Adjust the brakes. 

Adjusting the wheel bearing play
1.

Remove the hub cap (4) using special tool 
(DAF no. 1329498).

2.

Lift the leading rear axle.

3.

Release the brakes.

4.

Remove the split pin (3) from the hub nut (2).

5.

Tighten the hub nut to the specified 
tightening torque, see "Technical data". Turn 
the wheel at least 5 revolutions in anti-
clockwise direction and then 5 revolutions in 
clockwise direction when fixing the hub nut.

6.

Check that the wheel rotates smoothly.

7.

Turn back the hub nut until the split pin can 
be fitted. Fit a new split pin.

Note:
There are 2 split pin holes in the axle journal. 
Select the split pin hole where the hub nut needs 
to be turned back the smallest distance.

S7 00 635

S7 00 657

1

2

3

4

©

 200423

3-41

Inspection and adjustment

EXPLANATORY NOTES ON THE MAINTENANCE ACTIVITIES

ΧΦ85 series

5

8.

Check the wheel bearing play. Check the 
bearings for wear if the wheel bearing play 
remains too large after adjustment.

9.

Fit the hub cap. Tighten the hub cap to the 
specified torque using the special tool 
(DAF no. 1329498), see "Technical data"'.

10. Adjust the brakes.

EXPLANATORY NOTES ON THE MAINTENANCE ACTIVITIES

3-42

©

 200423

Inspection and adjustment

5

ΧΦ85 series

3.46 CHECKING THE SHOCK ABSORBERS FOR ATTACHMENT AND LEAKS

1.

Visually inspect the attachment of the shock 
absorbers and for any leaks.

3.47 CHECKING THE CONDITION AND ATTACHMENT OF SPRING LEAVES, 

SPRING CLAMPS AND U-BOLTS

Checking U-bolts
1.

Visually inspect the condition and 
attachment of the U-bolts.

2.

When retightening the U-bolt nuts, the 
attachment nut must not be slackened first 
and then tightened to a specific torque, see 
"Technical data".

3.48 CHECKING THE HINGE POINTS AND AXLE SUSPENSION FASTENING (AIR 

SUSPENSION)

Torque rod
1.

Check the attachment of the torque rod and 
torque rod supports.

2.

Check the pivots of the torque rod for wear 
and play.

Stabiliser bar
1.

Check the attachment of the stabiliser bar 
and stabiliser bar support.

2.

Check the pivots of the stabiliser bar for wear 
and play.

Ball joints three-point fixation
1.

Check the attachment of the ball joints and 
three-point fixation support.

2.

Check the ball joint housing for surface 
cracks.

3.

Check the dust cover for damage.


Content   ..  1198  1199  1200  1201   ..