DAF CF65, CF75, CF85 Series . Manual - part 1137


  Index      DAF     DAF CF65, CF75, CF85 Series - service repair manual


Search            


Content   ..  1135  1136  1137  1138   ..


DAF CF65, CF75, CF85 Series . Manual - part 1137


©

 200518

5-5

Draining and filling

EXPLANATORY NOTES ON THE MAINTENANCE ACTIVITIES

ΧΦ65/65 (II) series

5

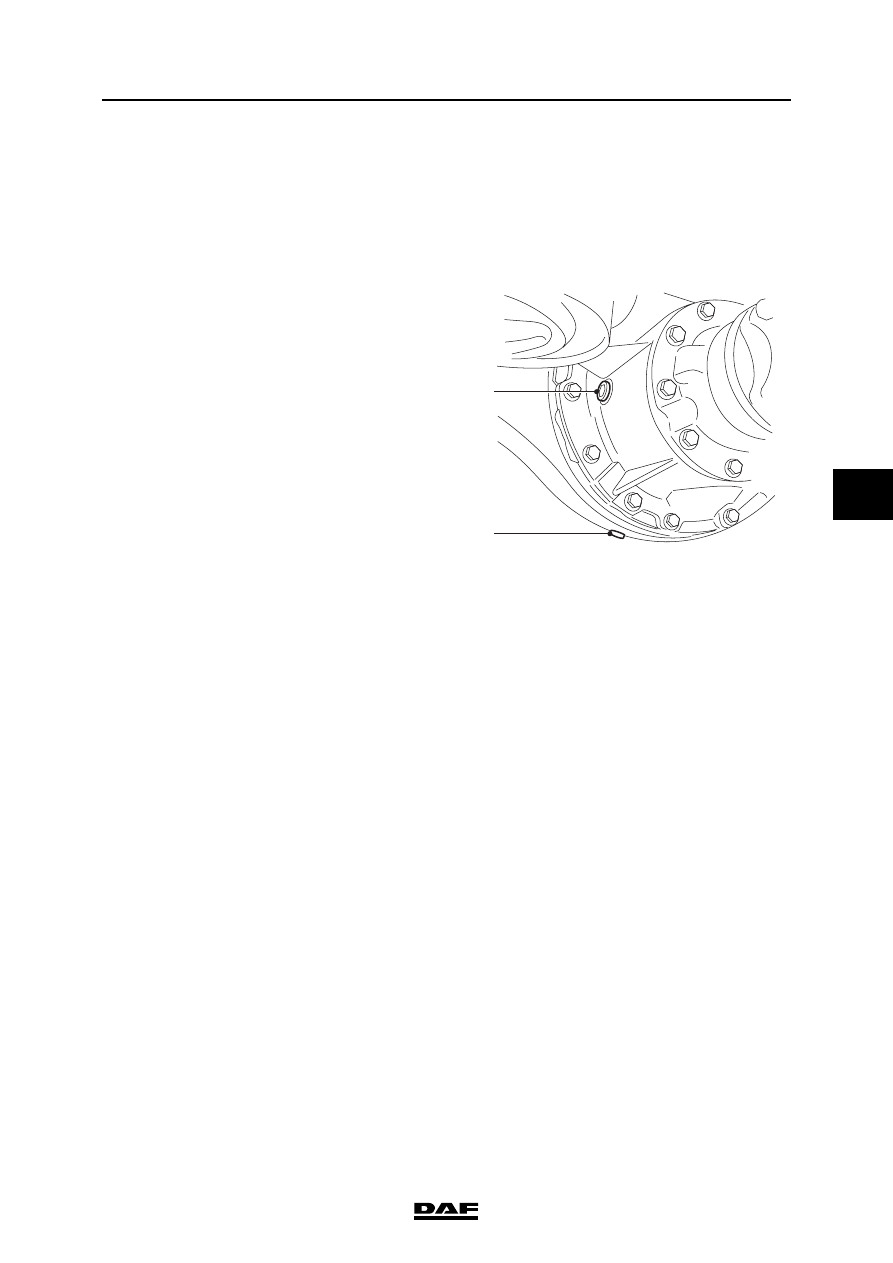
5.4 DRAINING AND FILLING, DIFFERENTIAL

To prevent skin injury, avoid 

unnecessary contact with the 

drained oil. 

Draining the 1132 axle differential
1.

Position the vehicle on a level surface.

2.

Remove the level check/filler plug (1) and the 

drain plug (2) using the special Torx wrench 

(DAF no. 1329493). Drain the oil.

3.

Fit the drain plug using the special Torx 

wrench (DAF no. 1329493) and tighten it to 

the specified torque; see "Technical data".

Filling the 1132 axle differential
1.

Fill the differential gear via the level check/

filling opening (1) with the specified quantity 

of oil; see "Technical data".

2.

Check the oil level after approx. 5 minutes: it 

should reach up to the level check/filler plug.

3.

Fit the level check/filler plug (1) using the 

special Torx wrench (DAF no. 1329493) and 

tighten to the specified torque; see 

"Technical data".

}

1

2

A800523

EXPLANATORY NOTES ON THE MAINTENANCE ACTIVITIES

5-6

©

 200518

Draining and filling

5

ΧΦ65/65 (II) series

5.5 DRAINING AND FILLING THE GEARBOX

To prevent skin injury, avoid 

unnecessary contact with the 

drained oil.

ZF 6S-850 gearbox

Draining the gearbox
1.

Place the vehicle on a level and horizontal 

surface.

2.

Drain the gearbox at operating temperature 

using plug (B). 

Filling the gearbox
1.

Clean the drain plug and fit it, tightening to 

the specified torque; see "Technical data".

2.

Fill the oil through level check/filler opening 

(A) until the oil reaches the rim of the filler 

opening.

3.

After filling the gearbox, tighten the level 

check plug to the specified torque; see 

"Technical data".

Eaton 6309A gearbox

To prevent skin injury, avoid 

unnecessary contact with the 

drained oil.

Draining the gearbox
1.

Place the vehicle on a level and horizontal 

surface.

Note:

Drain the gearbox at operating temperature.

2.

Remove the combined drain plug/oil strainer 

(4) and level check/filler plug (1) and drain 

the oil.

3.

Clean the oil strainer (4) in a suitable solvent 

and dry thoroughly.

Filling the gearbox
1.

Check and replace the O-ring (3) and the 

sealing ring (2), if necessary. 

2.

Fit the combined drain plug/oil strainer, 

tightening it to the specified torque; see 

"Technical data".

}

B

M3038

A

}

1

2

3

4

V3 00 376

©

 200518

5-7

Draining and filling

EXPLANATORY NOTES ON THE MAINTENANCE ACTIVITIES

ΧΦ65/65 (II) series

5

3.

Fill the oil through level check/filler opening 

(1) until the oil reaches the rim of the filler 

opening.

4.

Fit the level check/filler plug, tightening it to 

the specified torque; see "Technical data".

Allison MD3060P automatic gearbox

To prevent skin injury, avoid 

unnecessary contact with the 

drained oil.

Draining the gearbox
1.

Bring the gearbox to operating temperature 

(approx. 71

C - 93C) to allow the oil to drain 

more quickly and more fully.

2.

Place the vehicle on a level and horizontal 

surface.

3.

Remove the drain plug (1) from the gearbox 

oil sump.

4.

Remove the oil filters (2) (see chapter 

"Removal and installation").

Filling the gearbox
1.

Clean the drain plug (1) and, fitted with a new 

sealing ring, tighten it to the specified torque; 

see "Technical data".

2.

Fit the oil filters (2) (see chapter "Removal 

and installation").

3.

Fill the gearbox through the dipstick holder 

with the specified oil quantity; see "Technical 

data".

}

V300371

2

1

W 3 03 098

EXPLANATORY NOTES ON THE MAINTENANCE ACTIVITIES

5-8

©

 200518

Draining and filling

5

ΧΦ65/65 (II) series

4.

Check that the oil level reaches the "Cold 

full" mark.

Note:

To take the dipstick out of the holder, the 

sealing cap must be held tightly while the 

dipstick is turned anti-clockwise.

5.

Check the oil level using the selector keypad 

(see chapter "Inspection and adjustment").

HOT 

FULL

COLD

FULL

HOT

ADD

COLD

ADD

W 3 03 099


Content   ..  1135  1136  1137  1138   ..