Citroen Nemo (2015 year). Instruction - part 11


  Index      Citroen     Citroen Nemo - instruction 2015 year in english


Search            


Content   ..  9  10  11  12   ..


Citroen Nemo (2015 year). Instruction - part 11


 159

9

QUICK HELP

Changing a wheel

-  If a pressure of at least 1.5 bars is not 

reached within 5 minutes

:

●  disconnect the compressor from the 

valve and from the 12 V accessory 

socket,

●  move the vehicle forward by 

approximately 10 metres to distribute the 

filling fluid inside the tyre,

●  then repeat the inflation operation.

-  If a pressure of at least 1.8 bars is not 

reached within 10 minutes

:

●  stop the repair procedure; the tyre has 

suffered too much damage and cannot 

be repaired,

●  contact a CITROËN dealer or a qualified 

workshop.

-  If the tyre has been inflated to a pressure 

of 3 bars

, set off again immediately.

After driving for approximately 10 minutes, 

stop and check the pressure of the tyre 

again.

Adjust the tyre pressure if necessary and 
contact a CITRoËn dealer or a qualified 
workshop as soon as possible.
You must inform the technician that you 
have repaired the tyre using the temporary 

puncture repair kit and show him its 
instructions.

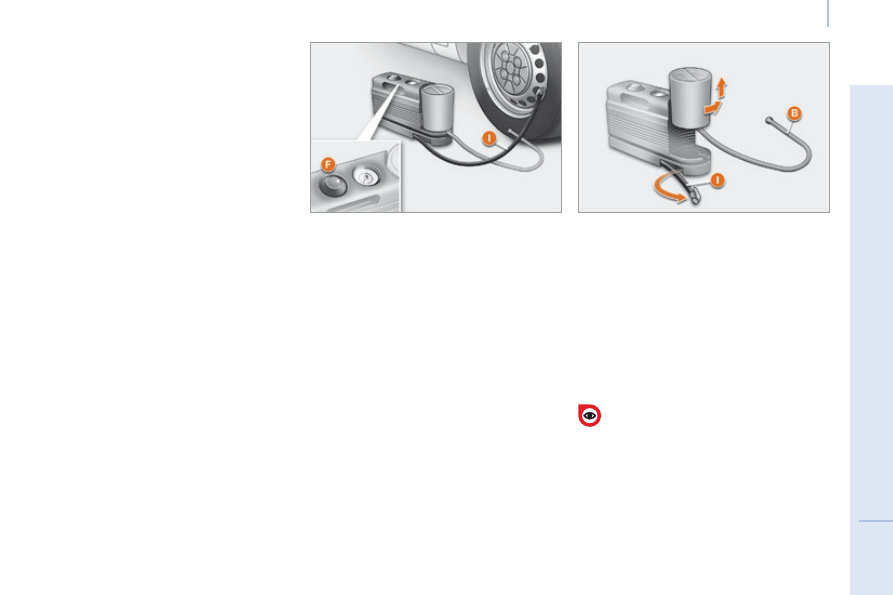
Checking and correcting the pressure

For checking and correcting the pressure of 

a tyre, use the compressor as follows:

-  disconnect the pipe I,
-  connect it directly to the tyre valve,
The cartridge will then be connected to 
the compressor and the sealant will not be 
injected.

Replacing the repair cartridge

disconnect the pipe I.
Turn the empty cartridge anticlockwise and 
lift it.
Insert the new cartridge and turn it 

clockwise.
Reconnect the pipe I and connect the pipe B 
to its location.

The repair cartridge contains ethylene-

glycol, a product which is harmful if 

swallowed and which causes irritation to the 
eyes.
keep this product out of reach of children.
After use, take the cartridge to a CITROËN 
dealer or to an authorised waste disposal 
site.

If the tyre has to be deflated:

-  connect the pipe I to the tyre valve,
-  press the yellow button, located in the 

centre of the switch F on the compressor.

 160

Snow chains

SNOW CHAINS

In wintry conditions, snow chains improve 
traction as well as the behaviour of the 
vehicle when braking.

The snow chains must be fitted only to 
the driving wheels. They must never be 

fitted to "space-saver" type spare wheels.

Take account of the legislation in force 
in your country on the use of snow 

chains and the maximum running speed 
authorised.

Advice on installation

F

  If you have to fit the chains during a 

journey, stop the vehicle on a flat surface 
on the side of the road.

F

  Apply the parking brake and position any 

wheel chocks to prevent movement of 
your vehicle.

F

  Fit the chains following the instructions 

provided by the manufacturer.

F

  Move off gently and drive for a few 

moments, without exceeding 30 mph  

(50 km/h).

F

  Stop your vehicle and check that the 

snow chains are correctly tightened.

 It is recommended that before you 
leave, you practise fitting the snow 
chains on a level and dry surface.

Use only the chains designed to be fitted to 

the type of wheel fitted to your vehicle:

For more information on snow chains, 
contact a CITRoËn dealer or a qualified 
workshop.

Original tyre size

Maximum link size.

175/70 R14

9 mm

185/65 R15

Avoid driving on roads that have been 

cleared of snow, to avoid damaging 

your vehicle's tyres and the road surface. If 
your vehicle is fitted with alloy wheels, check 

that no part of the chain or its fixings is in 
contact with the wheel rim.

 161

9

QUICK HELP

Changing a bulb

Front lamps

open the bonnet. To access the bulbs, reach 
behind the headlamp unit.
Remove the protective covers to gain 
access to the bulbs.
Carry out the operations in reverse order to 
refit each bulb.

CHANGING A BULB

Types of bulb

Various types of bulb are fitted on your 
vehicle. 
To remove them:
1.  Type A 
  Entirely glass bulb: pull gently as it is 

fitted by pressure.

2.  Type B 
  Bayonet bulb: press on the bulb then turn 

it anticlockwise.

3.  Type C 
  Cylindrical bulb: move aside the contacts.
4.  Type D -E 
  Halogen bulb: release the retaining 

spring from its housing.

High pressure washing
When using this type of washing on 

stubborn dirt, do not persist very long on 
the headlamps, or on other lamps and their 
edges to avoid damaging their coating and 
seals.

 162

Changing a bulb

1 - Dipped beam headlamps

Type D

, H4 - 55 W

-  Remove the cover by turning it 

anticlockwise.

-  Disconnect the electrical connector.
-  Release the retaining spring by pressing 

on the two clips.

-  Change the bulb taking care to align the 

metal part with the grooves on the lamp.

2 - Sidelamps

Type A

, W 5 W - 5 W

-  Remove the cover by turning it 

anticlockwise.

-  Pull the bulb holder to gain access to the 

bulb.

-  Change the bulb.

3 - Main beam headlamps

Type D

, H4 - 55 W

-  Remove the cover by turning it 

anticlockwise.

-  Disconnect the electrical connector.
-  Release the retaining spring by pressing 

on the two clips.

-  Remove the bulb holder.
-  Change the bulb taking care to align the 

metal part with the groove on the lamp.

4 - Direction indicators

Type B

, PY 21 W - 21 W amber

-  Turn the bulb holder a quarter turn 

anticlockwise.

-  Remove the bulb by pressing it lightly 

while turning it anticlockwise.

-  Change the bulb.
If you encounter any difficulty, consult a 
CITROËN dealer or a qualified workshop.

When each operation has been completed, 
check the operation of the lamps.

5 - Foglamps

Type E

, H1 - 55 W

Contact a CITRoËn dealer or a qualified 
workshop.

 163

9

QUICK HELP

Changing a bulb

Front / rear courtesy lamps

Type C

, 12 V 10 W - 10 W

-  Release the courtesy lamp using a 

screwdriver.

-  Remove the cover to gain access to the 

bulb.

-  Change the bulb moving aside the two 

contacts.

-  Ensure that the new bulbs are secured 

correctly between the two contacts.

-  Close the protective flap.
-  Fix the courtesy lamp in its housing and 

ensure that it is secured correctly.

Direction indicator side repeaters

Type A

, WY 5 W - 5 W amber

-  Push the repeater rearwards and release it.
-  Support the connector and turn the bulb 

holder a quarter of a turn to the left.

-  Turn the bulb a quarter of a turn to the 

left.

-  Pull the bulb then change it.
-  When refitting, engage the repeater 

rearwards then move it forwards.

 164

Changing a bulb

Rear lamps

-  Identify the faulty bulb then open the rear 

doors.

-  Unscrew the two screws using the 

screwdriver supplied in the tool kit 
(behind the driver's seat) and extract the 
bulb holder.

-  Release the lamp unit.
-  Disconnect the electrical connector.
-  Remove the support by moving aside the 

tabs.

-  Change the bulb.

Number plate lamps

Type A,

 C 5 W - 5 W

-  Unclip the transparent cover using 

the screwdriver supplied in the tool kit 
(behind the driver's seat) and extract the 
bulb holder.

-  Change the bulb by moving aside the two 

contacts.

-  Ensure that the new bulbs are secured 

correctly between the two contacts.

-  Replace the plastic lens and press on it.

For further information concerning the bulbs, 
refer to the table "Types of bulb".

1.  Brake lamps 

   Type B

, P 21 W - 21 W

2.  Direction indicators 

   Type B,

 PY 21 W - 21 W amber

3.  Reversing lamps 

   Type B,

 P 21 W - 21 W

4.  Sidelamps / Foglamps 


Type B

, P4/21W - 4W/21W

On the hinged rear doors

On the tailgate

 165

9

QUICK HELP

Changing a bulb

Third brake lamp

On the hinged rear doors

Type B

, W 5 W - 5 W (4 bulbs)

-  Unclip the transparent cover using the 

screwdriver located in the tool kit.

-  Disconnect the electrical connector.
-  Remove the bulb holder by squeezing the 

two tabs.

-  Remove the faulty bulb.
-  Change the bulb.

On the tailgate

Type B,

 W5W - 5W (5 bulbs)

-  Open the tailgate.
-  Remove the two cover retaining screws, 

then the cover.

-  Remove the bulb holder by squeezing the 

two tabs.

-  Remove the faulty bulb.
-  Change the bulb.

If you encounter any difficulty, consult a 
CITROËN dealer or a qualified workshop.

 166

Changing a wiper blade

CHANGING A WIPER BLADE

Changing a front or rear wiper blade

Instructions for removing the blade:
Lift the wiper arm A off the windscreen.
Turn the blade B

 90° around the pivot C on 

the end part of the arm.
Remove the pivot from the blade C.

Instructions for fitting the blade:
Fit the pivot C in the hole in the central part 
of the blade B.
Place the arm with the blade on the 
windscreen.

 167

9

QUICK HELP

Changing a fuse

CHANGING A FUSE

The two fuseboxes are placed on the 
dashboard on the driver's side and under the 
bonnet.

Removing and fitting a fuse

Before changing a fuse, the cause of the 
fault must be found and rectified. The fuse 
numbers are indicated on the fusebox.
always use the special tweezer to extract 
the fuse from its housing and check the 
condition of its filament.
Always replace a faulty fuse with a fuse 
of the same rating.
If a fuse fails again soon after replacement, 
have the electrical system of your vehicle 
checked by a CITROËN dealer or a qualified 

workshop.

Access to fuses in the dashboard
-  To gain access to the dashboard fuses, 

remove the 2 screws using the ignition 

key and tilt the housing.

CITRoËn will not accept responsibility 
for the cost incurred in repairing your 

vehicle or for rectifying the malfunctions 

resulting from the installation of accessories 
not supplied and not recommended by 
CITRoËn dealers and not installed in 
accordance with its instructions, in particular 
when the combined consumption of all of the 
additional equipment connected exceeds  
10 milliamperes.

A. Good.

B. Failed.

C. Tweezer.

Access to fuses in the engine compartment
-  For access to the fuses in the engine 

compartment, remove the left hand front 
headlamp connector, then unclip the 
fusebox cover.

 168

Changing a fuse

Table of dashboard fuses, driver's side

Marking

Rating

Functions

F12

7.5 a

Right-hand dipped beam headlamp supply

F13

7.5 a

Left-hand dipped beam headlamp supply - headlamp height 

adjuster

F31

5 a

Engine control unit supply switch

F32

7.5 a

Front lamp - front courtesy lamp - rear courtesy light lamp

F36

10 A

Audio system - mobile telephone pre-equipment - air 

conditioning control panel - EODB diagnostic socket

F37

5 a

Brake lamp - instrument panel

F38

20 a

Door locking

F43

15 A

Screenwash pump

F47

20 a

driver's electric window motor supply

F48

20 a

Passenger's electric window motor supply

F49

5 a

Parking sensors control unit - rear lighting switch - electric 

door mirrors - volumetric alarm control unit

F50

7.5 a

Airbags control unit

F51

7.5 a

Switch on brake pedal - switch on clutch pedal - door mirror 

controls - central Bluetooth system

F53

5 a

Instrument panel - rear foglamps

 169

9

QUICK HELP

Changing a fuse

Marking

Rating

Functions

F41

7.5 a

Door mirror demisting.

F94

15 A

Cigar lighter.

F96

15 A

12 V accessory socket.

F97

10 A

Heated seat, driver's side.

F98

10 A

heated seat, passenger's side.

 170

Changing a fuse

Marking

Rating

Functions

F01

60 a

Control unit

F02

40 A

Passenger compartment fan.

F03

20 a

Starter motor supply

F04

40 A

ABS hydraulic block pump supply

F06

30 A

Single speed cooling fan control

F07

40 A

High speed cooling fan control

F08

30 A

Air conditioning compressor

F09

15 A

Towbar harness.

F10

10 A

Horn

F11

10 A

Engine management secondary load supply

F14

15 A

Main beam headlamps

F15

15 A

12 V accessory socket.

Table of fuses in the engine 
compartment

 171

9

QUICK HELP

Changing a fuse

Marking

Rating

Functions

F16

7.5 a

Engine management control unit - electronic gearbox control unit and gear lever -  
T20 relay coil

F17

15 A

Supply for ignition coil - injectors - engine management control unit (1.3 HDi)

F18

7.5 a

Engine management control unit (1.3 HDi) - T09 relay coil

F19

7.5 a

Air conditioning compressor

F20

30 A

Supply for heated rear screen, electric door mirrors heater elements

F21

15 A

Fuel pump (1.4 petrol and 1.3 HDi)

F22

20 a

Engine management control unit (1.3 HDi)

F23

20 a

ABS hydraulic block electrovalves supply

F24

7.5 a

abS

F30

15 A

Foglamps

F81

60 a

Pre-heat unit (1.3 HDi)

F82

30 A

Electronic gearbox pump - electronic gearbox supply

F84

10 A

Electronic gearbox control unit and electrovalves

F85

30 A

Cigar lighter - 12 V accessory socket

F87

7.5 a

Reversing lamps - water in Diesel sensor - airflow sensor - T02, T05, T14, T17 and T19 relay coils  

(except 1.3 HDi)

5 a

Reversing lamps - water in Diesel sensor - airflow sensor - T02, To5, T14, T17 and T19 relay coils -  

battery state of charge sensor (except 1.3 HDi)

 172

Being towed or towing

 172

TOWING

The removable towing eye is located in the 

tool kit behind the driver's seat (Light van) or 
behind the rear bench seat (Combi).

Towing the vehicle

In the front bumper, unclip the cover on the 
right using a flat tool.

Screw the removable towing eye in fully.

Then hook the towing arm on the towing 
eye.
Unlock the steering by turning the the 

ignition key one notch and release the 

parking brake.

Switch on the hazard warning lamps on both 
vehicles.
Move off gently and drive slowly, towing for 
a short distance only.

On the towed vehicle, the gear 

lever must be put in neutral; failure 
to observe this special condition 

may result in damage to certain braking 

components (brakes, transmission...) and 

the absence of braking assistance when the 

engine is started.

Towing another vehicle

In the rear bumper, unclip the cover at the 
bottom using a flat tool.

Screw the removable towing eye in fully.

Then hook the towing arm on the towing 
eye.
Switch on the hazard warning lamps on both 
vehicles.
Move off gently and drive slowly, towing for 
a short distance only.

General recommendations

Observe the legislation in force in your 
country.

Ensure that the weight of the towing vehicle 

is higher than that of the towed vehicle.
The driver must remain at the wheel of the 
towed vehicle and must have a valid driving 
licence.
When towing a vehicle with all four wheels 

on the ground, always use an approved 

towing arm; rope and straps are prohibited.

The towing vehicle must move off gently.

When towing a vehicle with the engine off, 

there is no longer any power assistance for 

braking or steering.

In the following cases, you must always call 

on a professional recovery service:

-  vehicle broken down on a motorway or 

fast road,

-  four-wheel drive vehicle,
-  when it is not possible to put the gearbox 

into neutral, unlock the steering, or 

release the parking brake,

-  towing with only two wheels on the 

ground,

-  where there is no approved towing arm 

available...

 173

9

QUICK HELP

 174

Dimensions


Content   ..  9  10  11  12   ..