Citroen C3 Pluriel (2008 year). Instruction - part 5


  Index      Citroen     Citroen C3 Pluriel - instruction 2008 year in english


Search            


Content   ..  3  4  5  6   ..


Citroen C3 Pluriel (2008 year). Instruction - part 5


A

67 

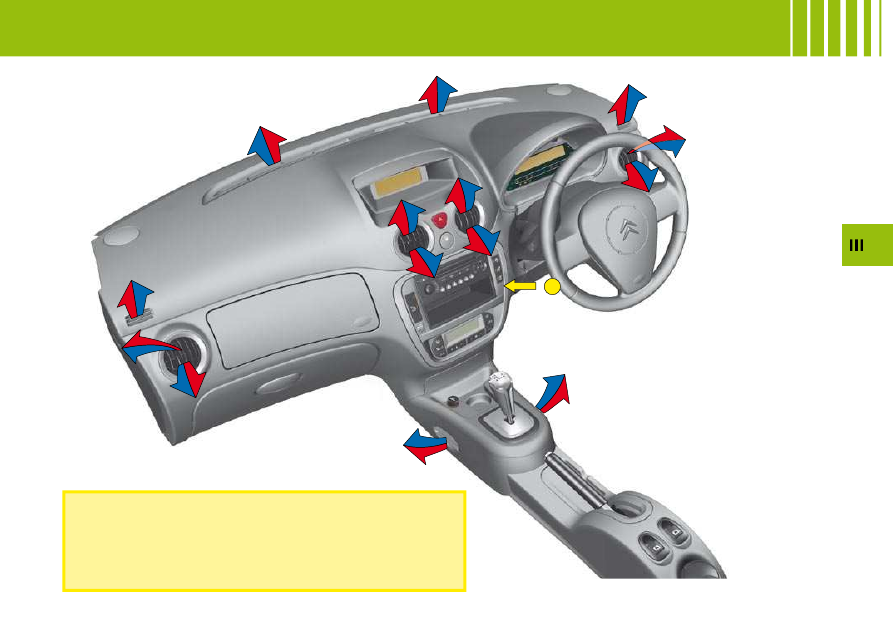
Warning: The automatic air conditioning system uses 
a  temperature  sensor  located  on  the  dashboard  (see 
reference A), this sensor should not be obstructed.

V E N T I L AT I O N   -   H E AT I N G

1

2

3

4

5

6

1

1

1

2

2

2

3

3

3

4

4

4

5

6

6

6

III

69 

V E N T I L AT I O N   -   H E AT I N G   - 

M A N U A L   A I R   C O N D I T I O N I N G

Air fl ow to the face level vents
(Air vents open)

1.  Air distribution

Air fl ow to the front and rear footwells
(Air vents closed)

Air fl ow to the footwells and windscreen and side 

windows

Air fl ow to the windscreen and side windows
Demisting - Defrosting

Distribution from the air blower can be altered at will by plac-
ing the distributor 1 in an intermediate position.

Air recirculation
This  position  is  useful  for  excluding  undesirable 
odours  or  fumes  coming  from  outside.  It  should  be 
cancelled  as  soon  as  possible  in  order  to  permit 

renewal of air in the cabin and to prevent misting.

2.  Cabin air

3.  Heater blower control

The air blower operates only when the engine is running. For 
optimum comfort in the passenger compartment, the control 
should not remain in position 0 (position 1 minimum).

4.  Temperature control

5.  Air conditioning

6.  Demisting - deicing of the rear screen.

MANUAL AIR CONDITIONING

VENTILATION - HEATING

III

68 

V E N T I L AT I O N   -   H E AT I N G

Air inlet

Check that the exterior grille for the air inlet, at the bot-
tom of the windscreen, is clean and free of dead leaves, 
snow, etc.
If  washing  the  vehicle  with  a  high  pressure  jet,  avoid 
targeting the air inlet zone.

Air vents

The air vents to the face (except the central air vent) have 

grilles for orienting the fl ow of air (up-down, right-left).

Air circulation

For  your  comfort  we  advise  you  to  maintain  a  proper 
distribution of air within the cabin, both at the front and 
at the rear.
Air outlets are also located on the central console close 
to the gear lever, to enhance comfort for the rear pas-
sengers.

Pollen fi lter – Odour fi lter

Your air conditioning installation is provided with a fi lter 

for protection against dust and odours.
This fi lter has to be changed according to the vehicle 

maintenance schedule. See “Maintenance Guide”.

Air conditioning

Whatever the time of year, even in cool weather the air 
conditioning  is  useful  in  removing  humidity  and  mist-
ing.
To keep the air conditioning compressor well sealed, it 
is essential to operate the air conditioning at least once 
in every month.
To be effective, the air conditioning should only be used 
with the windows closed.
If you are towing a heavy trailer and outside tempera-
tures are high, the air conditioning may be temporarily 
paused if the engine cooling requires this.
Water arising from condensation in the air conditioning 
system  is  evacuated  through  a  hole  provided  for  this 
purpose ; a pool of water may thus form underneath the 
vehicle when stationary.
You  are  advised  to  have  the  air  conditioning  system 
checked on a regular basis. See “Maintenance Guide”.
The air conditioning operates by using power from the 
engine.  This  results  in  a  slight  increase  in  fuel  con-
sumption.

Demisting  -  deicing  of  the  wind-
screen and front side windows

Place the controls for temperature and 

air fl ow on maximum.
Close the central air vents.

Operate the air conditioning.

Note: You should not be in air recirculation.

1

2

3

4

5

6

1

1

1

2

2

2

3

3

3

4

4

4

5

6

6

6

III

69 

V E N T I L AT I O N   -   H E AT I N G   - 

M A N U A L   A I R   C O N D I T I O N I N G

Air fl ow to the face level vents
(Air vents open)

1.  Air distribution

Air fl ow to the front and rear footwells
(Air vents closed)

Air fl ow to the footwells and windscreen and side 

windows

Air fl ow to the windscreen and side windows
Demisting - Defrosting

Distribution from the air blower can be altered at will by plac-
ing the distributor 1 in an intermediate position.

Air recirculation
This  position  is  useful  for  excluding  undesirable 
odours  or  fumes  coming  from  outside.  It  should  be 
cancelled  as  soon  as  possible  in  order  to  permit 

renewal of air in the cabin and to prevent misting.

2.  Cabin air

3.  Heater blower control

The air blower operates only when the engine is running. For 
optimum comfort in the passenger compartment, the control 
should not remain in position 0 (position 1 minimum).

4.  Temperature control

5.  Air conditioning

6.  Demisting - deicing of the rear screen.

MANUAL AIR CONDITIONING

VENTILATION - HEATING

5

3

4

B

A

5

3

4

III

70 

Air conditioning

The air conditioning only operates 
when the engine is running.
Press  the  control  located  on  the 

control panel.

Warning lamp on = in operation

Air  conditioning  is  obtained  by  the  mixing  of 
hot  air  and  cold  air.  Control 4  allows  you  to 
adjust the air conditioning while control 5 is in 
operation.
To obtain refrigerated air, you should check that 
the air blower control 3 is not on position “0”.

Air recirculation

This function isolates the passen-
ger  compartment  from  disagree-
able  odours  or  smoke  coming 

from outside and increases the effi ciency and 

rapidity of the air conditioning.
According  to  version,  press  on  control  A
(warning lamp comes on), or move control B.
The entry of air from outside is blocked.
This  function  should  be  cancelled  when  no 
longer needed in order to permit a renewal of 
cabin air and to prevent misting.
Note: To obtain a rapid rise in cabin tempera-
ture, place control A or B in the air recircula-
tion position and control 4 on maximum in the 

4

red zone.

If after a prolonged stop in bright sunlight, the cabin temperature 
is very high:

Open  the  windows  for  a  few  moments  to  let  in  air,  then  close 
the windows again.
Adjust the temperature on control 4 to the maximum cold posi-
tion.
Open the air vents.
Use the recycled cabin air position.
Place  the  air  blower  control  3  to  the  position  close  to  maxi-
mum.
With comfort restored, action the air blower 3 and the tempera-
ture control 4 to adjust comfort.


M A N U A L   A I R   C O N D I T I O N I N G

2

8

5

1

7

3

4

9

6

5

7

6

3

1

4

III

71 

A U T O M A T I C   A I R   C O N D I T I O N I N G

1.  Automatic air conditioning
2.  Display
3.  Temperature adjustment
4.  Air conditioning
5.  Air recirculation
6.  Air distribution
7. 

Air fl ow

8.  Demisting - deicing of the windscreen and front side windows
9.  Demisting - deicing of the rear screen

The  temperature  inside  the  cabin  cannot  be 
lower  than  the  temperature  outside  if  the  air 
conditioning is not operating.
The air conditioning maintains optimum com-
fort whatever the climatic conditions, through 
permanent  automatic  operation  (you  have 
pressed the “AUTO” button).
Note:  The  automatic  mode  only  calls  for 
conditioned  air  in  order  to  attain  the  desired 
cabin temperature or to remove air humidity. 
Therefore  the  air  conditioning  warning  lamp 
may come on only intermittently.

Control panel

2.  Display

2

8

5

3

9

6

7

1

4

III

72 

 A U T O M A T I C   A I R   C O N D I T I O N I N G 

 1. Automatic operation

This  is  the  normal  operating  mode  for 
the system.
A  press  on  this  button,  confi rmed  by 

AUTO”  on  the  display,  assures  auto-

matic control of:

The air fl ow.
 The cabin temperature. 
 The air distribution. 
Air recirculation.
Air conditioning.

To revert to manual mode, press again on the button.  


2. Display

3. Temperature adjustment

To obtain the desired temperature, press the appropri-
ate key:

To lower the temperature.

+  To raise the temperature.
An adjustment around 22°C will give you a temperature 

that is comfortable.
You  may  wish  to  vary  this  between  20°C  and  24°C 

according to your preference.
HI (high): Demand for maximum heat.
LO (low): Demand for maximum cold.
Note: 

When starting from cold, in order to prevent unwanted 

cold air, the air fl ow will increase only gradually to its 

optimum level.
On entering the vehicle after a prolonged stop, when 
the interior temperature has again become too cold 
(or  too  hot)  for  comfort,  do  not  alter  the  tempera-
ture  setting  to  try  and  restore  the  desired  comfort 
level. The system automatically uses all of its power 
to  compensate  the  temperature  gap  as  quickly  as 
possible.

III

73 

 A U T O M A T I C   A I R   C O N D I T I O N I N G 

Manual recalling of one or more functions

One or more functions can be adjusted manually, while still retaining the other functions in automatic mode.
The function display “AUTO” then goes out.

4. Air conditioning

Press the control located on the control 
panel.

A symbol appears on the display (system active).
To prevent misting inside the vehicle in cold or humid 
weather, you are advised to use the AUTO mode.
Press  on  the  control  on  the  dashboard  to  activate  or 
deactivate the production of cold air.
Air  conditioning  is  then  obtained  from  the  mixing  of 
hot  air  with  cold  air,  using  the  air  blower  temperature 
adjustment 3.

5. Air recirculation

By  pressing  the  control,  the  entry  of  air 
from  outside  is  closed  off  and  the  sym-
bol appears on the display.

This position is useful for excluding undesirable odours 
or fumes coming from outside. It should be cancelled 
as soon as possible in order to permit renewal of air in 
the cabin and to prevent misting.
For this, press the “AUTO” button or press again on the 
air recycling button.

6. Air distribution

Press on the button to scroll through the 

displays of air fl ow to:

Windscreen.

Central and lateral air vents. Windscreen 
and passenger footwells.

Windscreen and passenger footwells.

Passenger footwells.
(Air vents closed).

Central and lateral air vents.

Central and lateral air vents and passen-
ger footwells.

Note: In AUTO position the air distribution displayed is 
that chosen by the system.

III

74 

 A U T O M A T I C   A I R   C O N D I T I O N I N G 

To increase it.

To decrease it.

The level of air fl ow is indicated on the display by the 

progressive  fi lling  of  the  fan  blades  (seven  possible 

adjustment positions).

Note: If you place the air blower on position 0, the sys-
tem is deactivated (the display disappears).

Note: 

In AUTO  position  the  air  fl ow  displayed  is  that 

chosen by the system.

7. Air fl ow

Heater blower control. Press button:

8. Demisting - Defrosting

While  it  is  operating,  the  warning  lamp 
lights  and  the  symbol  appears  on  the 
display.
This  control  is  for  rapid  deicing  or 

demisting of the windscreen and side windows. It auto-
matically  triggers  the  air  conditioning,  optimising  air 

fl ow  and  air  distribution  for  the  continued  comfort  of 

the vehicle occupants.
To stop it, press again either on the button 8 or on the 
button “AUTO”.

9. Demisting - deicing of the rear 
screen

Press AUTO  to  return  the  system  to  its 
automatic function.

2

4

3

5

1

III

75 

F R O N T   S E A T S

1

5

4

3

2

5

III

76 

F R O N T   S E A T S

Manual adjustments

Backrest angle

Use the control to adjust the backrest angle.
It is possible to recline the backrest to an angle of 45° by tilting 

it until it locks. Press the control to unlock.

Access to the rear seat posi-
tions

To  gain  access  to  the  rear  seats 
or to exit the vehicle from there, tilt 
the control 5 towards the front and 
move the seat forwards.
Afterwards the front seat will revert 
to its initial position.
Make sure that the seat is securely 
locked in place.

Seat height and rake adjustment

Raise the control and place the seat in the desired position.

Reach

Lift the control bar and adjust to the desired position.

Head restraint

To  raise  or  lower  the  head  restraint,  pull  it  forwards  at  the 
same time as sliding it.
Adjustment  is  correct  when  the  top  of  the  head  restraint  is 

Adjustment 
level with the top of the head.

To remove it, bring it to the high position. Lift the tab with the 
aid of a coin and pull.

Should  it  be  difficult  to  lock 
a  front  seat  in  place  after 
folding back the rear bench-
seat backrest, move the front 
seat forwards using the con-
trol bar 4.

A

4

III

77 

R E A R   S E A T S

Rear head restraints

The rear head restraints are fi xed.
They incorporate a protection arch 
in case of the vehicle overturning.

Foldable backrest

The  backrest  is  foldable  either 
totally or in half.
First  adjust  the  front  seat  to  a 
forward or medium position.
It is essential to use the control 
bar 4. See “Front seats”.
Action control A located on the rear 
of the backrest.
Tilt  the  backrest  fully  towards  the 
front.
When you reposition the backrest, 
make sure that it locks in place.
Note:  The  rear  benchseat  is  not 
movable.

If you decide to drive with the doors locked, remember that 

in the event of an accident this renders access more diffi cult 

for the emergency services.

A

III

78 

A I R B A G S

In  the  front  passenger's  seat  position,  it  is  imperative  to  deactivate  the 
front  passenger's  airbag  if  you  are  installing  a  “rear-facing”  child  seat 
there.  Otherwise  the  child  risks  being  killed  or  seriously  injured  should 
the airbag deploy.

Front passenger's airbag deactivation

In order to be able to use a rear-facing child seat in the front passenger's seat position, it is imperative to deactivate 
the passenger's airbag.
For that:

With the ignition switched off, insert the key into the switch A.
Turn the key to the “OFF” position, the passenger's airbag is deactivated.
The front passenger's airbag deactivation warning lamp, in the instrument panel, lights up when you switch on 
the ignition.

Reactivating the front passenger's airbag

Do not forget to reactivate the function.
For that:

With the ignition switched off, insert the key into the switch A.
Turn the key to the “ON” position, the airbag is activated.
The warning lamp in the instrument panel lights up for a few seconds when you switch on the ignition.

The airbags only operate when the ignition is switched on. The triggering of the airbags is accompanied by a slight noise.
Note : the gas discharged from the airbags may cause slight irritation.


III

79 

C H I L D   R E S T R A I N T S

rear of the vehicle, the front seat of the vehicle must be adjusted so that the 
child’s feet do not touch the backrest of the front seat.
This child seat can also be installed in seat positions not fi tted with ISOFIX 

anchorages. In this case, it is compulsory to secure it to the seat using the 
seat belt.
(1) On ISOFIX anchorages, you may fi x only the ISOFIX child seat specifi -

cally approved for your vehicle.
Child seats secured by means of the vehicle seat belt
In conformity with Directive 2000/3, the table tells you to what extent each 

of the seat positions in your vehicle may take a child seat that is secured by 
means of the vehicle seat belt and approved as “Universal” as a function of 
the weight of the child.

Seat position(s)

Weight of child

< 13 kg

(groups 0 and 0+)

9 - 18 kg 

(group 1)

15 - 25 kg 

(group 2)

22 - 36 kg 

(group 3)

Front passenger’s (a)

U

U

U

U

Rear

U

U

U

U

KEY TO THE TABLE

U: Seat position suitable for the installation of a universal rear-facing child seat and a universal forward-facing child seat posi-
tion.

(a): In the front passenger's seat position, it is imperative to deactivate the front passenger's airbag if you are installing a “rear-fac-
ing” child seat there. Otherwise the child risks being killed or seriously injured should the airbag deploy.

Take care to comply with the fi tting instructions given in the 

child seat manufacturer’s installation guide.

ISOFIX anchoring points and 
the ISOFIX fastening system

The rear seats of your vehicle are 
equipped  with  ISOFIX  anchoring 

points.  These  consist  of  2  rings 

located  between  the  backrest  and 

the  vehicle  seat,  approx.  28  cm 

apart.
ISOFIX  child  seats  are  equipped 

with  2  latches  which  are  eay  to 

attach to these rings.
Incorrect installation of a child seat 
in  a  vehicle  compromises  protec-
tion  of  the  child  in  the  event  of  a 
collision. 
The  ISOFIX system enables you to 
minimise the risks posed by incor-

rect  fi tting.  The  ISOFIX  fastening 

system  gives  you  a  convenient, 

strong and reliable fi tting for a child 

seat in your vehicle.
The  ISOFIX  child  seat  recom-
mended (1) for your vehicle is:
The  RÖMER  Duo  Plus  ISOFIX 
(1) :
This child seat is approved for chil-

dren from 9 to 18 kg. It is only be 

installed  in  the  «forward-facing» 
position. The use of the upper strap 
is  not  necessary.  If  the  RÖMER 

position. The use of the upper strap 

upper strap 

Duo Plus  ISOFIX is installed in the 

1

2

2

III

80 

I N T E R I O R   L I G H T I N G

1.  Interior lamps

Move the control 1

 to the 3 following positions.

Automatic lighting of the interior lamps

On entering the vehicle:
They come on as soon as the vehicle is unlocked or a door is opened.
They go out 30 seconds after the doors are closed or when ignition is switched on.
On vacating the vehicle:
They come on as soon as the ignition key is removed (timed for 30 seconds), or when a door is opened.

They go out 30 seconds after all the doors have been closed or immediately after the vehicle has been locked.

2.  Spotlamps

A press on one of the buttons 2 switches the corresponding spotlamp on or off.
These do not work if the ignition is off or in economy mode.

In this position, the interior lamp comes on when you open a door 
or the boot.

In this position, it is deactivated and remains permanently off. The 
spotlamps are deactivated.

In this position, lighting is permanent.

III

81 

I N T E R I O R   C O M F O R T

Lower glovebox

To open, pull the handle and lower 
the lid.
It  comprises  a  storage  area  for 
vehicle documents.

Oddments tray on front cen-
tral console

WARNING

WARNING: As a safety measure, the glovebox must remain shut when 

the vehicle is in motion.


Content   ..  3  4  5  6   ..