Citroen C2 (2008 year). Instruction - part 4


  Index      Citroen     Citroen C2 - instruction 2008 year in english


Search            


Content   ..  2  3  4  5   ..


Citroen C2 (2008 year). Instruction - part 4


A

B

1

4

3

2

II

66 

C R U I S E   C O N T R O L

Cruise control must only be used where the traffi c conditions permit driving at a constant speed.
Do not use it on congested roads or when the weather or the road conditions are poor.

This  driving  assistance  function  allows  you  to  drive  at  the  speed  of  your 
choice without the need to action the accelerator.
This  device  is  active  at  speeds  above  approx.  40  km/h  (25 mph),  in  the 

higher gears only.
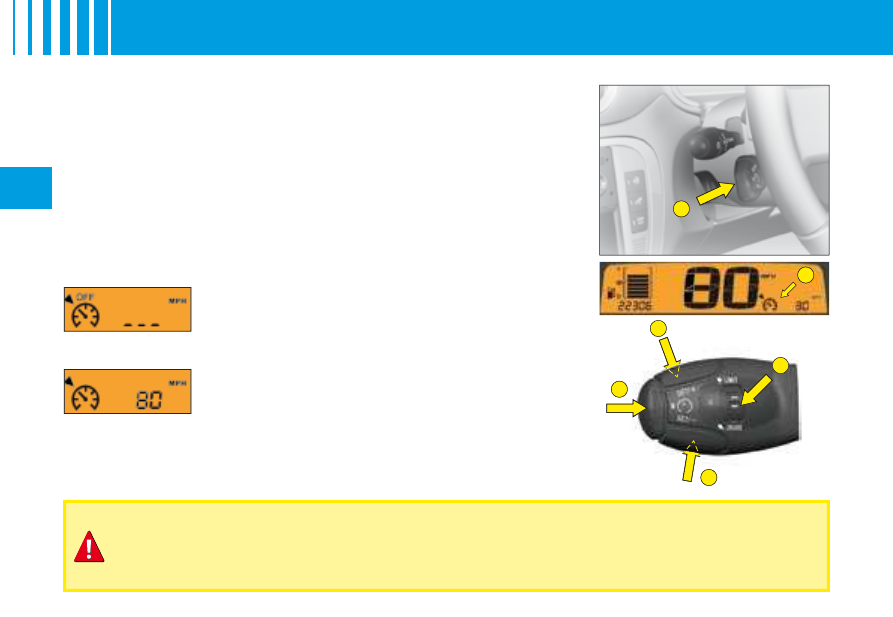
The button A for cruise control is located on the lighting control stalk.
Remark:  The  information  relating  to  the  cruise  control  is  displayed  in 
the  instrument  panel  screen  at  B.  This  display  causes  the  trip  computer 
information to disappear (if it is shown on the instrument panel).

To select the function

Turn the control 1 to the "CRUISE" position.

When  you  select  the  function  via  control  1,  no  speed 
has yet been memorised.

To select a cruise speed

Accelerate  to  the  desired  speed,  then  give  a  short  press  on  button 2  or 
button 4.

The cruise speed is then memorised. It is shown in the 
display on instrument panel B.

You  can  then  release  the  accelerator  pedal. The  vehicle  will  automatically 
keep to that chosen speed.
Remark: The vehicle speed may vary slightly from that memorised.

II

67 

C R U I S E   C O N T R O L

Temporary override of the cruise speed

While  cruise  control  is  in  operation,  it  is  always  pos-
sible to go above the cruise speed simply by pressing 
the accelerator pedal (for example to overtake another 

vehicle). The  speed  displayed  fl ashes. You  have  only 

to release the accelerator pedal to return to your cruise 
speed.
Remark: If during cruise control the system cannot keep 
to the cruise speed (e.g. on a steep descent), then the 

speed fl ashes. If necessary, brake to curb your speed.

Adjustment of the memorised speed while 
cruise control is in operation

To  adjust  the  memorised  speed,  displayed  in  zone B
press:

Button 4 to increase the speed.
Button 2 to decrease the speed.

Remark:  Successive  presses  will  modify  the  cruise 
speed  in  steps  of  1  km/h  and  a  continuous  press  in 

steps of 5 km/h (3 mph).

Disengagement of the memorised cruise speed.

Either by pressing the brake pedal or the clutch 
pedal.
Or by the ESP system being active.
Or by pressing button 3.

Note:  Cruise  control  is  deactivated  if  the  gear  lever  is  in 
neutral (position N)


Reactivation of cruise control

By recalling the memorised speed:
Following a disengagement, press on control 3.
Your vehicle automatically resumes the memorised 
cruise speed, which then displays on the screen in 
instrument panel B.
By selecting the current speed:
Give a short press on button 2 or 4, once the 
desired speed is reached.
The information "OFF" then disappears from the 
display.

If the memorised cruise speed is higher than the current 
speed, the vehicle will accelerate to match it.

To cancel the function

By moving the control from the "CRUISE" position 
to the 0 position.
Or stop the engine.

The speed that was chosen is no longer memorised.
Remark:
While cruise control is in operation, the displayed speed 

fl ashes if the memorised speed is exceeded.
If there is a malfunction, either the memorised speed or 

the dashes "- - -" will fl ash and the warning lamp "OFF" 

will come on permanently in the display.
Contact a CITROËN dealer.

These actions bring up the informa-
tion "OFF" in the instrument panel 
display.

These  actions  do  not  cancel  the  cruise  speed  which 
remains displayed.

The  driver  still  has  to  remain  attentive 
and in complete control of his vehicle.
You are recommended to keep your feet 
within range of the pedals.

A

1

4

3

2

B

II

68 

S P E E D   L I M I T E R

This  driving  assistance  function  enables  you  to  select  a  maximum  speed 
that you wish not to exceed. This must be greater than 30 km/h (approx. 
20 mph)
.
Control  A  for  the  speed  limiter  is  situated  below  the  lighting/signalling 
control stalk.
Remark:  The  information  relating  to  the  speed  limiter  is  displayed  in 
the  instrument  panel  screen  at  B.  This  display  causes  the  trip  computer 
information to disappear (if it is shown on the instrument panel).

To select the function

Turn control 1 to position "LIMIT".

On selection of the function via control 1, the last speed 
memorised is displayed.

To adjust the maximum speed

When the engine is running, you can adjust the memorised speed by either 
short presses or long presses on:

Button 4 to increase the memorised speed.
Button 2 to decrease the memorised speed.

Remark: Successive presses will modify the cruise speed in steps of 1 km/h 

and a continuous press in steps of 5 km/h (3 mph).

Activation of the maximum speed

As the desired maximum speed is displayed, press control 3 to activate the 
speed limitation.


The information "OFF" then disappears from the display.

While the function is active, actioning the accelerator pedal will not permit 
the  programmed  speed  to  be  exceeded,  unless  you  press  the  pedal  hard 
down past the tight spot. See "Temporary override of the maximum speed".
Remark: The vehicle speed may vary slightly from that memorised.

II

69 

S P E E D   L I M I T E R

Disengagement of the maximum speed

Press button 3 located on the end of control A.

This action causes the information "OFF" to appear in the instrument panel screen.
The memorised speed remains displayed and is not cancelled.

Temporary override of the maximum speed

At any time, it is possible to go above the memorised maximum speed by pressing the accelerator pedal hard down 
past the tight spot.
While the memorised speed is being exceeded, the displayed speed fl ashes.
You have only to release the accelerator pedal to return below the maximum speed, to restore the function.
Remark: If during speed limitation the system cannot keep to the maximum speed (especially on a steep descent or 

if you accelerate too hard), the speed fl ashes. Adapt your speed as necessary.
The function will re-engage when your speed has returned below the desired maximum.

To cancel the function

By moving the control from position "LIMIT" to position 0.
Or stop the engine.

The speed that you chose is memorised.
If there is a malfunction, the memorised speed will fl ash and the warning lamp "OFF" will come on permanently in 

the display. Contact a CITROËN dealer.

If there is a malfunction, the memorised speed will fl ash and the warning lamp 

If there is a malfunction, the memorised speed will fl ash and the warning lamp 


A fl oor covering that is not recommended by CITROËN may slide underneath the accelerator pedal 

and thus prevent the tight spot from being crossed.
It will then be impossible to exceed the chosen speed, except by an action on the controls under 
the steering wheel.
The driver still has to remain attentive and in complete control of his vehicle.

1

II

70 

P A R K I N G   A S S I S T A N C E

Proximity  sensors  are  located  in 
the rear bumper of your vehicle.
When  you  are  manœuvring  in 
reverse  gear  at  a  speed  of  less 
than  around  10 km/h
  (approx. 

6 mph), they inform you of the pres-

ence of any obstacle located within 
their detection zone, by means of:

An audible signal emitted by 
the rear loudspeakers on the 
LH and/or RH side.
Display of the outline of 
your vehicle with shading 
corresponding to the area 
where an obstacle is detected.

As  the  vehicle  approaches  the 
obstacle, the sound signal becomes 
more  and  more  urgent  and  the 
shaded areas are displayed closer 
and closer to the vehicle.
When  the  obstacle  is  less  than 

around 25  centimetres  from  the 

vehicle, the sound signal becomes 
continuous 

with 

display 

of 

"WARNING" panel on the screen.

Operation

When you engage reverse  gear,

a sound signal confi rms to you that 

the system is active. The outline of 
your vehicle appears on the screen. 
Any  obstacles  situated  to  the  rear 
of your vehicle can be detected.
Remarks:

The proximity sensors cannot 
detect objects that are 
immediately under or over the 
bumpers.
A thin object such as a spike, 
a bollard or similar, can only 
be detected at the start of the 
manœuvre but not when the 
vehicle arrives close up to it.
In poor weather or in winter, 
you need to ensure that the 
sensors are not covered with 
mud or with ice or snow.
This system in no way replaces 
vigilance and responsibility on 
the part of the driver.

Activation/Deactivation

You  can  activate/deactivate  the 
parking  assistance  by  pressing 
button 1.  When  the  parking  assis-
tance is inactive, the warning lamp 
on button 1 is lit up.
Activation/deactivation of the parking 
assistance  is  memorised  when  you 
stop the vehicle.
Remark: The system is deactivated 
automatically if a trailer is attached 
to the vehicle.
The  fi tting  of  the  towbar  should 

be  carried  out  by  the  CITROËN 

The  fi tting  of  the  towbar  should 

The  fi tting  of  the  towbar  should 

network.

A

B

III

71 

Locking from the inside

A  press  on  the  control A  operates 
the  electric  central  locking  and 
unlocking,  provided  all  the  doors 
are closed.
It is still possible to open the doors 
from the inside.
If  one  of  the  doors  or  the  tailgate 
is open or not properly closed, the 
central locking does not operate.

The warning lamp associated with the control A signals 3 statuses:

lt fl ashes when the ignition key is in the stop position or when the key is 

not detected and the doors are locked.
It lights up when the ignition key is in the "accessories" position or 
"ignition + engine running" or starter position and if the doors are locked.
It goes out when the doors are not locked.

Note: Control A is inactive if the vehicle has been locked using the remote 
control or the key.

Anti-theft

In  all  cases,  as  soon  as  the  vehicle  is  moving  above  a  speed  of  10 km/h 
(approx. 6 mph), the tailgate locks automatically. The tailgate unlocks when 
a door is opened or when the interior locking/unlocking control is actioned.

Anti-theft protection

On starting the vehicle, the system automatically locks the doors as soon as 
you reach approximately 10 km/h (approx. 6 mph).
Note: If a door has been opened, this will lock again automatically when the 
vehicle reaches approx. 10 km/h (approx. 6 mph).

Activation/Deactivation of the function

After  switching  on  the  ignition,  give  a  long  press  on  the  central  unlocking 
button until a message is displayed.

Manual operation 
(Emergency mode)

It  is  possible  to  lock  the  vehicle’s 
doors, in the event of an electrical 
malfunction, by actioning control B
on each door.
With  the  door  open,  insert  for 
example  the  end  of  a  key  into  the 
cavity and turn.
Then close the door.
After  a  repair,  normal  functioning 
resumes  by  means  of  the  unlock-
ing control A, the remote control or 
the key used in the driver’s door.

If  you  decide  to  drive 
with the doors locked, 
remember  that  in  the 
event  of  an  accident 
this  renders  access 
more  difficult  for  the 
emergency services.

A C C E S S

ANTI-THEFT AND ANTI-INTRUSION PROTECTION

2

1

2

1

B

C

A

III

72 

The boot can be accessed in 
two ways:

Open  the  upper  tailgate  1  by 
pressing  control  A  (The  luggage- 
cover  folds  automatically  against 
the  upper  tailgate  to  permit  rapid 
access to the boot contents).
Open the upper tailgate 1 by press-
ing control A, then the lower tailgate 
2 by moving control B.

Closing the upper and lower 
rear tailgates

Close tailgate 2, then tailgate 1.
Note:  As  soon  as  the  vehicle  is 
moving at around 10 km/h (approx. 
6 mph), the tailgates lock automati-
cally.

Unlocking in emergency

In  the  event  of  a  malfunction  in 
unlocking  of  the  upper  tailgate, 
it  can  be  unlocked  from  the  boot 
interior:

Insert a screwdriver into the 
aperture C in the lock.
Move it until the upper tailgate 
unlocks.

It is necessary to open the upper tailgate in order to access 
the opening control for the lower tailgate.
Always  close  the  lower  tailgate  before  reclosing  the  upper 
tailgate.
The lower tailgate can support spread loads of up to 100 kg.

A C C E S S

A

III

73 

V E N T I L A T I O N   -   H E A T I N G

Warning: The automatic air conditioning system uses 
a  temperature  sensor  located  on  the  dashboard  (see 
reference A), this sensor should not be obstructed.

1

2

3

5

6

1

1

1

2

2

2

3

3

3

5

6

6

6

4

4

4

4

III

75 

V E N T I L A T I O N   -   H E A T I N G   - 

M A N U A L   A I R   C O N D I T I O N I N G

Air fl ow to the face level vents
(Air vents open)

1.  Air distribution

Air fl ow to the front and rear footwells
(Air vents closed)

Air fl ow to the footwells and windscreen and side 

windows

Air fl ow to the windscreen and side windows
Demisting - Defrosting

Distribution  from  the  air  blower  can  be  altered  at  will  by 
placing the distributor 1 in an intermediate position.

Air recirculation
This  position  is  useful  for  excluding  undesirable 
odours  or  fumes  coming  from  outside.  It  should  be 
cancelled  as  soon  as  possible  in  order  to  permit 

renewal of air in the cabin and to prevent misting.

2.  Cabin air

3.  Heater blower control

The air blower operates only when the engine is running. For 
optimum comfort in the passenger compartment, the control 
should not remain in position 0 (position 1 minimum).

4.  Temperature control

5.  Air conditioning

6.  Demisting - deicing of the rear screen.

MANUAL AIR CONDITIONING

VENTILATION - HEATING

III

74 

V E N T I L A T I O N   -   A I R   C O N D I T I O N I N G

Air inlet

Check  that  the  exterior  grille  for  the  air  inlet,  at  the 
bottom  of  the  windscreen,  is  clean  and  free  of  dead 
leaves, snow, etc.
If  washing  the  vehicle  with  a  high  pressure  jet,  avoid 
targeting the air inlet zone.

Air vents

The air vents to the face (except the central air vent) have 

grilles for orienting the fl ow of air (up-down, right-left).

Air circulation

For  your  comfort  we  advise  you  to  maintain  a  proper 
distribution of air within the cabin, both at the front and 
at the rear.
Air  outlets  are  also  located  on  the  central  console 
close to the gear lever, to enhance comfort for the rear 
passengers.

Pollen fi lter – Odour fi lter

Your installation has a fi lter for keeping out dust.
This fi lter has to be changed according to the vehicle 

maintenance schedule. See "Maintenance Guide".

Air conditioning

Whatever  the  time  of  year,  even  in  cool  weather  the 
air  conditioning  is  useful  in  removing  humidity  and 
misting.
To keep the air conditioning compressor well sealed, it 
is essential to operate the air conditioning at least once 
in every month.
To be effective, the air conditioning should only be used 
with the windows closed.
If you are towing a heavy trailer and outside tempera-
tures are high, the air conditioning may be temporarily 
paused if the engine cooling requires this.
Water arising from condensation in the air conditioning 
system  is  evacuated  through  a  hole  provided  for  this 
purpose; a pool of water may thus form underneath the 
vehicle when stationary.
You  are  advised  to  have  the  air  conditioning  system 
checked on a regular basis. See "Maintenance Guide".
The  air  conditioning  operates  by  using  power  from 
the  engine.  This  results  in  a  slight  increase  in  fuel 
consumption.

Demisting - deicing of the 
windscreen and front side 
windows

Place the controls for temperature and 

air fl ow on maximum.

Close the central air vents.
Operate the air conditioning.

Note: You should not be in air recirculation.


1

2

3

5

6

1

1

1

2

2

2

3

3

3

5

6

6

6

4

4

4

4

III

75 

V E N T I L A T I O N   -   H E A T I N G   - 

M A N U A L   A I R   C O N D I T I O N I N G

Air fl ow to the face level vents
(Air vents open)

1.  Air distribution

Air fl ow to the front and rear footwells
(Air vents closed)

Air fl ow to the footwells and windscreen and side 

windows

Air fl ow to the windscreen and side windows
Demisting - Defrosting

Distribution  from  the  air  blower  can  be  altered  at  will  by 
placing the distributor 1 in an intermediate position.

Air recirculation
This  position  is  useful  for  excluding  undesirable 
odours  or  fumes  coming  from  outside.  It  should  be 
cancelled  as  soon  as  possible  in  order  to  permit 

renewal of air in the cabin and to prevent misting.

2.  Cabin air

3.  Heater blower control

The air blower operates only when the engine is running. For 
optimum comfort in the passenger compartment, the control 
should not remain in position 0 (position 1 minimum).

4.  Temperature control

5.  Air conditioning

6.  Demisting - deicing of the rear screen.

MANUAL AIR CONDITIONING

VENTILATION - HEATING

5

3

4

B

A

5

3

4

III

76 

Air conditioning

The air conditioning only operates 
when the engine is running.
Press  the  control  located  on  the 
control panel.

Warning lamp on = in operation

Air  conditioning  is  obtained  by  the  mixing  of 
hot  air  and  cold  air.  Control 4  allows  you  to 
adjust the air conditioning while control 5 is in 
operation.
To obtain refrigerated air, you should check that 
the air blower control 3 is not on position "0".

Air recirculation

This function isolates the passen-
ger  compartment  from  disagree-
able  odours  or  smoke  coming 

from outside and increases the effi ciency and 

rapidity of the air conditioning.
According  to  version,  press  on  control  A
(warning lamp comes on), or move control B.
The entry of air from outside is blocked.
This  function  should  be  cancelled  when  no 
longer needed in order to permit a renewal of 
cabin air and to prevent misting.
Note: To obtain a rapid rise in cabin temperature, 
place control A or B in the air recirculation posi-
tion and control 4 on maximum in the red zone.

4

If after a prolonged stop in bright sunlight, the cabin temperature 
is very high:

Open the windows for a few moments to let in air, then close 
the windows again.
Adjust the temperature on control 4 to the maximum cold position.

4

Open the air vents.
Use the recycled cabin air position.
Place the air blower control 3 to the position close to maximum.
With comfort restored, action the air blower 3 and the 
temperature control 4 to adjust comfort.


M A N U A L   A I R   C O N D I T I O N I N G

2

8

5

7

3

9

6

1

4

1

4

5

7

6

3

III

77 

1. Automatic air conditioning
2. Display
3. Temperature adjustment
4. Air conditioning
5. Air recirculation
6. Air distribution
7. 

Air fl ow

8. Demisting - deicing of the windscreen and front side windows
9. Demisting - deicing of the rear screen

The  temperature  inside  the  cabin  cannot  be 
lower  than  the  temperature  outside  if  the  air 
conditioning is not operating.
The air conditioning maintains optimum com-
fort whatever the climatic conditions, through 
permanent  automatic  operation  (you  have 
pressed the 

"AUTO" button).

Note:  The  automatic  mode  only  calls  for 
conditioned  air  in  order  to  attain  the  desired 
cabin temperature or to remove air humidity. 
Therefore  the  air  conditioning  warning  lamp 
may come on only intermittently.

Control panel

2.  Display

A U T O M A T I C   A I R   C O N D I T I O N I N G

2

8

5

3

9

6

7

1

4

III

78 

A U T O M A T I C   A I R   C O N D I T I O N I N G

1. Automatic operation

This  is  the  normal  operating  mode  for 
the system.

A  press  on  this  button,  confi rmed  by 

"AUTO" on the 

display, assures automatic control of:

The air fl ow.
The cabin temperature.
The air distribution.
Air recirculation.
Air conditioning.

To revert to manual mode, press again on the button.


2. Display

3. Temperature adjustment

To obtain the desired temperature, press the appropriate 
key:

To lower the temperature.

+  To raise the temperature.
An  adjustment  around  22 °C  will  give  you  a  tempera-
ture that is comfortable.
You  may  wish  to  vary  this  between  20 °C  and  24 °C 
according to your preference.
HI (high): Demand for maximum heat.
LO (low): Demand for maximum cold.
Note: 

When starting from cold, in order to prevent 

unwanted cold air, the air fl ow will increase only 

gradually to its optimum level.
On entering the vehicle after a prolonged stop, 
when the interior temperature has again become 
too cold (or too hot) for comfort, do not alter the 
temperature setting to try and restore the desired 
comfort level. The system automatically uses all of 
its power to compensate the temperature gap as 
quickly as possible.

III

79 

A U T O M A T I C   A I R   C O N D I T I O N I N G

Manual recalling of one or more functions

One or more functions can be adjusted manually, while still retaining the other functions in automatic mode.
The function display 

"AUTO" then goes out.

4. Air conditioning

Press the control located on the control 
panel.

A symbol appears on the display (system active).
To prevent misting inside the vehicle in cold or humid 
weather, you are advised to use the 

AUTO mode.

Press  on  the  control  on  the  dashboard  to  activate  or 
deactivate the production of cold air.
Air  conditioning  is  then  obtained  from  the  mixing  of 
hot  air  with  cold  air,  using  the  air  blower  temperature 
adjustment 3.

5. Air recirculation

By  pressing  the  control,  the  entry  of  air 
from outside is closed off and the symbol 
appears on the display.

This position is useful for excluding undesirable odours 
or fumes coming from outside. It should be cancelled 
as soon as possible in order to permit renewal of air in 
the cabin and to prevent misting.
For  this,  press  the 

"AUTO" button or press again on 

the air recycling button.

6. Air distribution

Press on the button to scroll through the 

displays of air fl ow to:

Windscreen.

Central and lateral air vents. Windscreen 
and passenger footwells.

Windscreen and passenger footwells.

Passenger footwells.
(Air vents closed).

Central and lateral air vents.

Central and lateral air vents and 
passenger footwells.

Note: In AUTO position the air distribution displayed is 
that chosen by the system.

III

80 

A U T O M A T I C   A I R   C O N D I T I O N I N G

To increase it.

To decrease it.

The level of air fl ow is indicated on the display by the 

progressive  fi lling  of  the  fan  blades  (seven  possible 

adjustment positions).

Note:  If  you  place  the  air  blower  on  position  0,  the 
system is deactivated (the display disappears).

Note:  In  AUTO

  position  the  air  fl ow  displayed  is  that 

O

chosen by the system.

7. Air fl ow

Heater blower control. Press button:

8. Demisting - Defrosting

While  it  is  operating,  the  warning  lamp 
lights  and  the  symbol  appears  on  the 
display.

This control is for rapid deicing or demisting of the wind-
screen and side windows. It automatically triggers the 

air conditioning, optimising air fl ow and air distribution 

for the continued comfort of the vehicle occupants.
To stop it, press again either on the button 8 or on the 
button 

"AUTO".

9.  Demisting - deicing of the rear 

screen

Press AUTO  to  return  the  system  to  its 

automatic function.


Content   ..  2  3  4  5   ..