Chrysler Town, Dodge Caravan. Manual - part 446


  Index      Chrysler     Chrysler TOWN & COUNTRY, VOYAGER, Dodge Caravan - service repair manual 2001-2007 year


Search            


Content   ..  444  445  446  447   ..


Chrysler Town, Dodge Caravan. Manual - part 446


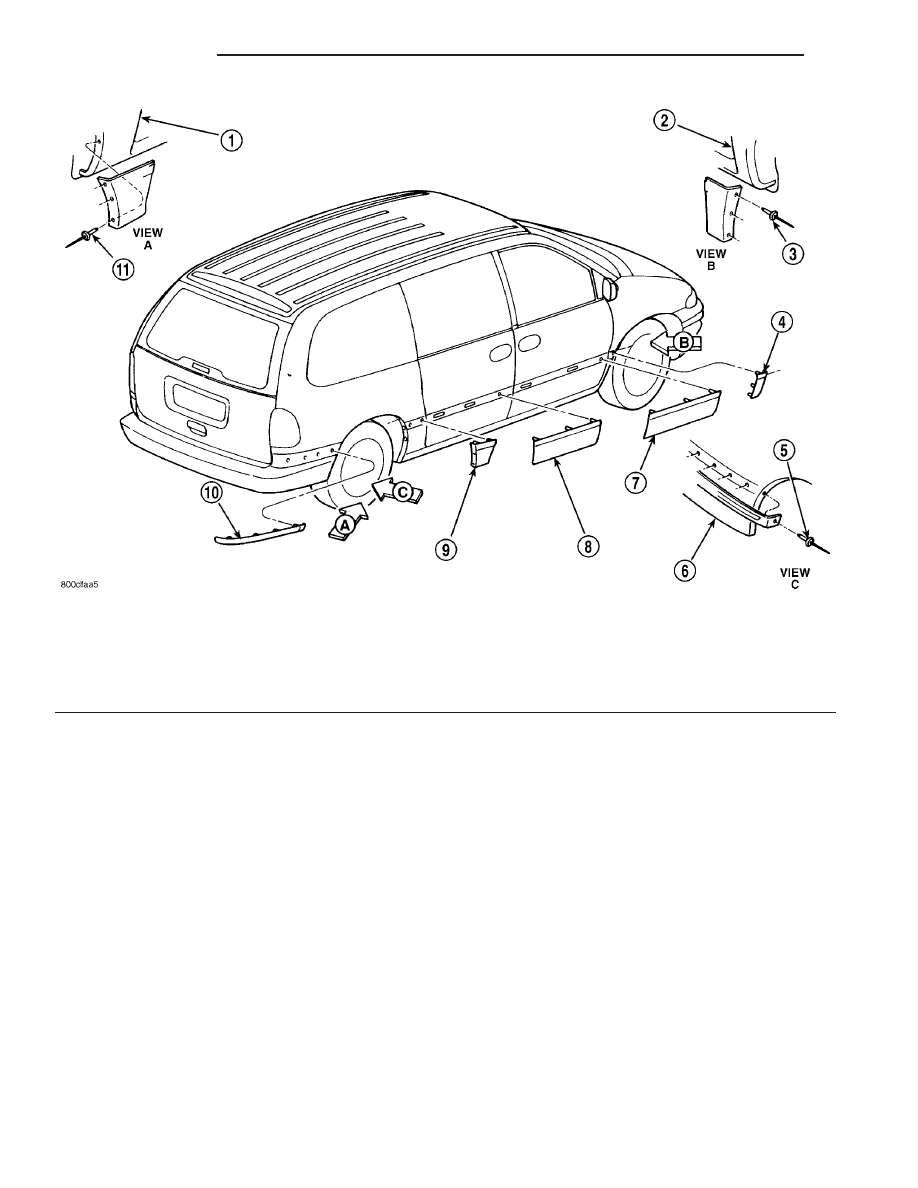
Fig. 4 BODY SIDE MOLDINGS - PREMIUM TYPICAL

1 - QUARTER PANEL
2 - FRONT FENDER
3 - POP-RIVET
4 - FENDER MOLDING
5 - POP-RIVET
6 - FASCIA

7 - FRONT DOOR MOLDING
8 - SLIDING DOOR MOLDING
9 - QUARTER PANEL MOLDING
10 - FASCIA MOLDING
11 - POP-RIVET

23 - 48

EXTERIOR

RS

BODY SIDE MOLDINGS (Continued)

COWL GRILLE

REMOVAL

(1) Remove wiper arms. (Refer to 8 - ELECTRI-

CAL/WIPERS/WASHERS/WIPER

ARMS

-

REMOVAL)

(2) Remove four (4) screws securing cowl cover to

wiper module (Fig. 6).

(3) Disengage quarter turn fasteners at outboard

ends of cowl grill from body.

(4) Release hood latch and open hood.

CAUTION: To prevent hood scratching of cowl grille
before removal, cover outboard exterior ends of
cowl grille with masking tape or equivalent method.

NOTE: Do not over bend cowl grille during removal.
Bend cowl grille just enough to clear top of wiper
pivot shaft and bottom rear corner of hood.

(5) Remove cowl grill by raising above driver side

wiper pivot shaft and swinging away towards engine
compartment. The cowl grille will need to be bent on
outboard end to clear simultaneously top of wiper
pivot shaft and bottom corner of hood.

(6) Close hood. Do not latch. Remove outboard

screws. (Fig. 7).

(7) Disconnect washer hose in line connector.
(8) Disconnect washer hose and grommet from

hole in wiper module and pull out.

(9) Remove cowl grille by raising over opposite

wiper pivot shaft and removing away from vehicle.

(10) Remove cowl cover from vehicle.

Fig. 5 BODY SIDE MOLDINGS WITH APPLIQUE - TYPICAL

1 - FRONT ROCKER PANEL APPLIQUE
2 - FRONT DOOR MOLDING
3 - SLIDING DOOR MOLDING

4 - REAR ROCKER PANEL APPLIQUE
5 - LIFTGATE MOLDING
6 - POP-RIVET

RS

EXTERIOR

23 - 49

BODY SIDE MOLDINGS (Continued)

INSTALLATION

(1) Reverse removal procedure.
(2) When installing cowl cover over wiper module,

make sure fore aft locator on the underside of cowl
grill seat into the locator grooves on top of wiper
module.

(3) Star all cowl grille mounting screws by hand

before torquing to specifications.

(4) Assure washer hose is properly routed and not

pinched.

(5) Center cowl grille to body and windshield.

(6) Assure “arrow” indicator head of quarter turn

fasteners is pointing toward windshield.

(7) Tighten screw to 1.2 N·m (11 in. lbs.) torque.
(8) Install the wiper arms. (Refer to 8 - ELECTRI-

CAL/WIPERS/WASHERS/WIPER ARMS - INSTAL-
LATION)

(9) Check for proper spray pattern from washer

nozzles.

EXTERIOR NAME PLATES -
TAPE ATTACHED

REMOVAL

(1) Mark reference points before removing.
(2) Using a heat gun gently apply heat in a circu-

lar motion to loosen the adhesive bond.

(3) Using a nonmetallic prying device, such as a

plastic or wood trim stick gently pry up at corners
and remove.

(4) Clean off all traces of adhesive or double sided

tape from the panel with a general purpose adhesive
remover.

INSTALLATION

(1) Clean panel surface with isopropy alcohol.
(2) Align badgeing to reference points.
(3) Install and press securely to full adhesive con-

tact

(4) Clean away any reference points.

EXTERIOR NAME PLATES -
ADHESIVE ATTACHED

REMOVAL

(1) Mark reference points before removing.
(2) Using a heat gun gently apply heat in a circu-

lar motion to loosen the adhesive bond.

(3) With your fingernail lift up and peel away

badgeing/tape from panel, using a heat gun as you
go.

(4) Clean off all traces of adhesive from the pan-

el(s) with a general purpose adhesive remover.

INSTALLATION

(1) Clean panel surface with isopropy alcohol.
(2) Remove paper carrier and align badgeing/tape

to reference points or adjacent panel.

(3) Install and press securely, using a plastic

spreader to eliminate all air bubbles.

(4) Remove top protective carrier.
(5) Clean away any reference points.

Fig. 6 COWL COVER

1 - COWL COVER
2 - WIPER PIVOT
3 - WASHER HOSES
4 - HOOD

Fig. 7 COWL COVER RETAINERS

1 - SCREW
2 - WINDSHIELD
3 - COWL COVER
4 - FRONT FENDER

23 - 50

EXTERIOR

RS

COWL GRILLE (Continued)

FRONT FENDER

REMOVAL

(1) Remove headlamp housing. (Refer to 8 - ELEC-

TRICAL/LAMPS/LIGHTING

-

EXTERIOR/HEAD-

LAMP UNIT - REMOVAL)

(2) Remove mud guard.
(3) Remove inner splash shield.
(4) Remove fender to fascia nuts.
(5) Remove outboard cowl grille/fender bracket

screw.

(6) Remove fender bolt to lower rocker panel.
(7) Remove fender bolt to lower cowl.
(8) Pull fascia away from fender.
(9) Remove bolts attaching fender to upper rail.
(10) Remove fender from vehicle (Fig. 8).

INSTALLATION

(1) Place fender in position on vehicle.
(2) From inside engine compartment, start the

center upper rail bolt. install all the bolts attaching
fender to upper rail and tighten.

(3) Install fender to lower cowl panel bolt.
(4) Install fender to rocker panel bolt.
(5) Place fascia into position.
(6) Install

outboard

cowl

grille/fender

bracket

screw.

(7) Install fender to fascia nuts.
(8) Install inner splash shield.
(9) Install mud guard.

(10) Install headlamp assembly. (Refer to 8 -

ELECTRICAL/LAMPS/LIGHTING

-

EXTERIOR/

HEADLAMP UNIT - INSTALLATION)

(11) Check fender for flush and gap.

FUEL FILL DOOR

REMOVAL

(1) Remove left quarter trim panel.
(2) Remove water shield patch covering access hole

in C-pillar.

(3) Disengage latch release link from clip on fuel

fill blocker latch arm (Fig. 12).

(4) Open fuel fill door.
(5) Remove screws holding fuel fill neck to fuel

filler housing.

(6) Position fuel fill neck out of the way.
(7) Reaching inside fuel filler housing, release clips

holding housing to quarter panel (Fig. 9).

(8) Remove fuel fill door from vehicle.
(9) Disengage clip holding link to fuel fill door

(Fig. 13).

(10) Remove link from fuel fill door.

INSTALLATION

(1) Install spring to housing and door
(2) Snap door into housing.
(3) Insert lockout link into clip on fuel fill door.
(4) Engage clip to hold link to fuel fill door.
(5) Insert lockout link through grommet in panel

between inner and outer quarter panel.

(6) Close fuel fill door.
(7) Install fuel filler housing to outer quarter

panel.

Fig. 8 FENDER

1 - FASTENERS
2 - FENDER
3 - FASTENERS

Fig. 9 FUEL FILLER HOUSING AND DOOR

1 - FUEL FILLER HOUSING W/LATCH
2 - CLIP
3 - FUEL FILLER HOUSING DOOR
4 - CLIPS
5 - FIX CLIP

RS

EXTERIOR

23 - 51


Content   ..  444  445  446  447   ..