Chrysler Town, Dodge Caravan. Manual - part 413


  Index      Chrysler     Chrysler TOWN & COUNTRY, VOYAGER, Dodge Caravan - service repair manual 2001-2007 year


Search            


Content   ..  411  412  413  414   ..


Chrysler Town, Dodge Caravan. Manual - part 413


(3) Select sensors.
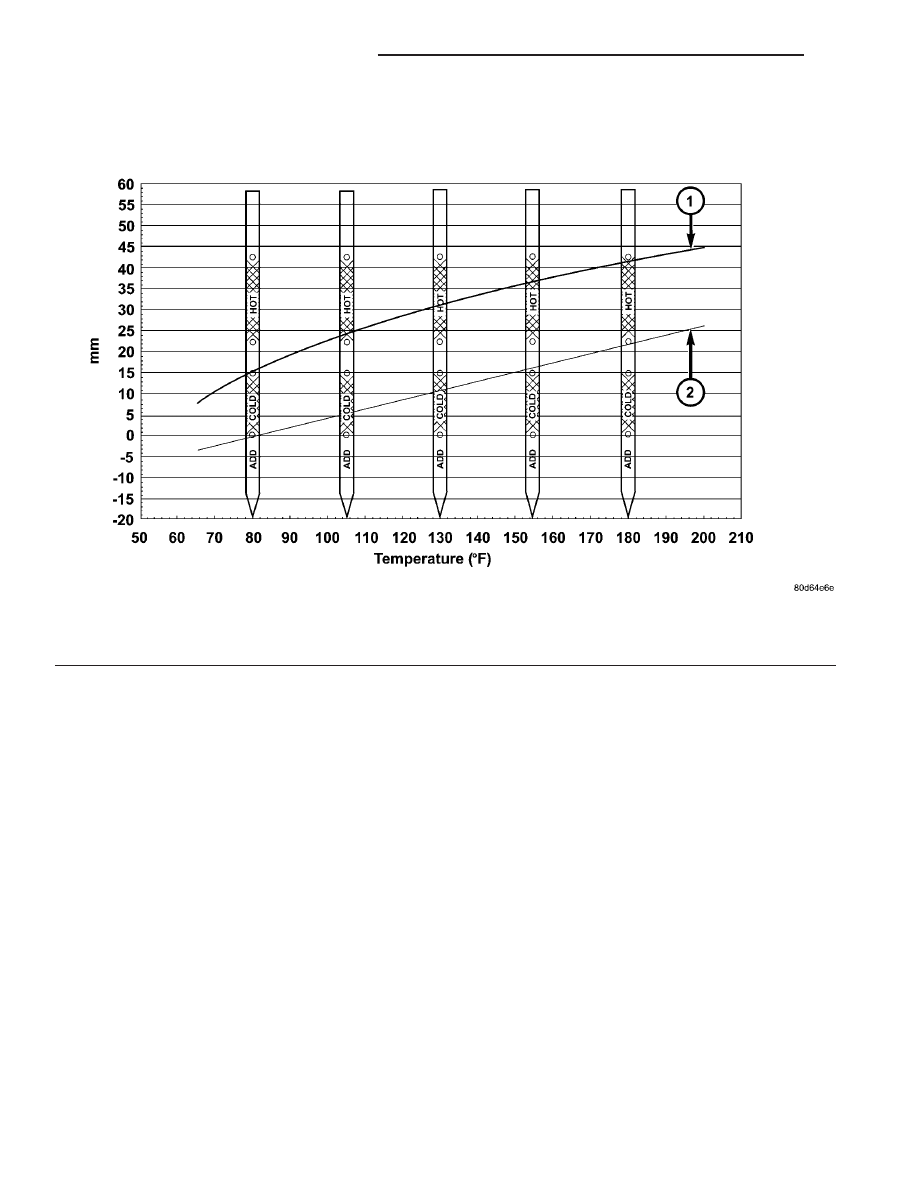
(4) Read the transmission temperature value.
(5) Compare the fluid temperature value with the

fluid temperature chart (Fig. 210).

(6) Adjust transmission fluid level shown on the

indicator according to the chart.

(7) Check transmission for leaks.
Low fluid level can cause a variety of conditions

because it allows the pump to take in air along with
the fluid. As in any hydraulic system, air bubbles
make the fluid spongy, therefore, pressures will be
low and build up slowly.

Improper filling can also raise the fluid level too

high. When the transaxle has too much fluid, the
gears churn up foam and cause the same conditions
which occur with a low fluid level.

In either case, air bubbles can cause overheating

and/or fluid oxidation, and varnishing. This can
interfere with normal valve, clutch, and accumulator
operation. Foaming can also result in fluid escaping
from the transaxle vent where it may be mistaken
for a leak.

FLUID CONDITION

Along with fluid level, it is important to check the

condition of the fluid. When the fluid smells burned,
and is contaminated with metal or friction material
particles, a complete transaxle recondition is proba-
bly required. Be sure to examine the fluid on the dip-
stick closely. If there is any doubt about its condition,
drain out a sample for a double check.

Mopar

t ATF+4 (Automatic Transmission Fluid)

when new is red in color. The ATF is dyed red so it
can be identified from other fluids used in the vehicle
such as engine oil or antifreeze. The red color is not
permanent and is not an indicator of fluid condition.
As the vehicle is driven, the ATF will begin to look
darker in color and may eventually become brown.
This is normal. ATF+4 also has a unique odor that
may change with age. Consequently, odor and color
cannot be used to indicate the fluid condition
or the need for a fluid change.

After the fluid has been checked, seat the dipstick

fully to seal out water and dirt.

Fig. 210 Transmission Fluid Temperature Chart

1 - MAX. LEVEL
2 - MIN. LEVEL

21 - 202

41TE AUTOMATIC TRANSAXLE

RS

FLUID (Continued)

STANDARD PROCEDURE - FLUID AND FILTER
SERVICE

NOTE: Refer to the maintenance schedules in
LUBRICATION and MAINTENANCE, or the vehicle
owner’s manual, for the recommended maintenance
(fluid/filter change) intervals for this transaxle.

NOTE: Only fluids of the type labeled Mopar

T

ATF+4

(Automatic Transmission Fluid) should be used. A
filter change should be made at the time of the
transmission oil change. The magnet (on the inside
of the oil pan) should also be cleaned with a clean,
dry cloth.

NOTE: If the transaxle is disassembled for any rea-
son, the fluid and filter should be changed.

FLUID/FILTER SERVICE (RECOMMENDED)

(1) Raise vehicle on a hoist. Refer to LUBRICA-

TION and MAINTENANCE for proper procedures.
Place a drain container with a large opening, under
transaxle oil pan.

(2) Loosen pan bolts and tap the pan at one corner

to break it loose allowing fluid to drain, then remove
the oil pan.

(3) Install a new filter and o-ring on bottom of the

valve body (Fig. 211).

(4) Clean the oil pan and magnet. Reinstall pan

using new Mopar Silicone Adhesive sealant. Tighten
oil pan bolts to 19 N·m (165 in. lbs.).

(5) Pour four quarts of Mopar

t ATF+4 (Automatic

Transmission Fluid) through the dipstick opening.

(6) Start engine and allow to idle for at least one

minute. Then, with parking and service brakes
applied, move selector lever momentarily to each
position, ending in the park or neutral position.

(7) Check the transaxle fluid level and add an

appropriate amount to bring the transaxle fluid level
to 3mm (1/8 in.) below the lowest mark on the dip-
stick (Fig. 212).

(8) Recheck the fluid level after the transaxle has

reached normal operating temperature (180°F.). Refer
to Fluid Level and Condition Check for the proper
fluid fill procedure.

(9) To prevent dirt from entering transaxle, make

certain that dipstick is fully seated into the dipstick
opening.

DIPSTICK TUBE FLUID SUCTION METHOD
(ALTERNATIVE)

(1) When performing the fluid suction method,

make sure the transaxle is at full operating temper-
ature.

(2) To perform the dipstick tube fluid suction

method, use a suitable fluid suction device (Vacula™
or equivalent).

(3) Insert the fluid suction line into the dipstick

tube.

NOTE: Verify that the suction line is inserted to the
lowest point of the transaxle oil pan. This will
ensure complete evacuation of the fluid in the pan.

(4) Follow the manufacturers recommended proce-

dure and evacuate the fluid from the transaxle.

(5) Remove the suction line from the dipstick tube.

Fig. 211 Filter and O-Ring

1 - OIL FILTER
2 - O-RING

Fig. 212 Fluid Level Indicator

1 - FLUID LEVEL INDICATOR

RS

41TE AUTOMATIC TRANSAXLE

21 - 203

FLUID (Continued)

(6) Pour four quarts of Mopar

t ATF+4 (Automatic

Transmission Fluid) through the dipstick opening.

(7) Start engine and allow to idle for at least one

minute. Then, with parking and service brakes
applied, move selector lever momentarily to each
position, ending in the park or neutral position.

(8) Check the transaxle fluid level and add an

appropriate amount to bring the transaxle fluid level
to 3mm (1/8 in.) below the lowest mark on the dip-
stick (Fig. 212).

(9) Recheck the fluid level after the transaxle has

reached

normal

operating

temperature

(180°F.).

(Refer to 21 - TRANSMISSION/TRANSAXLE/AUTO-
MATIC - 41TE/FLUID - STANDARD PROCEDURE)

(10) To prevent dirt from entering transaxle, make

certain that dipstick is fully seated into the dipstick
opening.

GEAR SHIFT CABLE

REMOVAL

(1) Disconnect battery cables.
(2) Remove battery shield.
(3) Remove battery.
(4) Remove speed control servo and position out of

way.

(5) Disconnect gear shift cable at manual valve

lever (Fig. 213).

(6) Disconnect gear shift cable from upper mount

bracket (Fig. 213).

(7) Remove instrument panel lower silencer (Fig.

214).

(8) Remove knee bolster (Fig. 215).

(9) Disconnect gear shift cable from gear shift

lever (Fig. 216).

(10) Remove gear shift cable from column bracket

(Fig. 216).

(11) Disengage grommet from dash panel (Fig.

217) and remove gear shift cable from inside vehicle.

Fig. 213 Gearshift Cable at Transaxle - Typical

1 - MANUAL VALVE LEVER
2 - GEAR SHIFT CABLE
3 - UPPER MOUNT BRACKET

Fig. 214 Instrument Panel Lower Silencer

1 - INSTRUMENT PANEL LOWER SILENCER

Fig. 215 Knee Bolster

1 - KNEE BOLSTER

21 - 204

41TE AUTOMATIC TRANSAXLE

RS

FLUID (Continued)

INSTALLATION

(1) Fish gear shift cable dash panel opening into

engine compartment and secure grommet (Fig. 218).

(2) Install gear shift cable through column bracket

(Fig. 219) until audible “click” is heard.

(3) Connect gear shift cable to gear shift lever (Fig.

219).

Fig. 216 Gearshift Cable at Column

1 - GEAR SHIFT CABLE

Fig. 217 Gearshift Cable/Grommet at Dash Panel

1 - CABLE GROMMET
2 - DASH PANEL

Fig. 218 Gearshift Cable/Grommet at Dash Panel

1 - CABLE GROMMET
2 - DASH PANEL

Fig. 219 Gearshift Cable at Column

1 - GEAR SHIFT CABLE

RS

41TE AUTOMATIC TRANSAXLE

21 - 205

GEAR SHIFT CABLE (Continued)


Content   ..  411  412  413  414   ..