Chrysler Town, Dodge Caravan. Manual - part 73


  Index      Chrysler     Chrysler TOWN & COUNTRY, VOYAGER, Dodge Caravan - service repair manual 2001-2007 year


Search            


Content   ..  71  72  73  74   ..


Chrysler Town, Dodge Caravan. Manual - part 73


REMOVAL

There are no repairs to be made to the fan or

shroud assembly. If the fan is warped, cracked, or
otherwise damaged, it must be replaced as an assem-
bly (Fig. 21).

(1) Remove the radiator upper crossmember. (Refer

to 23 - BODY/EXTERIOR/GRILLE OPENING REIN-
FORCEMENT - REMOVAL)

(2) Disconnect the radiator fan electrical connec-

tors.

(3) Remove radiator fan(s) retaining screw (Fig.

21).

(4) Remove the radiator fan(s) by lifting upward to

release from mounts.

INSTALLATION

(1) Install the radiator fan(s) into mounts and

attaching clips on the radiator.

(2) Install radiator fan(s) attaching screws (Fig.

21). Tighten to 5 N·m (45 in. lbs.).

(3) Connect the radiator fan(s) electrical connec-

tors.

(4) Install the radiator upper support crossmem-

ber. (Refer to 23 - BODY/EXTERIOR/GRILLE OPEN-
ING REINFORCEMENT - INSTALLATION)

(5) Install the upper radiator mounts to the cross-

member bolts, if removed. Tighten to 8 N·m (70 in.
lbs.).

(6) Install the radiator upper hose to the support

clip (2.4L engine).

RADIATOR FAN RELAY

DESCRIPTION

The radiator fan relay is a solid state type and is

located on the front bumper reinforcment (Fig. 22).
Refer to WIRING DIAGRAMS for a circuit sche-
matic.

OPERATION

The solid state radiator fan relay is controlled by

the Powertrain Control Module (PCM) by way of a
Pulse Width Modulated (PWM) signal. The relay con-
trol circuit supplies a 12 volt signal to the PCM. The
PCM then pulses the ground circuit to achieve fan on
time. The relay provides a voltage to the fan motors
which is proportional to the pulse width it receives
from the PCM. The duty cycle ranges from 30% for
low speed operation, then ramps-up to 100% for high
speed operation. This fan control system provides
infinitely variable fan speeds, allowing for improved
fan noise, A/C performance, better engine cooling,
and additional vehicle power.

To control operation of the relay, the PCM looks at

inputs from:

• Engine coolant temperature

• A/C pressure transducer

• Ambient temperature from the body controller

• Vehicle speed

• Transmission oil temperature
The PCM uses these inputs to determine when the

fan should operate and at what speed. For further
information on fan operation, (Refer to 7 - COOL-
ING/ENGINE/RADIATOR FAN - OPERATION).

REMOVAL

(1) Open hood.
(2) Disconnect and isolate the battery negative

cable.

(3) Remove the radiator crossmember to front fas-

cia closure panel.

(4) Disconnect the relay electrical connector (Fig.

22).

(5) Remove the rivet attaching the relay to the

front bumper beam (Fig. 22).

(6) Remove the relay.

INSTALLATION

CAUTION: The relay mounting location is designed
to dissipate heat. Ensure the relay is securely
attached to prevent relay “thermal” shutdown and
relay damage, resulting in possible engine over-
heating.

(1) Position relay and install a new rivet (Fig. 22).
(2) Connect electrical connector to relay.

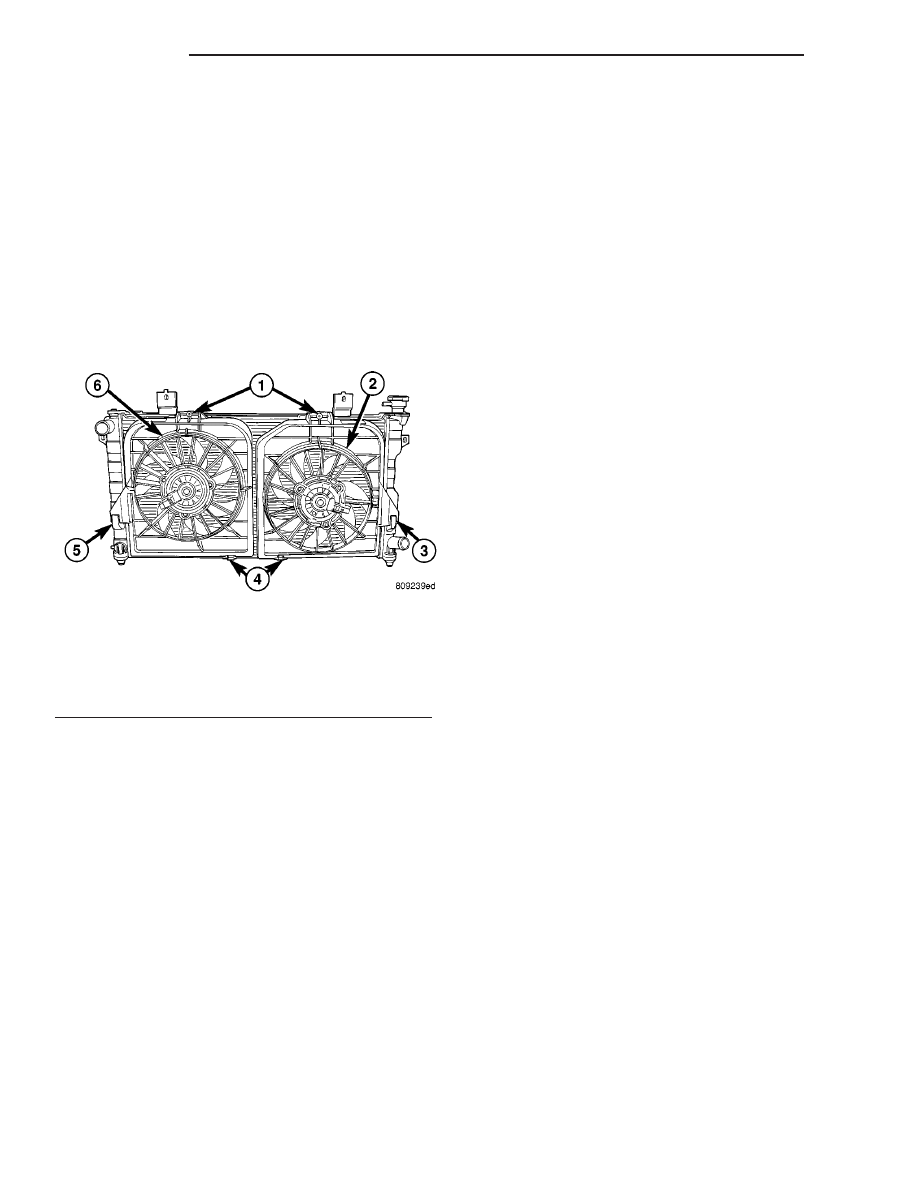
Fig. 21 Radiator Fans

1 - SCREWS - RADIATOR FAN ATTACHING
2 - RADIATOR FAN - RIGHT
3 - MOUNT - RIGHT RADIATOR FAN
4 - CLIPS - RADIATOR FAN LOWER
5 - MOUNT - LEFT RADIATOR FAN
6 - RADIATOR FAN - LEFT

7 - 30

ENGINE

RS

RADIATOR FAN (Continued)

(3) Install closure panel and attaching screws.
(4) Connect negative cable to battery.

WATER PUMP - 2.4L

DESCRIPTION

The water pump has a cast aluminum body and

housing with a stamped steel impeller. The water
pump bolts directly to the block (Fig. 23). The cylin-
der block to water pump seal is provided by a rubber
O-ring. The water pump is driven by the engine tim-
ing belt.

REMOVAL

(1) Disconnect negative cable from battery.
(2) Raise vehicle on a hoist.
(3) Remove the right inner splash shield.
(4) Remove the accessory drive belts (Refer to 7 -

COOLING/ACCESSORY

DRIVE/DRIVE

BELTS

-

REMOVAL).

(5) Drain the cooling system (Refer to 7 - COOL-

ING - STANDARD PROCEDURE).

(6) Support engine from the bottom and remove

right engine mount. (Refer to 9 - ENGINE/ENGINE
MOUNTING/RIGHT MOUNT - REMOVAL).

(7) Remove right engine mount bracket (Fig. 24).
(8) Remove the timing belt (Refer to 9 - ENGINE/

VALVE TIMING/TIMING BELT AND SPROCKET(S)
- REMOVAL).

Fig. 22 Radiator Fan Relay

1 - FRONT FASCIA
2 - FAN RELAY
3 - RIVET
4 - A/C CONDENSER (FRONT SIDE)

Fig. 23 Water Pump

1 - CYLINDER BLOCK
2 - WATER PUMP

RS

ENGINE

7 - 31

RADIATOR FAN RELAY (Continued)

(9) Remove timing belt idler pulley.
(10) Hold camshaft sprocket with Special tool

C-4687 and adaptor C-4687-1 while removing bolt.
Remove both cam sprockets.

(11) Remove the timing belt rear cover (Refer to 9

- ENGINE/VALVE TIMING/TIMING BELT COV-
ER(S) - REMOVAL).

(12) Remove the generator and bracket (Fig. 24).
(13) Remove water pump to engine attaching

screws (Fig. 25).

CLEANING

Clean gasket mating surfaces as necessary.

INSPECTION

Replace water pump body assembly if it has any of

these defects:

(1) Cracks or damage on the body.
(2) Coolant leaks from the shaft seal, evident by

wet coolant traces on the pump body.

(3) Loose or rough turning bearing.
(4) Impeller rubs either the pump body or the

engine block.

(5) Impeller loose or damaged.
(6) Sprocket or sprocket flange loose or damaged.

INSTALLATION

(1) Install new O-ring gasket in water pump body

O-ring locating groove (Fig. 26).

CAUTION: Make sure O-ring is properly seated in
water pump groove before tightening screws. An
improperly located O-ring may be damaged and
cause a coolant leak.

(2) Assemble pump body to block and tighten

screws to 12 N·m (105 in. lbs.) (Fig. 25). Pressurize
cooling system to 103.4 Kpa (15 psi) with pressure
tester and check water pump shaft seal and O-ring
for leaks.

(3) Rotate pump by hand to check for freedom of

movement.

(4) Install the timing belt rear cover (Refer to 9 -

ENGINE/VALVE TIMING/TIMING BELT COVER(S)
- INSTALLATION).

(5) Install camshaft sprockets and torque bolts to

101 N·m (75 ft. lbs.) while holding camshaft sprocket
with Special tool C-4687 and adaptor C-4687-1.

(6) Install timing belt idler pulley and torque

mounting bolt to 61 N·m (45 ft. lbs.).

Fig. 24 Generator Bracket

1 - BRACKET - ENGINE MOUNT

5 - BOLT

2 - BOLT

6 - TENSIONER - DRIVE BELT

3 - GENERATOR

7 - BOLT

4 - BOLT

8 - BOLT

7 - 32

ENGINE

RS

WATER PUMP - 2.4L (Continued)

(7) Install the timing belt (Refer to 9 - ENGINE/

VALVE TIMING/TIMING BELT AND SPROCKET(S)
- INSTALLATION).

(8) Install the generator mount bracket. (Fig. 24)

(9) Install the generator.
(10) Install right engine mount bracket and engine

mount (Refer to 9 - ENGINE/ENGINE MOUNTING/
RIGHT MOUNT - INSTALLATION).

(11) Fill the cooling system (Refer to 7 - COOLING

- STANDARD PROCEDURE).

(12) Install the accessory drive belts (Refer to 7 -

COOLING/ACCESSORY

DRIVE/DRIVE

BELTS

-

INSTALLATION).

(13) Lower vehicle and connect battery cable.

WATER PUMP - 3.3/3.8L

DESCRIPTION

The water pump has a die-cast aluminum body

and a plastic impeller. It bolts directly to the timing
chain case cover, using a rubber seal for sealing (Fig.
27). It is driven by the accessory drive belt.

REMOVAL

(1) Drain the cooling system. (Refer to 7 - COOL-

ING - STANDARD PROCEDURE)

(2) Remove the accessory drive belt shield.
(3) Remove the accessory drive belt. (Refer to 7 -

COOLING/ACCESSORY

DRIVE/DRIVE

BELTS

-

REMOVAL)

(4) Remove water pump pulley bolts (Fig. 27).

Fig. 25 Water Pump - 2.4L

1 - CYLINDER BLOCK
2 - WATER PUMP

Fig. 26 Water Pump Body

1 - IMPELLER
2 - WATER PUMP BODY
3 - O-RING LOCATING GROOVE

Fig. 27 Water Pump - 3.3/3.8L Engine

1 - WATER PUMP
2 - PULLEY - WATER PUMP
3 - BOLT - PULLEY
4 - BOLT - WATER PUMP
5 - SEAL - WATER PUMP

RS

ENGINE

7 - 33

WATER PUMP - 2.4L (Continued)


Content   ..  71  72  73  74   ..