Chrysler Crossfire. Manual - part 945


  Index      Chrysler     Chrysler Crossfire - service repair manual 2005 year


Search            


Content   ..  943  944  945  946   ..


Chrysler Crossfire. Manual - part 945


6. Clean inside of windshield (1) with Mopar Glass Cleaner and lint-free cloth.

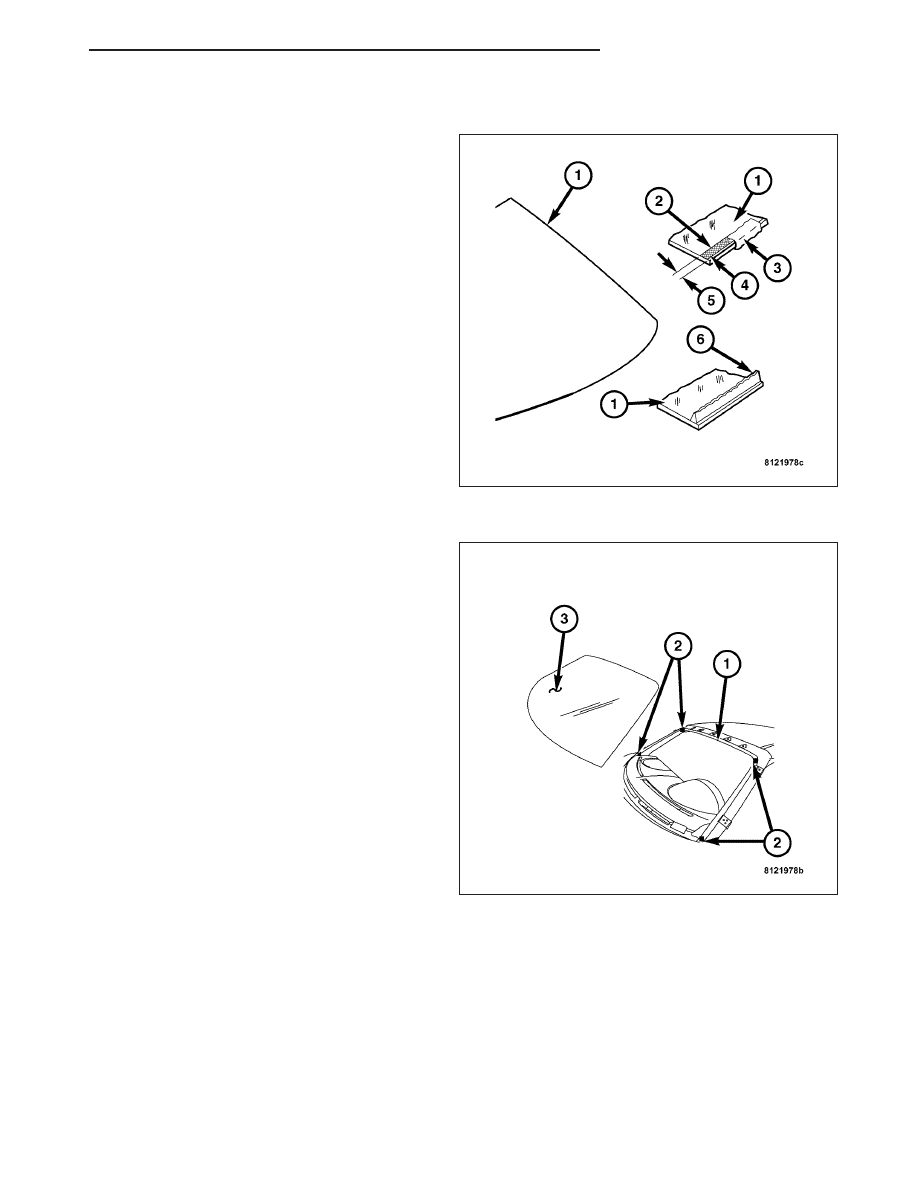
7. Apply clear glass primer (2) 25 mm (1 in.) wide (5)

around edge of windshield (1). Wipe with clean/dry
lint-free cloth (3).

8. Apply black-out primer (4) 25 mm (1 in.) wide (5)

on top and sides of windshield (1) and 25 mm (1
in.) (5) on bottom of windshield (1). Allow at least
three minutes drying time.

Note: Make sure the clear and black primers do
not flow passed the black frit.

9. Apply a 12 mm (0.47 in.) high by 8 mm (0.31 in.)

wide triangular bead of urethane (6) around perim-
eter of windshield along the inside of the moldings.
Apply two beads along the bottom edge.

10. Apply fence primer around the perimeter of the

windshield opening fence (1). Allow at least 18
minutes drying time.

11. With aid of a helper, position windshield (3) over

windshield opening. Align reference marks at bot-
tom of windshield to support spacers (2).

12. Slowly lower windshield glass to windshield open-

ing fence (1). Guide velcro-stabilizers at the lower
edge of the replacement windshield into proper
position as necessary. Push windshield inward to
fence spacers (2) at top and bottom until top is
flush to roof line.

13. Clean excess urethane from exterior with Mopar

Super Clean or equivalent.

ZH

STATIONARY GLASS

23 - 451

14. Install windshield side moldings (1) and top mold-

ing (2).

15. Install cowl cover and wipers.(Refer to 23 -

BODY/EXTERIOR/COWL GRILLE - INSTALLA-
TION).

16. Install inside rear view mirror.(Refer to 8 - ELEC-

TRICAL/POWER MIRRORS/AUTOMATIC DAY /
NIGHT MIRROR - INSTALLATION).

17. After urethane has cured, water test windshield to

verify repair.

23 - 452

STATIONARY GLASS

ZH

CONVERTIBLE TOP

TABLE OF CONTENTS

page

page

CONVERTIBLE TOP

DESCRIPTION

. . . . . . . . . . . . . . . . . . . . . . . . 454

OPERATION

. . . . . . . . . . . . . . . . . . . . . . . . . . 455

STANDARD PROCEDURE

STANDARD PROCEDURE - RELIEVING

HYDRAULIC PRESSURE . . . . . . . . . . . . . . . 482

STANDARD PROCEDURE - MANUALLY

LOWER TOP . . . . . . . . . . . . . . . . . . . . . . . . 482

STANDARD PROCEDURE - MANUALLY

RAISE TOP . . . . . . . . . . . . . . . . . . . . . . . . . 486

HYDRAULIC CYLINDER

DESCRIPTION

. . . . . . . . . . . . . . . . . . . . . . . . 491

OPERATION

. . . . . . . . . . . . . . . . . . . . . . . . . . 492

REMOVAL

REMOVAL - TONNEAU COVER CYLINDER

. 495

REMOVAL - MAIN CYLINDER

. . . . . . . . . . . 495

REMOVAL - REAR BOW CYLINDER

. . . . . . 496

REMOVAL - CYLINDER TRAVEL SENSOR

. . 500

INSTALLATION

INSTALLATION - TONNEAU COVER

CYLINDER . . . . . . . . . . . . . . . . . . . . . . . . . . 501

INSTALLATION - MAIN CYLINDER

. . . . . . . . 501

INSTALLATION - REAR BOW CYLINDER

. . . 502

INSTALLATION - CYLINDER TRAVEL

SENSOR . . . . . . . . . . . . . . . . . . . . . . . . . . . 506

HYDRAULIC LINES

DESCRIPTION

. . . . . . . . . . . . . . . . . . . . . . . . 507

OPERATION

. . . . . . . . . . . . . . . . . . . . . . . . . . 508

REMOVAL

. . . . . . . . . . . . . . . . . . . . . . . . . . . . 508

INSTALLATION

. . . . . . . . . . . . . . . . . . . . . . . . 510

HYDRAULIC PUMP MOTOR

DESCRIPTION

. . . . . . . . . . . . . . . . . . . . . . . . 513

OPERATION

. . . . . . . . . . . . . . . . . . . . . . . . . . 514

REMOVAL

REMOVAL - HYDRAULIC PUMP MOTOR

. . . 515

REMOVAL - PUMP RESERVOIR

. . . . . . . . . 516

INSTALLATION

INSTALLATION - HYDRAULIC PUMP

MOTOR . . . . . . . . . . . . . . . . . . . . . . . . . . . . 516

INSTALLATION - PUMP RESERVOIR

. . . . . . 517

SWITCH

REMOVAL

REMOVAL - POWER TOP SWITCH

. . . . . . . 518

REMOVAL - CARGO DIVIDER SWITCH

. . . . 518

REMOVAL - LATCH RETAINER SWITCH

. . . 518

REMOVAL - ROOF OPEN SWITCH

. . . . . . . 519

INSTALLATION

INSTALLATION - POWER TOP SWITCH

. . . 523

INSTALLATION - CARGO COMPARTMENT

DIVIDER SWITCH . . . . . . . . . . . . . . . . . . . . 524

INSTALLATION - LATCH RETAINER

SWITCH . . . . . . . . . . . . . . . . . . . . . . . . . . . . 524

INSTALLATION - ROOF OPEN SWITCH

. . . . 524

LATCH

REMOVAL

REMOVAL - REAR BOW LATCH

. . . . . . . . . 529

REMOVAL - TONNEAU COVER LATCH

. . . . 529

REMOVAL - LINKAGE ASSEMBLY

. . . . . . . . 530

REMOVAL - TOP CATCH

. . . . . . . . . . . . . . . 531

REMOVAL - LATCH RETAINER

. . . . . . . . . . 532

INSTALLATION

INSTALLATION - REAR BOW LATCH

. . . . . . 532

INSTALLATION - TONNEAU COVER LATCH

. 533

INSTALLATION - LINKAGE ASSEMBLY

. . . . 533

INSTALLATION - TOP CATCH

. . . . . . . . . . . 534

INSTALLATION - LATCH RETAINER

. . . . . . . 535

CABLE

REMOVAL

REMOVAL - COVER SUPPORT CABLE

. . . . 536

REMOVAL - DETENT CABLE

. . . . . . . . . . . . 540

INSTALLATION

INSTALLATION - COVER

SUPPORT CABLE . . . . . . . . . . . . . . . . . . . . 541

INSTALLATION - DETENT CABLE

. . . . . . . . 545

FLUID

DESCRIPTION

. . . . . . . . . . . . . . . . . . . . . . . . 545

REAR WINDOW

DESCRIPTION

. . . . . . . . . . . . . . . . . . . . . . . . 545

RELEASE HANDLE

REMOVAL

. . . . . . . . . . . . . . . . . . . . . . . . . . . . 546

INSTALLATION

. . . . . . . . . . . . . . . . . . . . . . . . 546

FOLDING TOP COVER

REMOVAL

. . . . . . . . . . . . . . . . . . . . . . . . . . . . 547

INSTALLATION

. . . . . . . . . . . . . . . . . . . . . . . . 554

ZH

CONVERTIBLE TOP

23 - 453

CONVERTIBLE TOP

DESCRIPTION

The Convertible Top on the Crossfire Roadster is fairly typical of convertible roofs. It is power operated, but requires
the driver to manually latch and unlatch the top from the windshield. One switch on the console operates the roof.
To lower the roof, release the roof latches with the “D” ring handle, push the “D” ring up and raise the top away from
the windshield. Press and hold the power top switch to the open position. If the windows are up, they will roll down
before the roof starts to move. The roof will then fold itself back into a storage compartment behind the seats.

The motion of the roof and the positioning of its different parts is completely determined by the geometry of the roof
structure. A scissors-like linkage is formed by a set of metal arms and brackets that are linked together by pins. The
linkage folds down into itself when the roof is open, and expands to form the structure of the roof when the roof is
closed.

The rear window is glass and is an integral part of the top. The window is equipped with a defroster grid. If for any
reason the rear window should need to be replaced, the soft top must be replaced. The window is not serviced
separately from the soft top.

23 - 454

CONVERTIBLE TOP

ZH


Content   ..  943  944  945  946   ..