Chrysler Crossfire. Manual - part 930


  Index      Chrysler     Chrysler Crossfire - service repair manual 2005 year


Search            


Content   ..  928  929  930  931   ..


Chrysler Crossfire. Manual - part 930


4. Expose the lines in the area of the center console

and attach the two halves of the floor covering at
the front and rear with clips (1) along the cutting
line. For this purpose cut slits in both of the carpet
halves with a blade and then insert the clips (1).

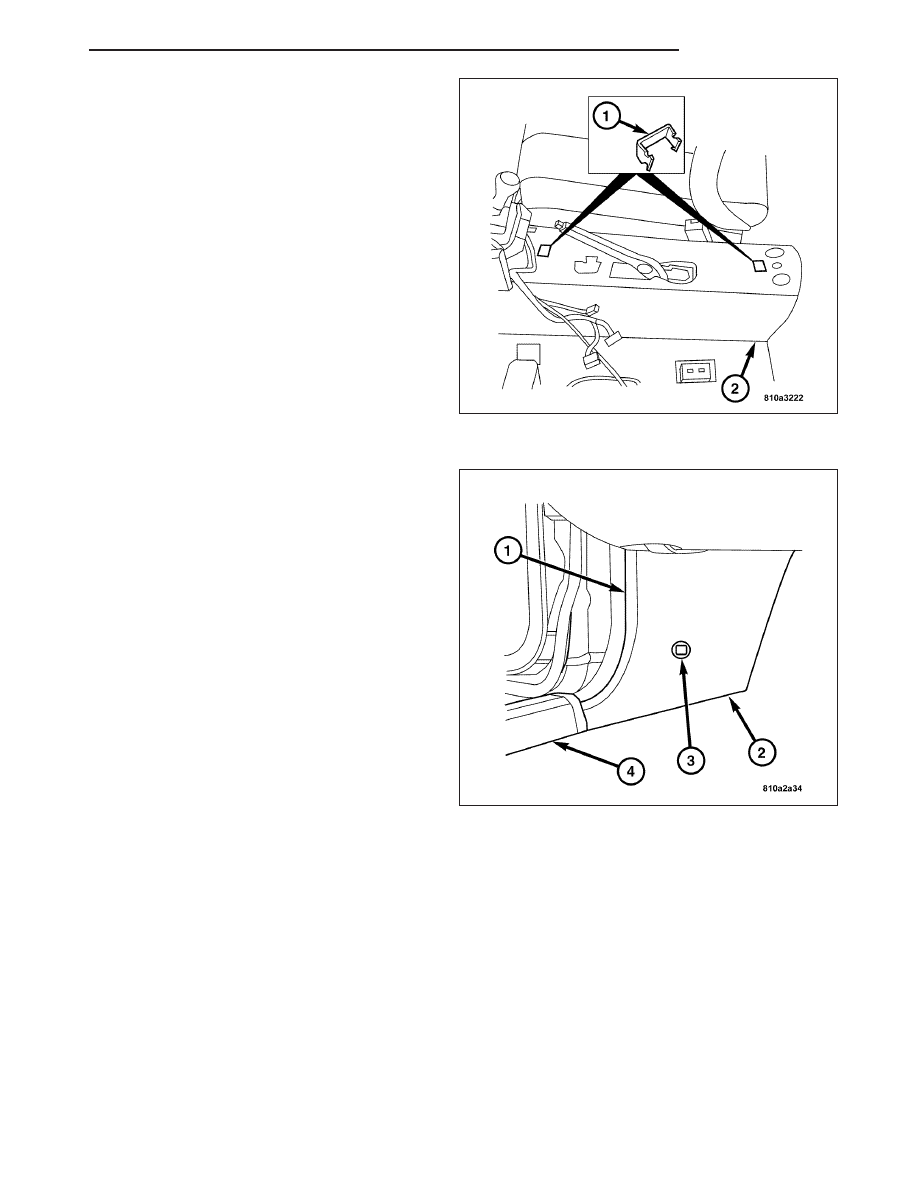
5. Install the plugs and the edge protector at the rear

in the lower area.

6. Connect the electrical connector to the parking

brake switch.

7. Install the storage pocket.

8. Install the paneling (2) in the left footwell.

9. Install the door sill trim plate (4). (Refer to 23 -

BODY/INTERIOR/DOOR

SILL

TRIM

PLATE

-

INSTALLATION). Install the edge guard (1) in the
area of the paneling (2). Install the screw (3) then
install the cap.

10. Install the cover below instrument panel. (Refer to

23 - BODY/INSTRUMENT PANEL/INSTRUMENT
PANEL ASSEMBLY - INSTALLATION).

11. Install the air outlet cover in the footwell.

12. Install the ashtray housing with the stowage com-

partment in the front center console. (Refer to 23
-

BODY/INTERIOR/CENTER

CONSOLE

-

INSTALLATION).

13. Install the cover on the center console. (Refer to

23

-

BODY/INTERIOR/CENTER

CONSOLE

-

INSTALLATION).

14. Install the rear center console. (Refer to 23 -

BODY/INTERIOR/CENTER CONSOLE - INSTAL-
LATION).

15. Install the front seat. (Refer to 23 - BODY/SEATS/SEAT - INSTALLATION).

ZH

INTERIOR

23 - 391

CENTER CONSOLE

REMOVAL

REMOVAL - CENTER CONSOLE (FRONT)

1. Remove the lower instrument panel (2). (Refer to

23 - BODY/INSTRUMENT PANEL/INSTRUMENT
PANEL ASSEMBLY - REMOVAL).

2. Remove the instrument cluster cover.(Refer to 23 -

BODY/INSTRUMENT

PANEL/INSTRUMENT

PANEL ASSEMBLY - REMOVAL).

3. Remove the shifter cover and bezel. Disconnect

the power window harness connectors.

4. Remove the rear center console. (Refer to 23 -

BODY/INTERIOR/CENTER

CONSOLE

-

REMOVAL).

5. Remove the radio (1). (Refer to 8 - ELECTRICAL/

AUDIO/RADIO - REMOVAL).

23 - 392

INTERIOR

ZH

6. Remove the center console cover. by removing the

two screws (1) in the radio hole. Then disconnect
the switch panel harness connectors.

7. Remove the A/C heater control module by remov-

ing the screws (3) and disconnecting the harness
connector from behind.

8. Remove the screws (4 and 2) from the sides of the

center console the I/P.

9. Remove the center console (2) from the vehicle.

REMOVAL - CENTER CONSOLE
COVER

1. Remove the radio. (Refer to 8 - ELECTRICAL/AU-

DIO/RADIO - REMOVAL).

ZH

INTERIOR

23 - 393

2. Remove the screws (1) in the radio cutout attach-

ing it to the center console cover.

3. Pull the cover (1) toward the rear and pull it out at

the top of the instrument panel (2 hooks).

23 - 394

INTERIOR

ZH


Content   ..  928  929  930  931   ..