Chrysler Crossfire. Manual - part 771


  Index      Chrysler     Chrysler Crossfire - service repair manual 2005 year


Search            


Content   ..  769  770  771  772   ..


Chrysler Crossfire. Manual - part 771


9. Securely tighten the multi-disc holding clutch B1 (5) on the converter housing (2) to 10 N·m (88.5 in. lbs.).

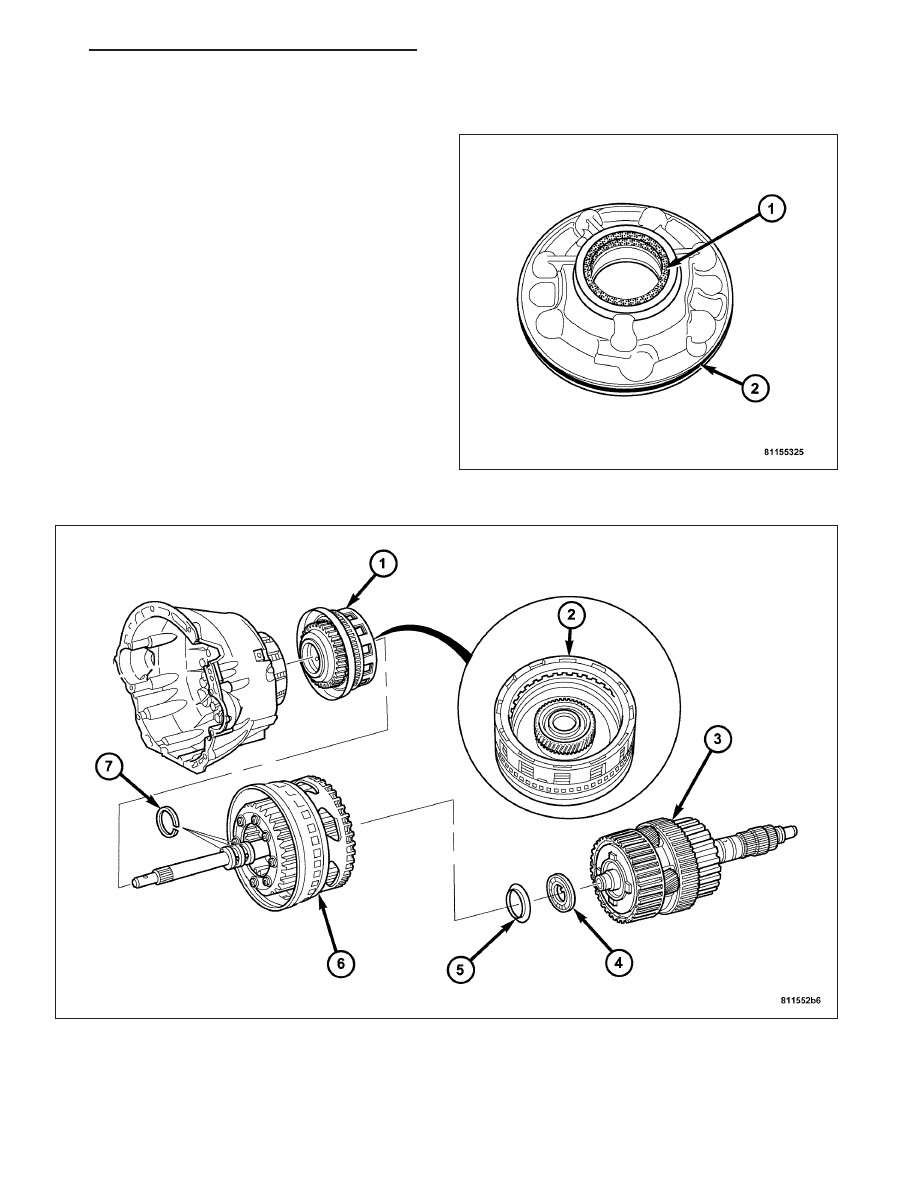
10. Install a new torque converter hub seal (1) into

the oil pump using Special Tool 8902A.

11. Install a new oil pump outer o-ring seal (2) onto

the oil pump.

12. Install the oil pump (6) and securely tighten.

Tighten the oil pump bolts to 20 N·m (177 in. lbs.).

13. Using grease, insert the teflon rings (7) in the groove so that the joint remains together.

14. Install the driving clutch K1 (1) onto multi-disc holding clutch B1.

15. Install the drive shaft with driving clutch K2 (6) and front planetary gear set (1).

16. Install the front washer (5) and the thrust needle bearing (4).

17. Install the output shaft with the center and rear planetary gear set and driving clutch K3 (3).

ZH

AUTOMATIC - NAG1 SERVICE INFORMATION

21 - 233

18. Using grease, install both the teflon rings (7) in the groove at the rear of the output shaft so that the joint stays

together.

19. Mount the transmission housing on the torque converter housing.

20. Screw in the bolts through the transmission housing into the torque converter housing. Tighten the bolts to 20

N·m (177 in. lbs.).

21. Measure the end-play between the parking lock gear and the grooved ball bearing in order to select the proper

geartrain end-play shim.

a. Place Special Tool 6311 (1) on the transmis-

sion housing. Using a depth gauge, measure
from the gauge bar (1) to the parking lock gear
(2).

b. Using a depth gauge, measure from the Spe-

cial Tool 6311 (1) to the contact surface of the
output shaft bearing (2) in the transmission
housing.

c. Subtract the first figure from the second figure

to determine the current end-play of the trans-
mission. Select a shim such that the end-play
will be 0.3-0.5 mm (0.012-0.020 in.). Shims are
available in thicknesses of 0.2 mm (0.008 in.),
0.3 mm (0.012 in.), 0.4 mm (0.016 in.), and 0.5
mm (0.020 in.).

d. Install the selected end-play shim.

22. Screw in the bolts through the converter housing

into the transmission housing. Tighten the bolts to
20 N·m (177 in. lbs.)

.

21 - 234

AUTOMATIC - NAG1 SERVICE INFORMATION

ZH

23. Install the output shaft bearing in the rear trans-

mission housing.

a. Using Special Tool 9287 (1), install the output

shaft bearing (2) into the transmission housing
(3). The closed side of the plastic cage
must point towards the parking lock gear.

b. Install the retaining ring (1). Ensure that the

retaining ring (1) is seated correctly in the
groove.

c. Check that there is no play between the bear-

ing (2) and the retaining ring (1) using a feeler
gauge.

d. There must be no play between the retaining

ring (1) and the bearing (2). If the ring cannot
be installed, a thinner ring must be used. If
there is play between the ring (1) and the bear-
ing (2), a thicker ring must be installed. Retain-
ing rings are available in thicknesses of 2.0
mm (0.079 in.), 2.1 mm (0.083 in.), and 2.2
mm (0.087 in.).

24. Rotate the transmission so that the bellhousing is

pointed upward and ensuring that the output shaft
is allowed to move freely.

ZH

AUTOMATIC - NAG1 SERVICE INFORMATION

21 - 235

25. Measure the input shaft end-play.

Note: If the end-play is incorrect, the transmission
is incorrectly assembled, or the geartrain end-play
shim is incorrect. The geartrain end-play shim is
selective.

a. Attach Special Tool 8266-18 (2) to Special Tool

8266-8 (1).

b. Attach Special Tool C-3339 (3) to Special Tool

8266-8 (1).

c. Install the assembled tool onto the input shaft

of the transmission and tighten the retaining
screw on Special Tool 8266-18 (2) to secure it
to the input shaft.

d. Position the dial indicator plunger against a flat

spot on the oil pump and zero the dial indica-
tor.

e. Move the input shaft in and out and record reading. End play should be 0.3-0.5 mm (0.012-0.020 in.). Adjust

as necessary.

26. Install the output shaft washer onto the output shaft.

27. Install a new transmission rear seal into the trans-

mission case (2) with Special Tool 8902A (1).

28. Install the propeller shaft flange onto the output

shaft.

29. Place the transmission in the PARK position

before attempting to tighten the output shaft nut.

30. Install a new output shaft nut. Tighten the output

shaft nut to 120 N·m (88.5 ft. lbs.).

21 - 236

AUTOMATIC - NAG1 SERVICE INFORMATION

ZH


Content   ..  769  770  771  772   ..