Chrysler Crossfire. Manual - part 348


  Index      Chrysler     Chrysler Crossfire - service repair manual 2005 year


Search            


Content   ..  346  347  348  349   ..


Chrysler Crossfire. Manual - part 348


Note: The carpet is firmly molded, and will need to
be propped up while servicing the impact sensor.

14. Disconnect the side impact sensor harness con-

nector.

CAUTION: Use caution when disconnecting the
squib connector. Do not pry on the connector
insulator to disengage the connector from the side
impact sensor. Improper removal of the connector
can result in damage to the airbag circuits or con-
nector insulator.

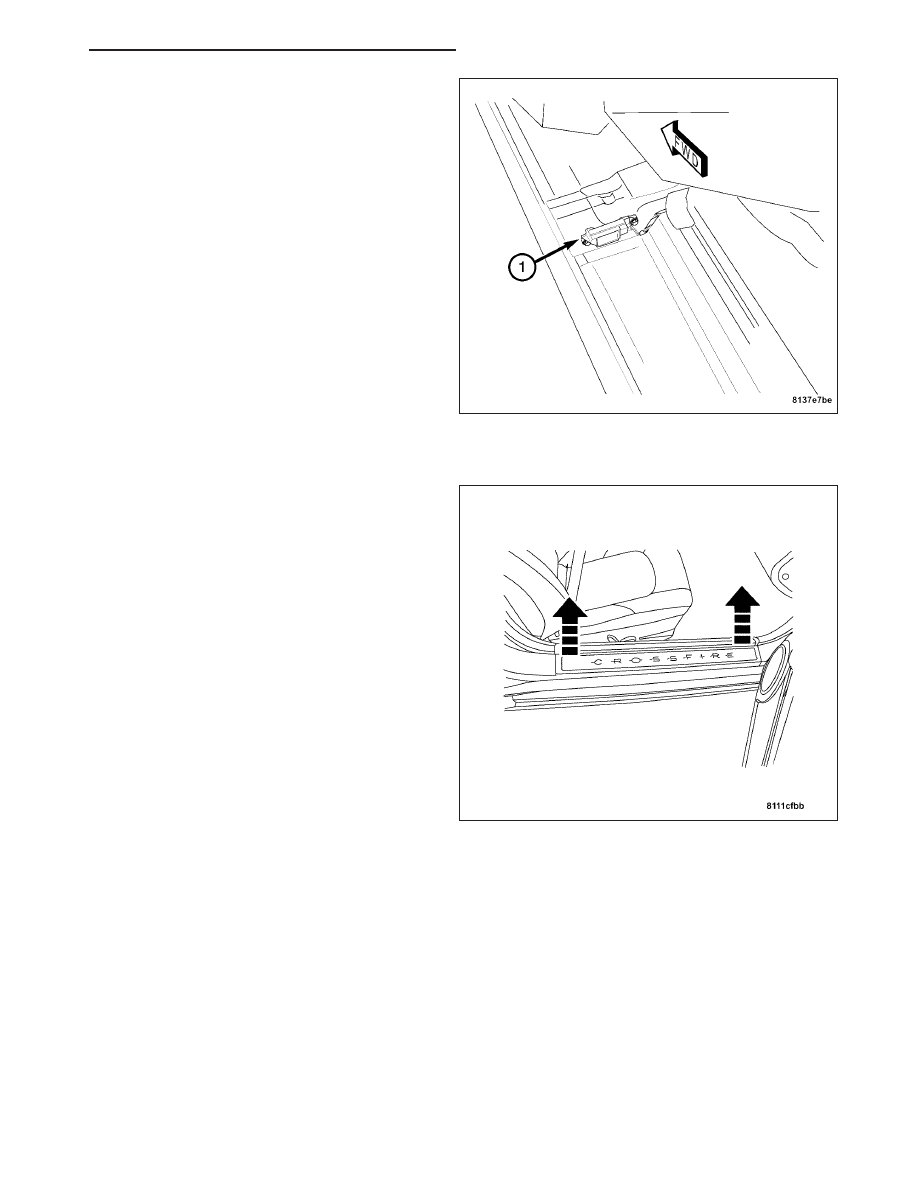
15. Remove the two bolts attaching the side impact

sensor (1) to the body cross brace.

16. Remove the side impact sensor from the vehicle.

REMOVAL – RIGHT SIDE

1. Before attempting any service procedures refer to

the warnings in the beginning of this section. (Refer
to 8 - ELECTRICAL/RESTRAINTS - WARNING).

2. Remove the door sill plate.

Note: Pull straight up on the sill plate to release it
from the retaining clips.

ZH

RESTRAINTS - SERVICE INFORMATION

8O - 115

3. Move the seat to the full rearward position.

4. Remove the seat track front bolts (1).

5. Move the seat to the full forward position.

Note: The seat track rear bolts are easily accessed
when the seat back is tilted fully forward.

6. Remove the seat track rear bolts (1).

7. Remove the seat belt bolt (2) holding the seat belt

to the seat.

8. Disconnect the negative battery cable. Wait two

minutes for the system capacitor to discharge
before further service.

8O - 116

RESTRAINTS - SERVICE INFORMATION

ZH

9. Tilt the seat back, to gain access to the bottom of

the seat.

10. Disconnect the power seat harness connectors.

11. Carefully remove the seat from the vehicle.

12. Remove the carpet retainer button (1) at the pas-

senger compartment rear wall.

Note: Do not pry on the carpet retainer button, the
button will unscrew from the fastener.

13. Fold back the carpet near the center of the door

sill to gain access to the side impact sensor.

Note: The carpet is firmly molded, and will need to
be propped up while servicing the impact sensor.

14. Disconnect the side impact sensor harness con-

nector (2).

CAUTION: Use caution when disconnecting the
squib connector. Do not pry on the connector
insulator to disengage the connector from the side
impact sensor. Improper removal of the connector
can result in damage to the airbag circuits or con-
nector insulator.

15. Remove the two bolts (1) attaching the side

impact sensor to the body cross brace.

16. Remove the side impact sensor from the vehicle.

ZH

RESTRAINTS - SERVICE INFORMATION

8O - 117

INSTALLATION

INSTALLATION — LEFT SIDE

1. Verify the negative battery cable (2) is discon-

nected before proceeding. Wait two minutes for
the system capacitor to discharge before fur-
ther service.

2. Position the side impact sensor (1) on the body

cross brace.

3. Install the bolts attaching the side impact sensor to

the body cross brace. Tighten the side impact sen-
sor bolts to 12 N·m (106 in. lbs.).

CAUTION: Use caution when connecting the squib
harness connector to the side impact sensor
receptacle. Improper assembly of these connec-
tors can result in damage to the airbag circuits or
connector insulators.

4. Connect the side impact sensor harness connector.

8O - 118

RESTRAINTS - SERVICE INFORMATION

ZH


Content   ..  346  347  348  349   ..