Chrysler 300/300 Touring/300C, Dodge Magnum. Manual - part 2157


  Index      Chrysler     Chrysler 300/300 Touring/300C, Dodge Magnum - service repair manual


Search            


Content   ..  2155  2156  2157  2158   ..


Chrysler 300/300 Touring/300C, Dodge Magnum. Manual - part 2157


REAR

1. Remove the driver and passenger front seats from

the vehicle. (Refer to 23 - BODY/SEATS/SEAT-
FRONT - REMOVAL).

2. Remove the center console from the front floor

panel transmission tunnel. (Refer to 23 - BODY/IN-
TERIOR/FLOOR CONSOLE - REMOVAL).

3. Remove the trim from the inside of both lower

B-pillars. (Refer to 23 - BODY/INTERIOR/B-PIL-
LAR TRIM - REMOVAL-LOWER).

4. Remove the rear seat cushion from the vehicle.

(Refer to 23 - BODY/SEATS/REAR SEAT CUSH-
ION COVER - REMOVAL).

5. Remove the scuff plate from both rear door sills.

(Refer to 23 - BODY/INTERIOR/REAR DOOR SILL
SCUFF PLATE - REMOVAL).

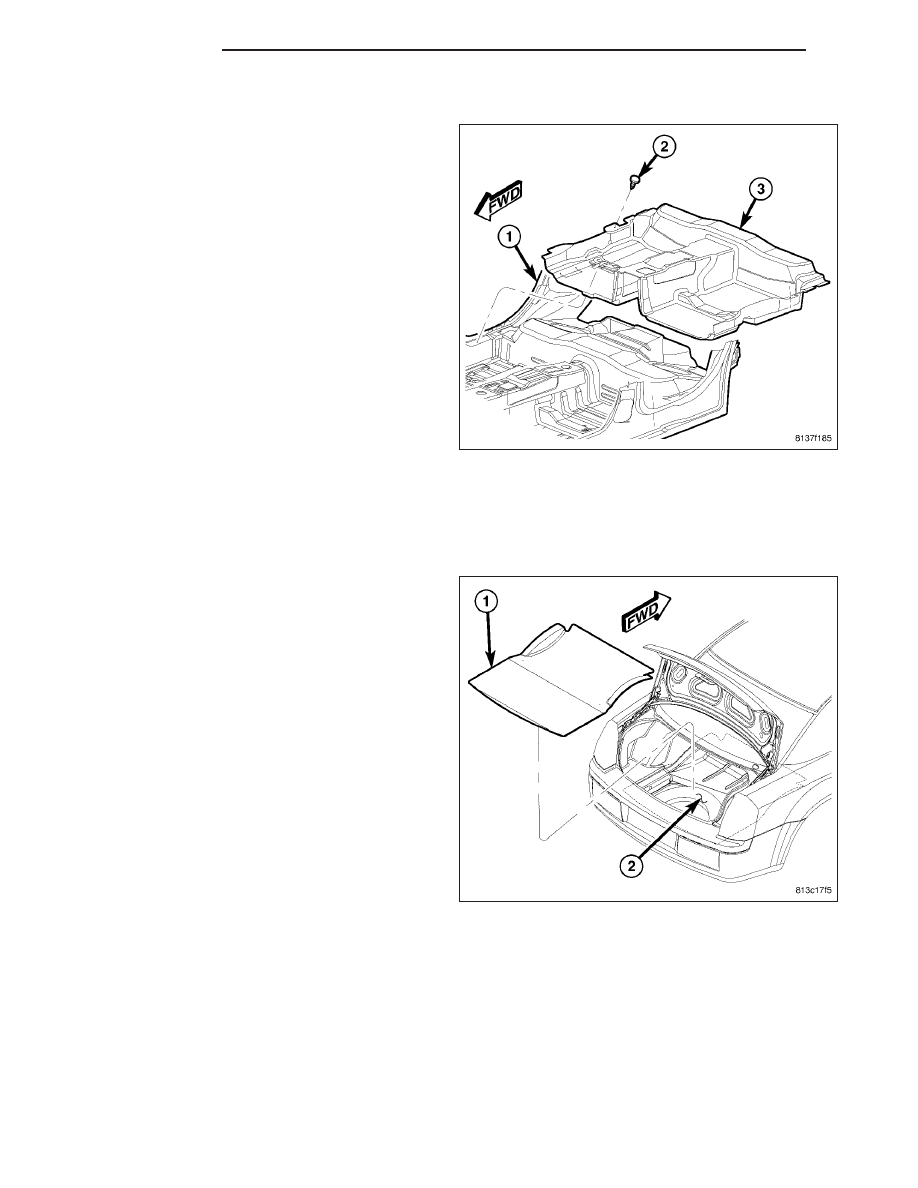
6. Remove the push-pin fasteners (2) that secure the

outboard edges of the rear carpet (3) near the front
of each rear door opening (1) sill.

7. Lift the rear carpet from the floor panel far enough to extract the body wire harness take outs and connectors

through the appropriate slits in the carpeting.

8. Remove the rear carpet from the vehicle through one of the rear door openings.

TRUNK - SEDAN

1. If equipped, remove the cargo liner and/or cargo

net from the luggage compartment.

2. Fold and remove the spare tire cover/trunk floor

carpet (1) from over the spare tire well (2).

23 - 176

INTERIOR

LX

CARGO AREA - WAGON

1. If equipped, remove the cargo net from the rear

cargo area.

2. Fold and remove the cargo floor carpet (1) from the

rear cargo area.

3. If equipped, remove the cargo liner and/or the

cargo organizer from the cargo compartment.

4. Fold and remove the spare tire cover/cargo com-

partment carpet (3) from over the spare tire well
(2).

INSTALLATION

FRONT

NOTE: The front carpet consists of two individual
carpets, one for the driver side and one for the
passenger side. These carpets can be removed
from and installed into the vehicle individually.

1. Position and fit the front carpet (3) onto the floor

panel. Be certain that the rear of the front carpet is
fitted over the floor panel front crossmember and
butts up against the front of the rear carpet without
interference with the rear floor air duct opening. Be
certain that the front of the front carpet is fitted to
the dash panel without interference with the steer-
ing column, the accelerator or the heater and air
conditioner unit. On the driver side only, be certain
the slit (4) on the inboard edge of the carpet is
engaged around the left instrument panel support
bracket (5) on the top of the floor panel transmis-
sion tunnel.

2. Install the two push-pin fasteners (1) that secure

the outboard edge of the front carpet to the front door opening sill.

3. On the driver side only, install the push-pin fastener (2) that secures the front carpet to the cowl side inner panel

above the foot rest.

LX

INTERIOR

23 - 177

4. On the driver side only, install the push-pin fastener

(3) that secures the inboard edge of the front car-
pet (1) to the transmission shifter bracket (2).

5. Reinstall the trim onto the driver or passenger side

lower cowl side inner panel as appropriate. (Refer
to 23 - BODY/INTERIOR/COWL TRIM - INSTALLA-
TION-LOWER).

6. Reinstall the center console onto the front floor

panel transmission tunnel. (Refer to 23 - BODY/IN-
TERIOR/FLOOR CONSOLE - INSTALLATION).

7. Reinstall the driver and/or passenger front seat into

the vehicle as appropriate. (Refer to 23 - BODY/
SEATS/SEAT-FRONT - INSTALLATION).

REAR

1. Position the rear carpet (3) into the vehicle through

one of the rear door openings.

2. Pull the body wire harness take outs and connec-

tors through the appropriate slits in the rear carpet.

3. Fit the rear carpet to the floor panel. Be certain to

align the holes in the carpet with the corresponding
holes in the floor panel. Be certain that the rear
edge of the carpet is fitted over the rear seat
kick-up area and over the rear seat cushion cups
on the top of the kick-up area. Be certain that the
front edge of the carpet is fitted over the front seat
rear crossmember and butts up against the rear of
the front seat front crossmember.

4. Install the push-pin fasteners (2) that secure the

outboard edges of the rear carpet near the front of
each rear door opening (1) sill.

5. Reinstall the scuff plate onto both rear door sills.

(Refer to 23 - BODY/INTERIOR/REAR DOOR SILL
SCUFF PLATE - INSTALLATION).

6. Reinstall the rear seat cushion into the vehicle. (Refer to 23 - BODY/SEATS/REAR SEAT CUSHION COVER -

INSTALLATION).

7. Reinstall the trim onto the inside of both lower B-pillars. (Refer to 23 - BODY/INTERIOR/B-PILLAR TRIM -

INSTALLATION-LOWER).

8. Reinstall the center console onto the front floor panel transmission tunnel. (Refer to 23 - BODY/INTERIOR/

FLOOR CONSOLE - INSTALLATION).

9. Reinstall the driver and passenger front seats into the vehicle. (Refer to 23 - BODY/SEATS/SEAT-FRONT -

INSTALLATION).

23 - 178

INTERIOR

LX

TRUNK - SEDAN

1. Fold the spare tire cover/trunk floor carpet (1) and

place it within the luggage compartment.

2. Unfold, position and fit the spare tire cover/trunk

floor carpet over the spare tire well (2) in the lug-
gage compartment.

3. If equipped, reinstall the cargo liner and/or cargo

net into the luggage compartment.

CARGO AREA - WAGON

1. Fold the spare tire cover/cargo compartment carpet

(3) and place it into the rear cargo area.

2. Unfold, position and fit the spare tire cover/cargo

compartment carpet over the spare tire well (2) in
the rear cargo area.

3. If equipped, reinstall the cargo liner and/or the

cargo organizer into the cargo compartment.

4. Fold the cargo floor carpet (1) and place it into the

rear cargo area.

5. Unfold, position and fit the cargo floor carpet into

the rear cargo area.

6. If equipped, reinstall the cargo net into the rear

cargo area.

LX

INTERIOR

23 - 179


Content   ..  2155  2156  2157  2158   ..