Chrysler 300/300 Touring/300C, Dodge Magnum. Manual - part 169


  Index      Chrysler     Chrysler 300/300 Touring/300C, Dodge Magnum - service repair manual


Search            


Content   ..  167  168  169  170   ..


Chrysler 300/300 Touring/300C, Dodge Magnum. Manual - part 169


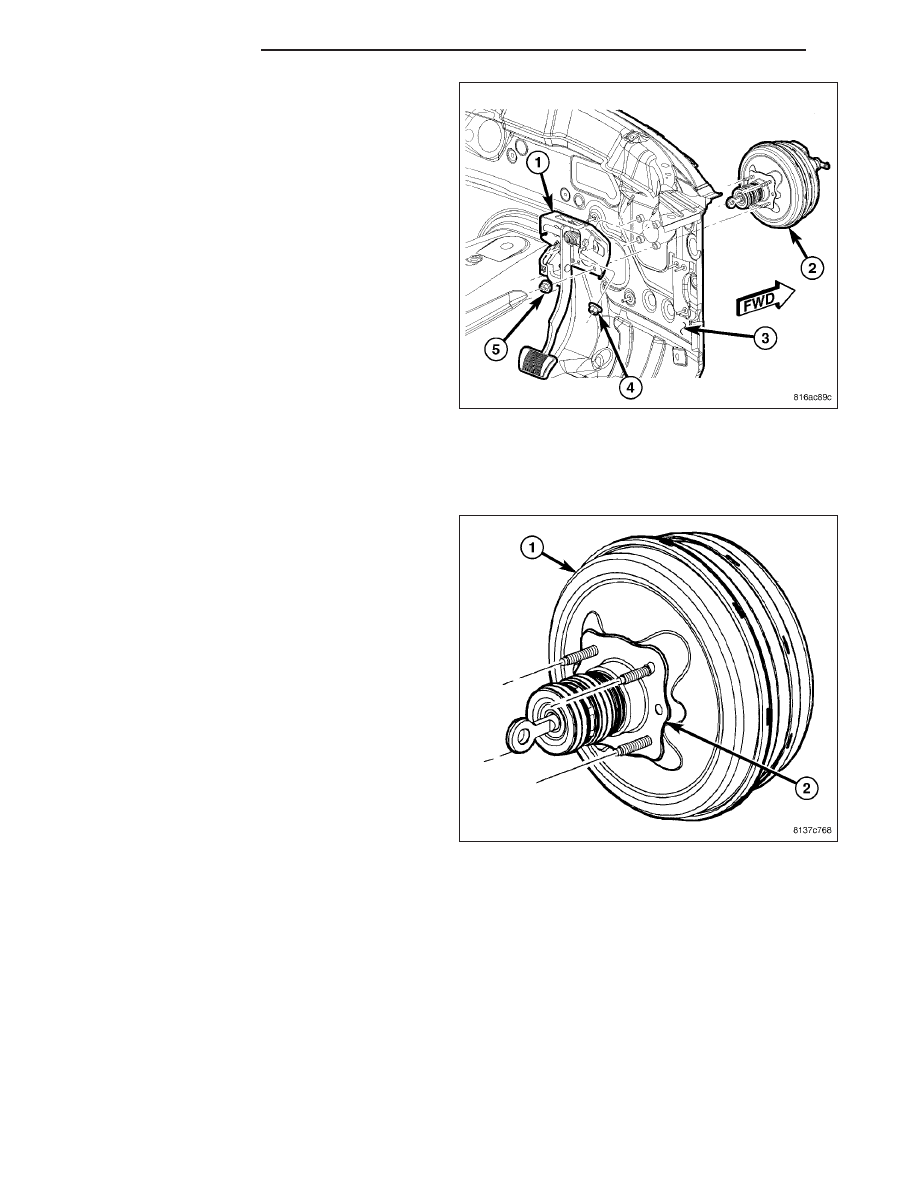
14. Remove four power brake booster mounting nuts

(5).

15. Slide power brake booster forward out of dash

panel and remove through opening between
cross-brace and windshield.

INSTALLATION

BOOSTER

NOTE: Before installing booster, make sure there
is a NEW booster seal (2) placed over push rod
and mounting studs on rear of booster (1).

5 - 118

BRAKES - BASE

LX

1. Install

power

brake

booster

through

opening

between

cross-brace

and

windshield.

Guide

booster (1) push rod and mounting studs through
dash panel (2).

NOTE: Be sure to tighten all four booster mount-
ing nuts to specifications or a vacuum leak can
result.

2. Install four power brake booster mounting nuts (4).

Tighten nuts to 25 N·m (18 ft. lbs.) torque.

3. Slide booster push rod (5) onto brake pedal pin (4).

Install NEW retaining clip (3) securing push rod to
brake pedal.

4. Install and adjust brake lamp switch (2). (Refer to 8

- ELECTRICAL/LAMPS/LIGHTING - EXTERIOR/
BRAKE LAMP SWITCH - INSTALLATION)

5. Connect vacuum hose (3) to check valve (2) on

face of booster (1). Do not remove check valve
from booster.

LX

BRAKES - BASE

5 - 119

6. If equipped with MK25 and Electronic Stability Pro-

gram (ESP), connect wiring harness (6) connector
at pedal travel sensor (7) on power brake booster
(3).

7. If equipped with MK25 and ESP, connect wiring

harness (6) connector at active brake booster sole-
noid (4).

8. Install master cylinder (1). (Refer to 5 - BRAKES/

HYDRAULIC/MECHANICAL/MASTER CYLINDER -
INSTALLATION)

9. Install windshield wiper module and components

removed to access. (Refer to 8 - ELECTRICAL/
WIPERS/WASHERS/WIPER

MODULE

-

INSTALLATION)

10. Connect battery negative cable (2) to battery post.

It is important that this is performed properly.
(Refer to 8 - ELECTRICAL/BATTERY SYSTEM -
STANDARD PROCEDURE)

11. Fill and bleed brakes as necessary.

12. Road test vehicle to ensure proper operation of

brakes.

5 - 120

BRAKES - BASE

LX

BOOSTER - RHD

NOTE: Before installing booster, make sure there
is a NEW booster seal (2) placed over push rod
and mounting studs on rear of booster (1).

1. Install

power

brake

booster

through

opening

between

cross-brace

and

windshield.

Guide

booster (2) push rod and mounting studs through
dash panel (3).

NOTE: Be sure to evenly tighten all four booster
mounting nuts to specifications or a vacuum leak
can result.

2. Install four power brake booster mounting nuts (5).

Tighten nuts to 25 N·m (18 ft. lbs.).

CAUTION: When installing booster push rod on brake pedal pin, be careful not to damage rubber O-ring on
pin.

3. Slide booster push rod onto brake pedal pin. Install NEW retaining clip securing push rod to brake pedal.

LX

BRAKES - BASE

5 - 121


Content   ..  167  168  169  170   ..