Chrysler 300/300 Touring/300C, Dodge Magnum. Manual - part 168


  Index      Chrysler     Chrysler 300/300 Touring/300C, Dodge Magnum - service repair manual


Search            


Content   ..  166  167  168  169   ..


Chrysler 300/300 Touring/300C, Dodge Magnum. Manual - part 168


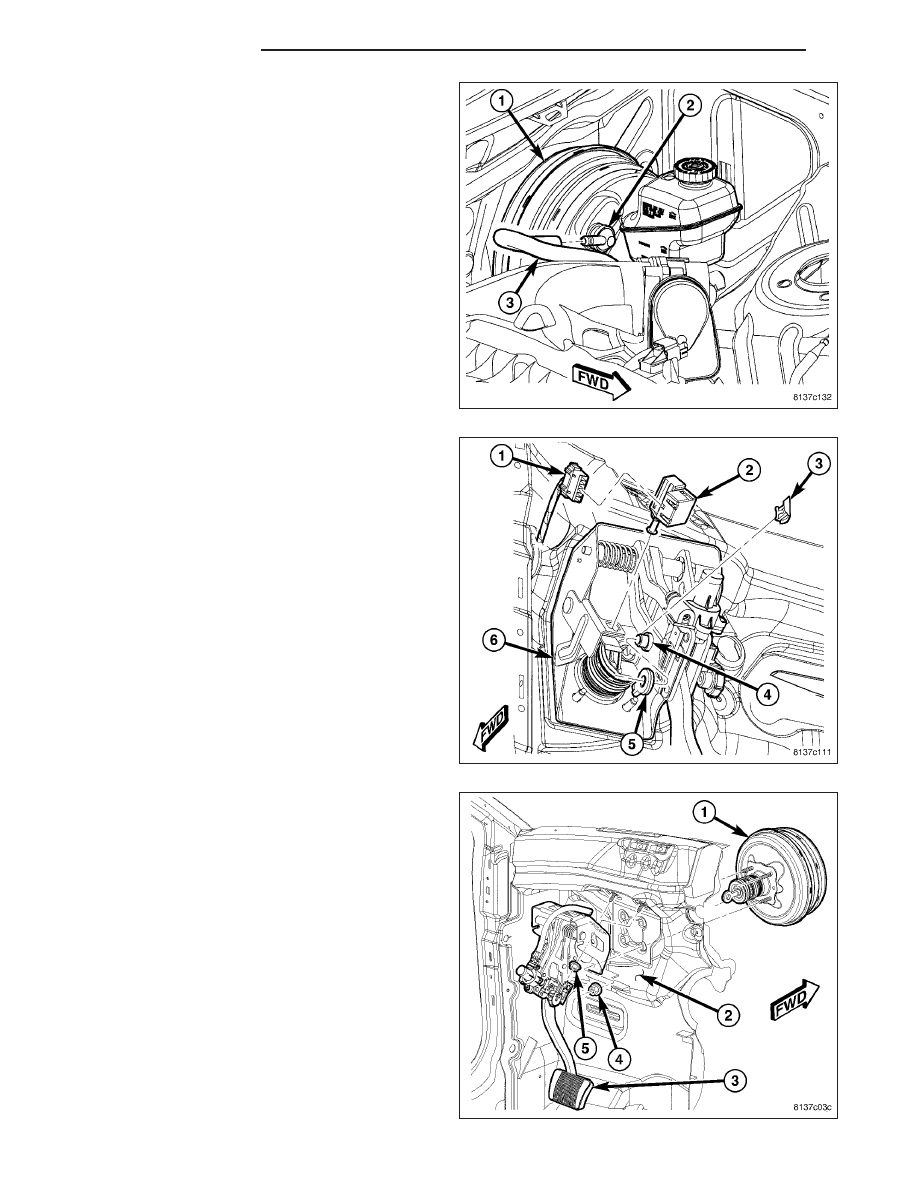
7. Disconnect vacuum hose (3) from check valve (2)

on face of booster (1). Do not remove check
valve from booster.

8. Remove brake lamp switch. (Refer to 8 - ELECTRI-

CAL/LAMPS/LIGHTING

-

EXTERIOR/BRAKE

LAMP SWITCH - REMOVAL)

9. Remove booster push rod from pin on brake pedal.

To do so:

a. Position small screwdriver between center tang

on power brake booster brake pedal pin retain-
ing clip (3).

b. Rotate screwdriver enough to allow retaining

clip center tang to pass over end of brake
pedal pin, then slide retaining clip off brake
pedal pin.

c. Discard retaining clip (3). It is not to be

reused. Install NEW retaining clip when
assembling.

10. Slide booster push rod (5) off brake pedal pin (4).

11. Remove four power brake booster mounting nuts

(4).

12. Slide power brake booster forward out of dash

panel and remove through opening between
cross-brace and windshield.

5 - 114

BRAKES - BASE

LX

BOOSTER - RHD

1. Move driver’s seat to full rearward position.

2. Disconnect and isolate battery negative cable (2)

from battery post.

3. Remove windshield wiper module. (Refer to 8 -

ELECTRICAL/WIPERS/WASHERS/WIPER

MOD-

ULE - REMOVAL)

4. Disconnect wiring harness connector (4) from

brake fluid level sensor (2) in master cylinder brake
fluid reservoir (1).

LX

BRAKES - BASE

5 - 115

5. Remove primary (3) and secondary (2) brake tubes

from master cylinder (4). Install sealing plugs in
open brake tube outlet ports.

CAUTION: Before removing master cylinder from
power brake vacuum booster, master cylinder and
vacuum booster must be thoroughly cleaned. This
must be done to prevent dirt particles from falling
into

power

brake

vacuum

booster.

Use

only

Mopar

T

Brake Parts Cleaner or equivalent.

6. Remove two nuts (2) attaching master cylinder (3)

to power brake booster (1).

7. Slide master cylinder (3) straight out of power

brake booster (1).

8. Disconnect vacuum hose (1) from check valve on

face of booster (2). Do not remove check valve
from booster.

5 - 116

BRAKES - BASE

LX

9. Remove driver side silencer under instrument panel. (Refer to 23 - BODY/INSTRUMENT PANEL/INSTRUMENT

PANEL SILENCER - INSTALLATION)

10. Remove steering column opening cover. (Refer to 23 - BODY/INSTRUMENT PANEL/STEERING COLUMN

OPENING COVER - INSTALLATION)

11. Remove stop lamp switch (2). (Refer to 8 - ELEC-

TRICAL/LAMPS/LIGHTING - EXTERIOR/BRAKE
LAMP SWITCH - REMOVAL)

CAUTION: When removing booster push rod from
brake pedal pin, be careful not to damage rubber
O-ring on pin.

12. Remove booster push rod from pin on brake

pedal. To do so:

a. Position small screwdriver (1) between center

tang on power brake booster brake pedal pin
retaining clip (4).

b. Rotate screwdriver enough to allow retaining

clip center tang to pass over end of brake
pedal pin (3), then slide retaining clip off brake
pedal pin.

c. Discard retaining clip. It is not to be reused.

Install NEW retaining clip when assembling.

13. Slide booster push rod (2) off brake pedal pin (3).

LX

BRAKES - BASE

5 - 117


Content   ..  166  167  168  169   ..