Chrysler 300/300 Touring/300C, Dodge Magnum. Manual - part 144


  Index      Chrysler     Chrysler 300/300 Touring/300C, Dodge Magnum - service repair manual


Search            


Content   ..  142  143  144  145   ..


Chrysler 300/300 Touring/300C, Dodge Magnum. Manual - part 144


HYDRAULIC/MECHANICAL

DESCRIPTION

DISC BRAKES

Four-wheel disc brakes are standard on this vehicle. There are two four-wheel disc brake systems available, a stan-
dard and a premium. The standard disc brake system is referred to as “Seventeen-Inch.” The premium disc brake
system is referred to as “Eighteen-Inch.”

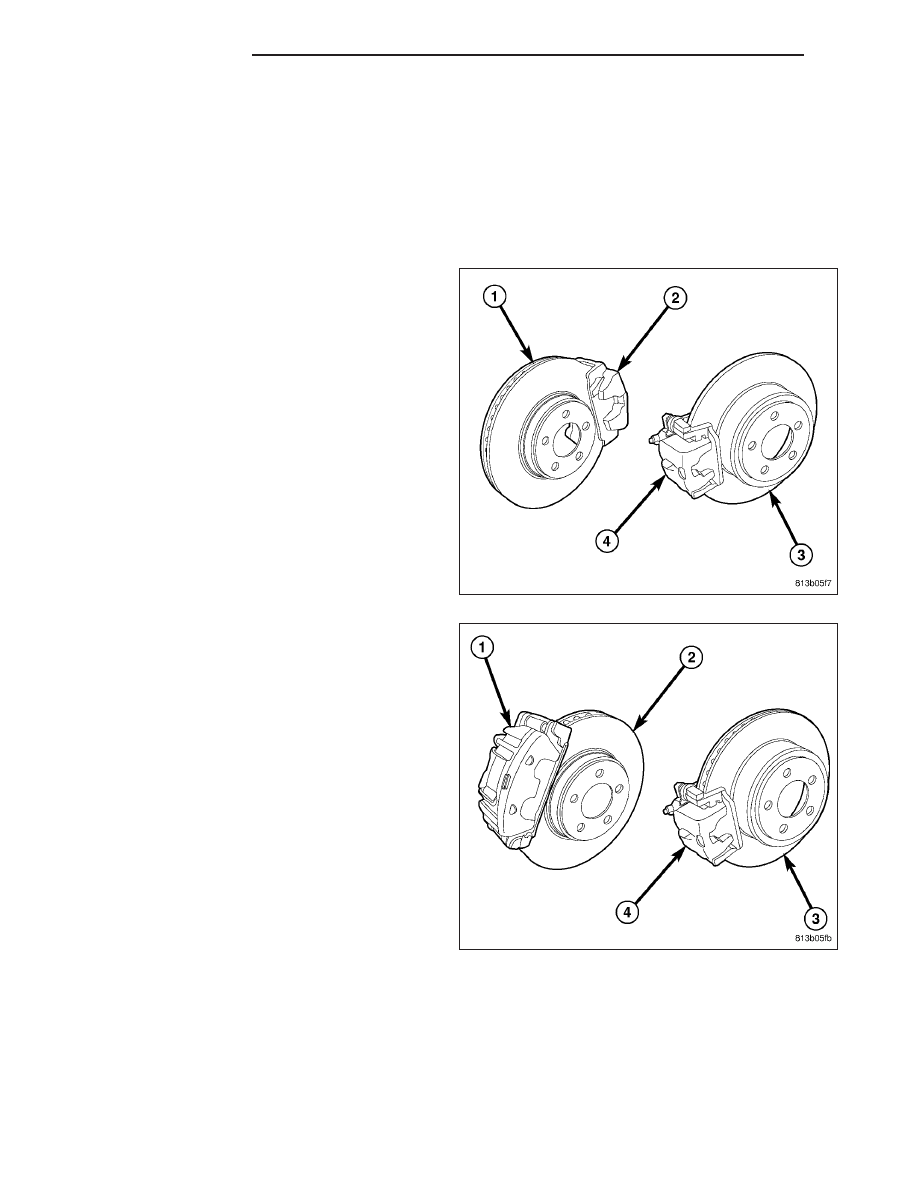
“Seventeen-inch” four-wheel disc brakes (so called
because they are designed to fit inside 17-inch
wheels) are standard on rear-wheel drive models with
V6 engines. They feature single-piston aluminum cali-
pers (2) and vented rotors (1) in the front and single-
piston aluminum calipers (4) with solid rotors (3) in the
rear.

“Eighteen-inch” four-wheel disc brakes (so called
because they are designed to fit inside 18-inch
wheels) are standard on Chrysler 300 Hemi C and all
international models, and optional on other models.
They feature twin-piston aluminum calipers (1) and
vented rotors (2) in the front and single-piston alumi-
num calipers (4) with vented rotors (3) in the rear.
Although the rear calipers appear the same as the
17-inch system, the rear calipers used with this sys-
tem feature a wider jaw to compensate for the wider,
vented brake rotors used.

Although the twin-piston caliper used is the same,
Rear-Wheel-Drive (RWD) models mount the caliper to
the rear (trailing end) of the knuckle while All-Wheel-
Drive (AWD) models mount the caliper to the front
(leading end) of the knuckle.

Vehicles equipped with the Police Package have heavy-duty brakes. Special brake linings are used front and rear.
The front brake calipers and rotors are the same as the premium “Eighteen-inch” brakes, but the rear brakes are
somewhat different. The rear brake caliper is similar, using the same diameter piston and seals, but is larger to
accommodate a larger brake rotor. The rear brake rotor is a thicker (4 mm thicker than premium), larger diameter
(350 mm) vented unit. The hat section of the rotor remains the same as premium to allow use of the standard
parking brake system. The rear brake caliper adapter (anchor) is different to allow for the larger brake rotor. All
components are serviced the same as premium brakes.

5 - 18

BRAKES - BASE

LX

All calipers are aluminum construction and are the low-drag type. New-technology caliper construction allows min-
imal drag of the pads on the discs with low clearance to the rotors to maintain maximum pedal feel and respon-
siveness.

All calipers are anodized, giving them an off-black appearance. This coating offers corrosion protection and a long-
term neat appearance.

Phenolic pistons are used in all calipers. The premium twin caliper pistons have stainless steel caps for protection
against damage due to contact with the brake pads.

All brake rotors are fully coated with Geomet™, a water-soluble, environmental friendly corrosion preventive. Both
the friction surfaces and the vents are coated. During initial brake applications of a new rotor, the brake pads scrub
the coating off the friction surfaces, ensuring that the remainder will be rust free. Coating the vents also ensures that
there will not be a loss of heat capacity over time.

DISC BRAKES - SRT8

SRT8 models utilize four-wheel disc brakes. All brake
calipers (2) are four-piston opposed fixed design man-
ufactured by Brembo. While identical in all other ways,
Chrysler SRT8 calipers are silver in color while Dodge
SRT8 calipers are red.

All brake rotors (3) are the internal vented type. There
are no dust shields behind the front brake rotors.

Each front brake caliper features four 42 mm pistons, two in each outer half of the caliper. The two outer halves of
this caliper connect hydraulically using internal passageways. These calipers are not serviceable. Do not attempt
disassembly.

Each rear brake caliper features four pistons also, two in each half of the caliper. Each half has one 28 mm and one
32 mm piston. When mounted, the smaller size (28 mm) piston is located at the top while the larger size (32 mm)
piston is located at the bottom. The two halves of the caliper are connected hydraulically by means of an external
brake tube located on the bottom of the caliper assembly. Each caliper half has its own bleeder screw at the top
and must be bled individually when bleeding is required. These calipers are not serviceable. Do not attempt disas-
sembly.

All SRT8 calipers mount directly to the knuckle. They do not use brake caliper adapters.

The SRT8 rear brake rotors have integrated parking brake drums like the standard rear disc brake system.

LX

BRAKES - BASE

5 - 19

PADS - FRONT BRAKE

REMOVAL

NOTE: Before proceeding, (Refer to 5 - BRAKES - WARNING) (Refer to 5 - BRAKES - CAUTION).

1. Raise and support vehicle. (Refer to LUBRICATION & MAINTENANCE/HOISTING - STANDARD PROCEDURE)

NOTE: Perform steps 2 through 6 on each side of the vehicle.

2. Remove wheel mounting nuts (3), then tire and

wheel assembly (1).

NOTE: In some cases, it may be necessary to retract caliper piston in its bore a small amount in order to
provide sufficient clearance between shoes and rotor to easily remove caliper from knuckle. This can usu-
ally be accomplished before guide pin bolts are removed by grasping rear of caliper and pulling outward
working with guide pins, thus retracting piston. Never push on piston directly as it may get damaged.

3. Remove Lower caliper guide pin bolt. To do so,

hold the guide pin (3) stationary while turning bolt
(1).

5 - 20

BRAKES - BASE

LX

4. Rotate caliper upward (1), exposing brake pads (2

and 5). Use care not to overextend brake hose
when doing this or damage may occur.

5. Remove inboard (2) and outboard (5) brake pads

from caliper adapter (4).

6. If necessary, remove anti-rattle clips (3) from upper

and lower abutments of adapter (4).

CLEANING

WARNING: Dust and dirt accumulating on brake parts during normal use may contain asbestos fibers from
production or aftermarket brake linings. Breathing excessive concentrations of asbestos fibers can cause
serious bodily harm. Exercise care when servicing brake parts. Do not sand or grind brake lining unless
equipment used is designed to contain the dust residue. Do not clean brake parts with compressed air or
by dry brushing. Cleaning should be done by dampening the brake components with a fine mist of water,
then wiping the brake components clean with a dampened cloth. Dispose of cloth and all residue containing
asbestos fibers in an impermeable container with the appropriate label. Follow practices prescribed by the
occupational Safety And Health Administration (OSHA) and the Environmental Protection Agency (EPA) for
the handling, processing, and disposing of dust or debris that may contain asbestos fibers.

INSPECTION

Visually inspect brake pads for uneven lining wear. Also inspect for excessive lining deterioration. Check the clear-
ance between the tips of the wear indicators (if equipped) on the pads and the brake rotors.

If a visual inspection does not adequately determine the condition of the lining, remove the disc brake pads from the
calipers and perform a physical check.

NOTE: It is important to inspect both front and rear brake pads during the same inspection. Typically, front
and rear brake pads wear out at the same time.

When servicing, replace both disc brake pads (inboard and outboard) for each caliper. It is necessary to replace the
pads on the opposite side of the vehicle as well as the pads failing inspection.

If the brake pads do not require replacement, be sure to reinstall the brake pads in the original position they were
removed from.

INSTALLATION

NOTE: Perform steps 1 through 7 on each side of the vehicle.

1. Completely retract caliper piston(s) back into bore(s) of caliper. To do so:

a. Remove fluid reservoir cap.

b. Use hand pressure or a C-clamp may be used to retract piston, first placing a wood block over piston(s)

before installing C-clamp to avoid damaging piston(s).

c. Install fluid reservoir cap.

LX

BRAKES - BASE

5 - 21


Content   ..  142  143  144  145   ..