Chrysler 300/300 Touring/300C, Dodge Magnum. Manual - part 38


  Index      Chrysler     Chrysler 300/300 Touring/300C, Dodge Magnum - service repair manual


Search            


Content   ..  36  37  38  39   ..


Chrysler 300/300 Touring/300C, Dodge Magnum. Manual - part 38


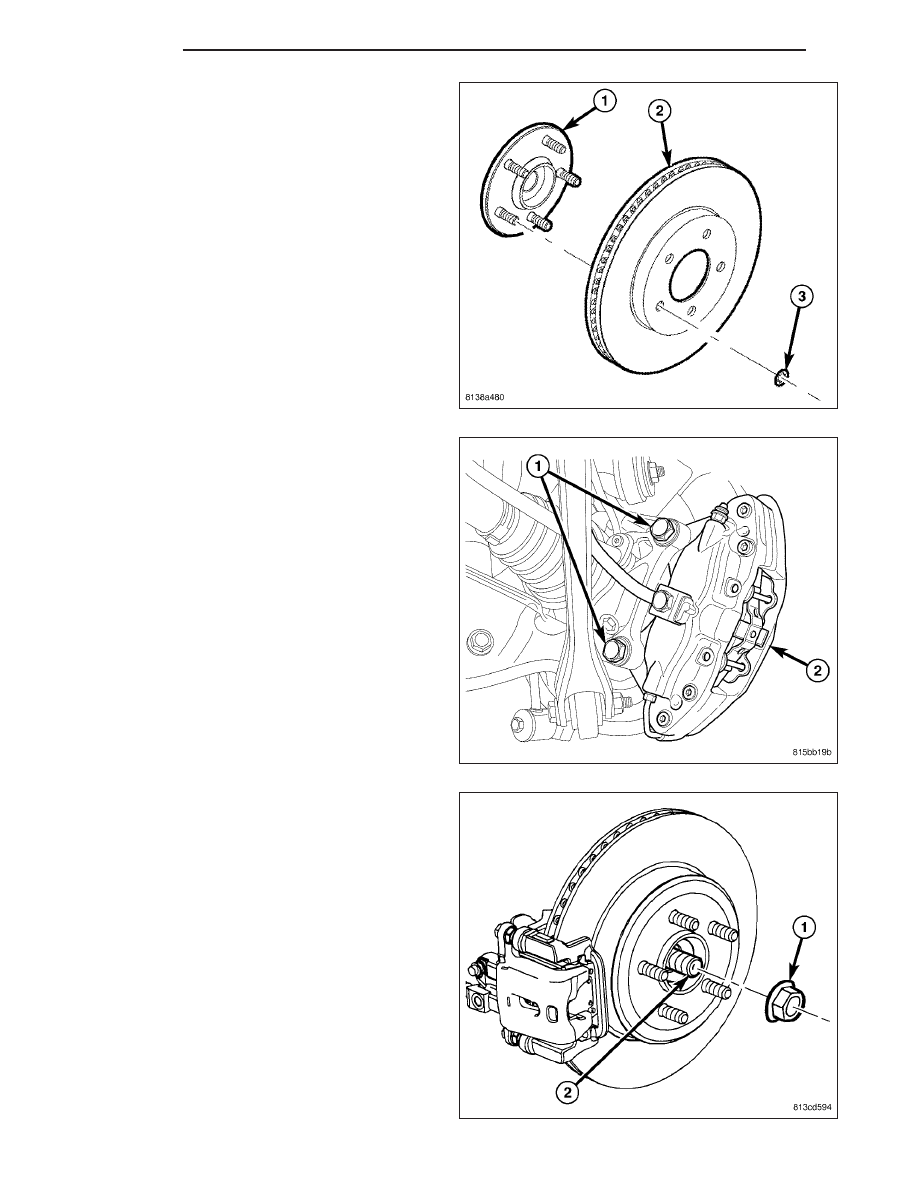
4. Clean hub face (1) to remove any dirt or corrosion

where rotor mounts.

5. Install brake rotor (2) over studs on hub and bear-

ing (1).

6. Slide caliper with pads (2) over brake rotor and

align with knuckle.

7. Install caliper mounting bolts (1). Tighten bolts to

130 N·m (96 ft. lbs.) torque.

8. Remove jack from under spring link.

9. Install hub nut (1) on end of half shaft (2). While a

helper applies brakes to keep hub from turning,
tighten hub nut to 213 N·m (157 ft. lbs.) torque.

10. Verify proper adjustment of the parking brake

shoes and adjust as necessary. (Refer to 5 -
BRAKES/PARKING

BRAKE/SHOES

-

ADJUSTMENT)

2 - 106

REAR

LX

11. Install tire and wheel assembly (1) (Refer to 22 -

TIRES/WHEELS - INSTALLATION). Tighten wheel
mounting nuts (3) to 150 N·m (110 ft. lbs.) torque.

12. Lower vehicle.

13. Pump brake pedal several times to ensure vehicle

has a firm brake pedal before moving vehicle.

14. Check and adjust brake fluid level in reservoir (1)

as necessary.

15. Road test vehicle and make several stops to wear

off any foreign material on brakes and to seat
brake pads.

LX

REAR

2 - 107

KNUCKLE

REMOVAL

KNUCKLE

1. Raise and support vehicle. (Refer to LUBRICATION & MAINTENANCE/HOISTING - STANDARD PROCEDURE)

2. Unclip wheel speed sensor cable at rear brake

rotor shield (1).

3. Remove screw (2) fastening sensor head (3) to

rear knuckle.

4. Remove wheel speed sensor head from knuckle.

5. Access and remove rear hub and bearing. (Refer

to 2 - SUSPENSION/REAR/HUB / BEARING -
REMOVAL)

6. Remove parking brake shoes. (Refer to 5 -

BRAKES/PARKING BRAKE/SHOES - REMOVAL)

7. If not removed, remove parking brake shoe actua-

tor lever (1) from end of cable (2).

8. Remove shoe support from knuckle.

2 - 108

REAR

LX

9. Remove parking brake cable screw (2) at knuckle

(3) and pull cable (1) out of knuckle.

10. Position under-hoist utility jack or jack stand under

spring link. Raise jack head to contact spring link
at shock mount secure in place.

11. Remove spring link-to-knuckle nut and bolt (2).

CAUTION: It important to use Guide (2) , Special
Tool 9361-2, when tapping sleeve in knuckle to
help keep Tap (1) , Special Tool 9361-1, straight
during use or damage to Tap may occur.

12. Place Guide 9361-2 (2) against sleeve (3) in

knuckle to keep Tap 9361-1 (1) straight. Using
Tap with an appropriate handle, cut threads
approximately halfway through bushing (or about
six complete threads). It is important to back
tap out, clean out burrs and lubricate Tap
often during process.

LX

REAR

2 - 109


Content   ..  36  37  38  39   ..