Chrysler Town & Country/Voyager, Dodge Caravan, Plymouth Voyager. Manual - part 118


  Index      Chrysler     Chrysler Town & Country/Voyager, Dodge Caravan, Plymouth Voyager - service repair manual 1992 year


Search            


Content   ..  116  117  118  119   ..


Chrysler Town & Country/Voyager, Dodge Caravan, Plymouth Voyager. Manual - part 118


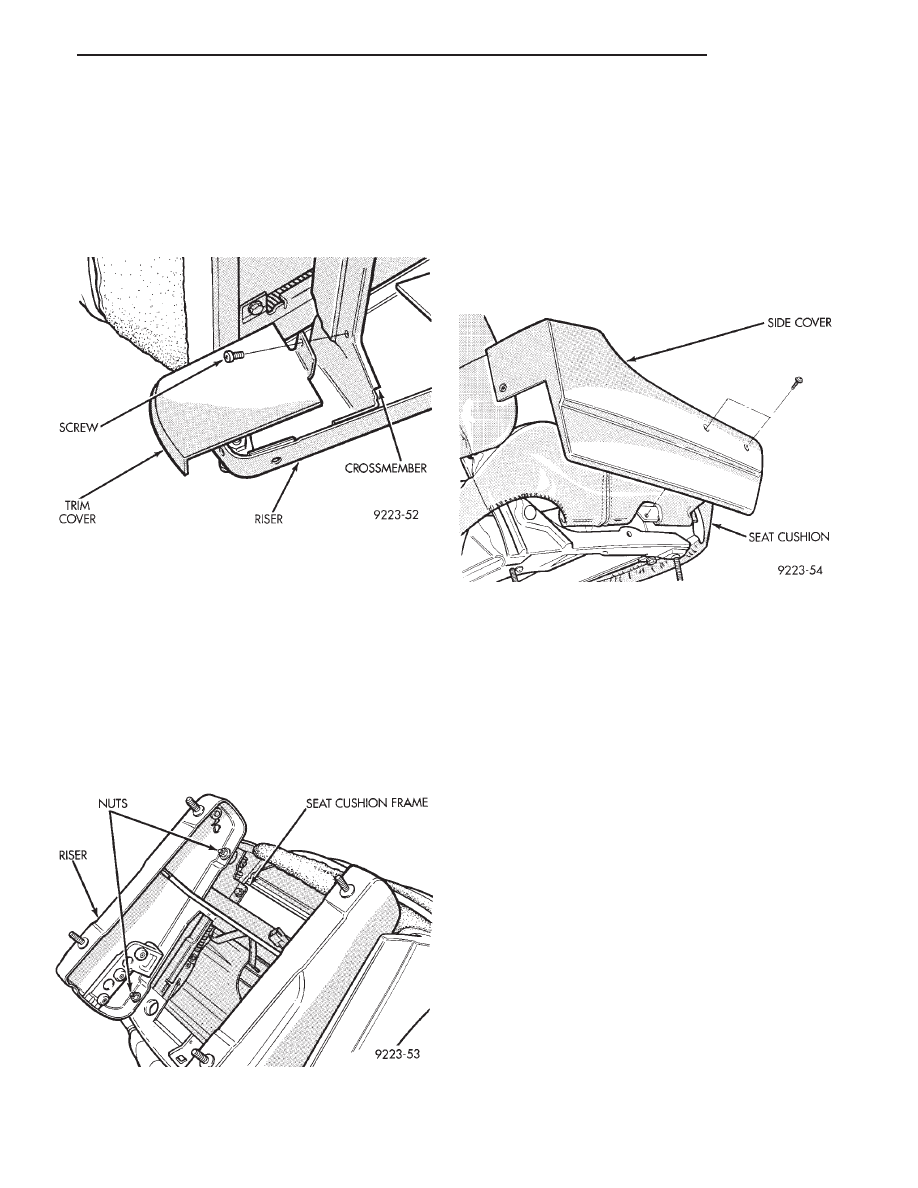
BUCKET SEAT RISER TRIM COVER

REMOVAL (FIG. 15)

(1) Remove screw holding riser trim cover to seat

riser crossmember.

(2) Separate trim cover from seat riser.

INSTALLATION

Reverse the preceding operation.

BUCKET SEAT RISER

REMOVAL (FIG. 16)

(1) Remove seat from vehicle. Refer Body Compo-

nent Service section for front seat procedures. Refer to
Owner’s Manual for rear seat procedures.

(2) Remove storage drawer, if equipped.
(3) Remove nuts holding riser to bottom of seat.
(4) Separate riser from seat.

INSTALLATION

Reverse the preceding operation.

BUCKET SEAT CUSHION SIDE COVER

REMOVAL (FIG. 17)

(1) Remove recliner handle, if equipped.
(2) Disengage seat belt buckle tether from side cover,

if equipped.

(3) Remove screws holding side cover to seat cushion

frame.

(4) Separate side cover from seat.

INSTALLATION

Reverse the preceding operation.

BUCKET SEAT CUSHION FRAME

REMOVAL (FIG. 18)

(1) Remove seat from vehicle. Refer Body Compo-

nent Service section for front seat procedures. Refer to
Owner’s Manual for rear seat procedures.

(2) Remove riser.
(3) Separate seat back from cushion.
(4) Disengage J-strip retainers from cushion frame.
(5) Separate frame from pad.

INSTALLATION

Reverse the preceding operation.

BUCKET SEAT CUSHION PAD

REMOVAL (FIG. 19)

(1) Remove seat from vehicle. Refer Body Compo-

nent Service section for front seat procedures. Refer to
Owner’s Manual for rear seat procedures.

(2) Separate riser from seat.
(3) Separate seat back from cushion.
(4) Disengage J-strip retainers from cushion frame.

Fig. 15 Bucket Seat Riser Trim Cover

Fig. 16 Bucket Seat Riser

Fig. 17 Bucket Seat Cushion Side Cover

.

BODY

23 - 11

(5) Disengage hook/loop fasteners holding cover to

pad.

(6) Remove hog-rings holding listing wire to hold

down wire in pad.

(7) Separate cover from pad.

BUCKET SEAT CUSHION PAD INSTALLATION
(FIG. 20)

(1) Center listing wire in pull down groove.
(2) Hog-ring listing wire to pull down wire in pad.
(3) Reverse steps 5 through 1 of preceding operation.

SECOND REAR SEAT BACK PANEL

REMOVAL (FIG. 21)

(1) Remove screws holding rear panel to seat back.
(2) Lift upward on base of panel and pull rearward

to disengage hooks holding top of panel to seat back.

(3) Separate panel from seat back.

INSTALLATION

Reverse the preceding operation.

SECOND REAR SEAT BACK HINGE COVER

REMOVAL (FIG. 22)

(1) Remove screw holding hinge cover to seat back

hinge.

(2) Separate cover from seat back hinge.

INSTALLATION

Reverse the preceding operation.

SECOND REAR SEAT BACK

REMOVAL (FIG. 23)

(1) Remove seat back hinge covers.
(2) Remove bolts holding bottom of seat back hinges

to cushion frame.

(3) Separate seat back from cushion.

Fig. 19 Seat Cushion Cover Listing and Hook/Loop

Fasteners

Fig. 18 Bucket Seat Cushion Frame

Fig. 20 Hog-ring Cover Listing to Pull Down

Fig. 21 Second Rear Seat Back Panel

23 - 12

BODY

.

SECOND REAR SEAT BACK INSTALLATION

Reverse the preceding operation.

SECOND REAR SEAT BACK HINGE

REMOVAL (FIG. 24)

(1) Remove seat back hinge cover.
(2) Remove bolts holding seat back hinge to cushion

frame.

(3) Remove nuts holding hinge to seat back.
(4) Separate seat back hinge from seat.

INSTALLATION

Reverse the preceding operation.

SECOND REAR SEAT TRACK

REMOVAL (FIG. 25)

(1) Remove second rear seat from vehicle.
(2) Position seat upside down on a clean work sur-

face.

(3) Disconnect track adjuster link wire from latch

arm.

(4) Remove nuts holding track to riser.

(5) Separate track from riser.

INSTALLATION

Reverse the preceding operation.

SECOND REAR SEAT RISER

REMOVAL (FIG. 26)

(1) Remove seat track, if equipped.
(2) Remove bolts holding riser to bottom of seat

frame.

(3) Separate riser from seat.

INSTALLATION

Reverse the preceding operation.

Fig. 22 Second Rear Seat Back Hinge Cover

Fig. 23 Second Rear Seat Back

Fig. 24 Second Rear Seat Back Hinge

Fig. 25 Second Rear Seat Track

.

BODY

23 - 13

SECOND REAR SEAT CUSHION PAD

REMOVAL

(1) Remove seat from vehicle.
(2) Position seat on a clean work surface.
(3) Separate seat back hinges from cushion frame.
(4) Remove seat risers.
(5) Remove seat belts from rear rail of seat cushion

frame.

(6) Disengage J-strip retainers holding trim cover to

bottom cushion frame.

(7) Separate frame from cushion pad and cover.
(8) Turn cushion pad upright on work surface.
(9) Roll cover inside out to top of cushion pad.
(10) Remove hog-rings holding cover listing wire to

hold down wire in cushion pad. Refer to Bucket Seat
Cushion Pad paragraph for typical illustrations.

(11) Separate cover from pad.

INSTALLATION

Reverse the preceding operation.

SECOND REAR SEAT BACK PAD

REMOVAL

(1) Remove seat back hinge covers.
(2) Remove bolts holding hinges to cushion frame.
(3) Separate seat back from cushion.
(4) Position seat back on a clean work surface.
(5) Remove seat back trim panel.
(6) Remove hog-rings holding cover to seat back

frame.

(7) Separate frame from back pad and cover.
(8) Turn back pad upright on work surface.
(9) Roll cover inside out to top of back pad.
(10) Remove hog-rings holding cover listing wires to

hold down wires in pad. Refer to Bucket Seat Back Pad
paragraph for typical illustrations.

(11) Separate cover from back pad.

INSTALLATION

Reverse the preceding operation.

CHILD RESTRAINT SEAT

The child restraint, two passenger seat, located in

the first rear position can be removed from the vehicle
using instructions provided in the Owner’s manual.

CHILD SEAT MODULE

REMOVAL

(1) Remove trim panel from rear of seat back.
(2) Open child seat and separate hook and loop

fasteners holding vinyl insert to module.

(3) Disengage J-strip retainer holding head re-

straint trim cover to seat back frame.

(4) Remove hog-rings holding seat back trim cover to

upper seat back frame (Fig. 27).

(5) Disengage push-in fasteners holding seat back

trim cover to module under head restraint.

(6) Pull seat back trim cover from under head re-

straint.

(7) Remove screws holding top of module to seat

back frame (Fig. 28).

(8) Close child restraint seat.
(9) Deflect pad at base of module upward to gain

access to hidden screws under module.

(10) Remove screws holding bottom of module to

seat back frame (Fig. 28).

(11) Rotate top of module forward while pulling

upward and separate module from seat back.

INSTALLATION

Reverse the preceding operation.

Fig. 26 Second Rear Seat Riser—Typical

Fig. 27 Seat Back Cover Hog-ring

23 - 14

BODY

.


Content   ..  116  117  118  119   ..