Chevrolet Silverado / GMC Sierra. Manual - part 2262


  Index      Chevrolet     Chevrolet Silverado / GMC Sierra - service repair manual 2007-2009 year


Search            


Content   ..  2260  2261  2262  2263   ..


Chevrolet Silverado / GMC Sierra. Manual - part 2262


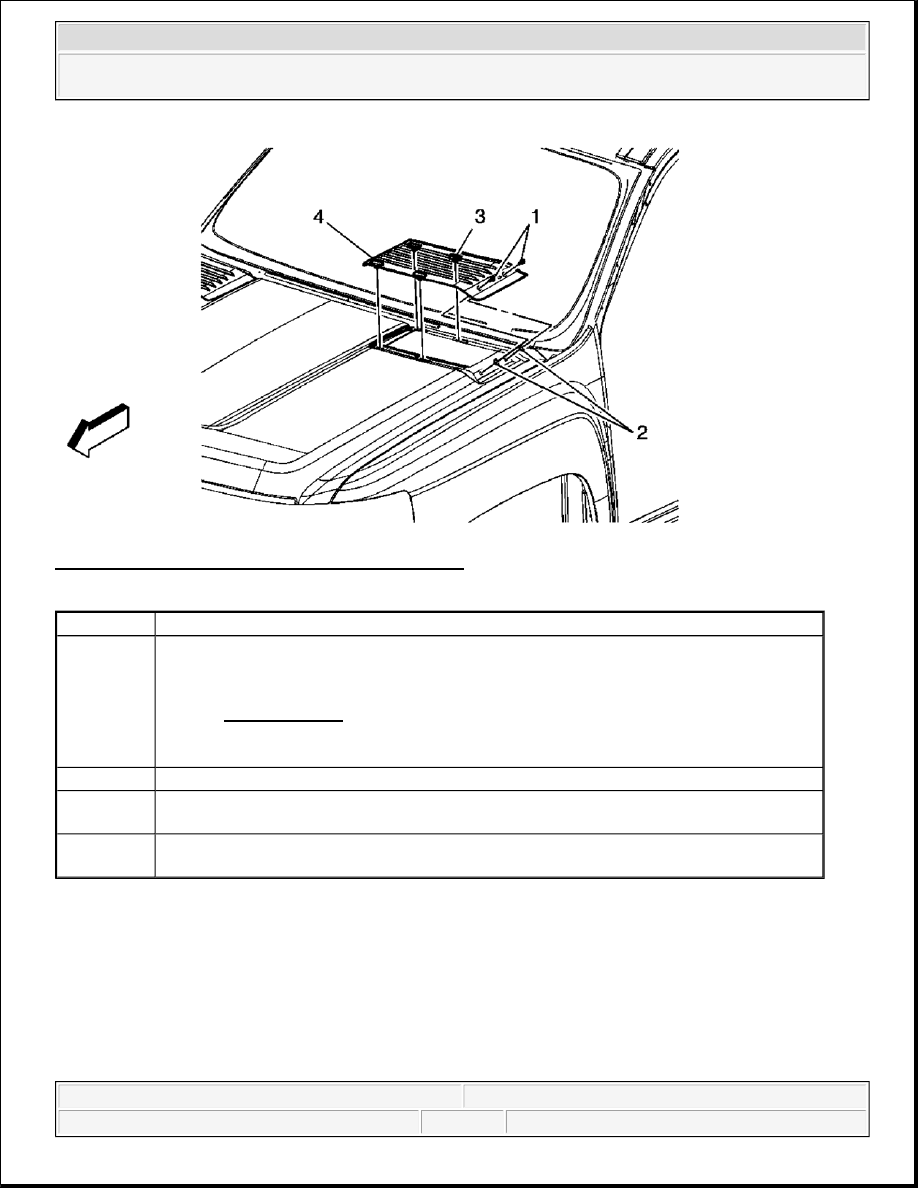
Fig. 27: View Of Hood Rear Molding (Chevrolet HD) 
Courtesy of GENERAL MOTORS CORP. 

PICKUP BOX SIDE UPPER MOLDING REPLACEMENT (HD) 

Callout

Component Name

1

Hood Rear Molding Screw (Qty: 2) 

Tighten:: 1.5 N.m (13 lb in) 

NOTE:

Refer to Fastener Notice .

2

Hood Rear Molding Assembly Nut (Qty: 2)

3

Hood Rear Molding Integral Clip (Qty: 4) 
Tip: Ensure all four clips are fully seated prior to installing the hood rear molding screws.

4

Hood Rear Molding 
Tip: Gently pry the hood molding upward, in order to remove.


2008 Chevrolet Silverado 1500 

2008 ACCESSORIES & EQUIPMENT Exterior Trim - Cab & Chassis Sierra, Cab & Chassis Silverado, Sierra & 

Silverado


Microsoft 


Friday, August 21, 2009 2:26:40 PM

Page 32 

© 2005 Mitchell Repair Information Company, LLC. 

Fig. 28: Viwe Of Pickup Box Side Upper Molding (HD) 
Courtesy of GENERAL MOTORS CORP. 

ROOF PANEL JOINT FINISH MOLDING REPLACEMENT 

Callout

Component Name

1

Pick Up Box Side Upper Molding Locators (Qty: 3) 
Tip: Upon installation of the new molding, align the 3 locators to the pick up box side rail 
and secure the retainers.

2

Pick Up Box Side Upper Molding Retainers (Qty: 23)

3

Pick Up Box Side Upper Molding


2008 Chevrolet Silverado 1500 

2008 ACCESSORIES & EQUIPMENT Exterior Trim - Cab & Chassis Sierra, Cab & Chassis Silverado, Sierra & 

Silverado


Microsoft 


Friday, August 21, 2009 2:26:40 PM

Page 33 

© 2005 Mitchell Repair Information Company, LLC. 

Fig. 29: View Of Roof Panel Joint Finish Molding 
Courtesy of GENERAL MOTORS CORP. 

Callout

Component Name

1

Roof Panel Joint Finish Molding (Rear) 

 
Tip: 

1. The part and surface should be 21°C (70°F) prior to installation. The vehicle should 

remain 21°C (70°F) for one hour after assembly to allow adhesive to develop 
sufficient bond strength.  

2. Remove the roof panel finish joint from the roof ditch.  

3. Use of a heat gun is recommended.  

4. Using a 50/50 mixture of isopropyl alcohol and clean drinkable water and a clean 

towel, remove the left over adhesive residue from the ditch.  

5. Wipe the roof ditch clean with a clean dry towel.  

6. Peel the adhesive tape backing from the roof panel joint finish molding.  

7. Secure the molding starting at the front edge working rearward.  

8. Completely wet out the roof panel finish joint molding.  

NOTE:

Refer to Exterior Trim Emblem Removal Notice .


2008 Chevrolet Silverado 1500 

2008 ACCESSORIES & EQUIPMENT Exterior Trim - Cab & Chassis Sierra, Cab & Chassis Silverado, Sierra & 

Silverado


Microsoft 


Friday, August 21, 2009 2:26:40 PM

Page 34 

© 2005 Mitchell Repair Information Company, LLC. 

REAR SPOILER REPLACEMENT (901/902)

Fig. 30: View Of Rear Spoiler (901/902) 
Courtesy of GENERAL MOTORS CORP. 

Callout

Component Name

1

Endgate Spoiler Assembly Screws (Qty: 4) 

Tighten: 10 N.m (89 lb in) 

NOTE:

Refer to Fastener Notice .

2

Endgate Spoiler Assembly Locator Pin

3

Endgate Spoiler Assembly Adhesive Tape Liner 
Tip: 

The part and surface should be ambient temperature prior to installation. The vehicle 
should remain ambient temperature for one hour after assembly to allow adhesive to 
develop sufficient bond strength.  

Release the liner and wet out once the endgate spoiler is in position and the screws 


2008 Chevrolet Silverado 1500 

2008 ACCESSORIES & EQUIPMENT Exterior Trim - Cab & Chassis Sierra, Cab & Chassis Silverado, Sierra & 

Silverado


Microsoft 


Friday, August 21, 2009 2:26:40 PM

Page 35 

© 2005 Mitchell Repair Information Company, LLC. 


Content   ..  2260  2261  2262  2263   ..