Chery Tiggo. Manual - part 297
 

  Index      Chery     Chery Tiggo - service repair manual 2009 year


Search            


Content   ..  295  296  297  298   ..


Chery Tiggo. Manual - part 297


17. Remove both front axle shafts (See Front Axle Shaft Removal & Installation in Section 09 Driveline & Axle).

18. Remove the engine undercover and splash shields.

19. Remove the engine to transaxle lower bolts.

(Tighten: Engine to transaxle lower bolts to 80 N·m)

20. Remove the bolts that mount the side sill to vehicle body.

(Tighten: Side sill to vehicle body bolts to 120 N·m)

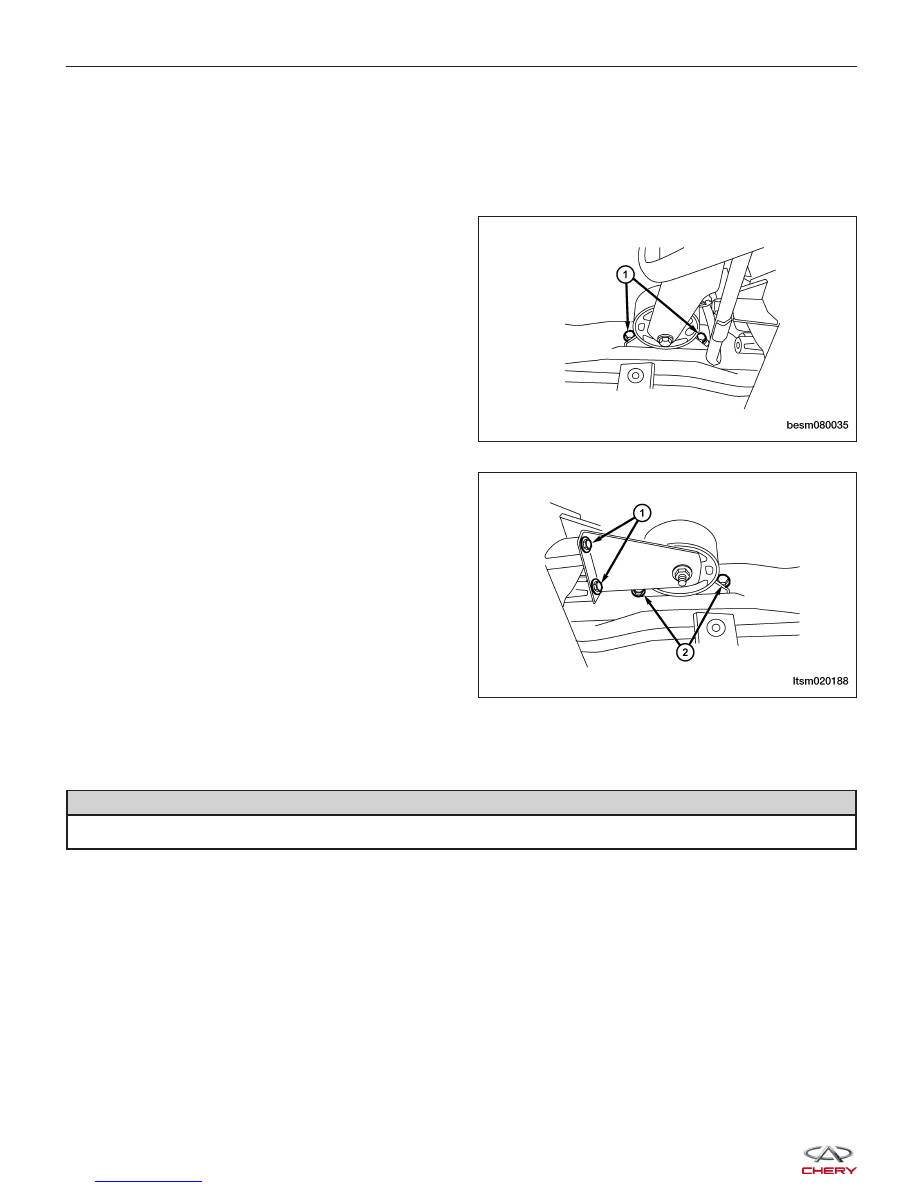
21. Remove the front engine mount bolts (1).

(Tighten: Front mount bolts to 60 N·m)

22. Remove the rear engine mount bolts (2) and the

rear engine mount bracket bolts (1).
(Tighten: Rear mount bolts to 40 N·m)

23. Remove the sub-frame assembly (See Sub-Frame Assembly Removal & Installation in Section 10 Suspension).

24. Remove the engine to transaxle lower bolts.

(Tighten: Transaxle mount bolts to 40 N·m)

25. Separate the transaxle from the engine and remove the transaxle from the vehicle.

WARNING!

Use a suitable jack to support the transaxle during removal.

26. Installation is in the reverse order of removal.

ON-VEHICLE SERVICE

BESM080035

LTSM020188


Installation Notes:
• Check the transaxle fluid level.

− Drive the vehicle until the ATF reaches oper-

ating temperature (70° - 80°C).

− Park the vehicle on level ground.
− Shift the gear selector lever to all gear posi-

tions once, then shift to gear “N”.

− Clean and check the outside of the dipstick

and remove the dipstick to check the fluid
level.

− Check if the transmission fluid level is within

the HOT marking of the dipstick. If lower than
the HOT marking, refill the transaxle until the
fluid level is above the HOT marking.

• After installation, check for any fluid leakage and

verify the transaxle fluid level is correct. Refill the
transaxle fluid through the fill hole (1) shown in the
figure.

Automatic Shifter Selector

Removal & Installation

1. Raise and support the vehicle.

2. Disconnect the negative battery cable.

3. Remove the air cleaner and air duct assembly.

4. Remove the base mounting of the air cleaner housing assembly.

ON-VEHICLE SERVICE

LTSM080185

08


5. Remove the shift cable adjusting bolt (1) from the

transaxle gearshift switch.

6. Remove the gearshift knob (1).

7. Remove the gearshift cover (2) from the lower

console.

8. Apply the parking brake (apply parking brake handle to clear lower console during removal).

9. Remove the lower console (See Lower Console Removal & Installation in Section 15 Body & Accessories).

10. Remove the shift cable from the gearshift mechanism.

11. Disconnect the electrical connector (2).

12. Remove the four bolts (1) and then remove the

gearshift mechanism from the bracket.

ON-VEHICLE SERVICE

LTSM080167

BESM080049

LTSM080182


13. Installation is in the reverse order of removal.

NOTE :
If the battery has low voltage, press the release switch
(1) to move the gearshift lever.

ON-VEHICLE SERVICE

LTSM080187

08


Content   ..  295  296  297  298   ..