Chery Tiggo. Manual - part 63


  Index      Chery     Chery Tiggo - service repair manual 2009 year


Search            


Content   ..  61  62  63  64   ..


Chery Tiggo. Manual - part 63


Inspection

NOTE :
All measurements should be taken with the engine block at room temperature, 21°C.

Engine Block
• Clean cylinder block thoroughly and check all core hole plugs for evidence of leaking.

• Examine block and cylinder bores for cracks or fractures.

• Check block deck surfaces for flatness. Deck surface must be within service limit of 0.050 mm.

Cylinder Bore

• The cylinder walls should be checked for out-of-round and taper with cylinder indicator or equivalent. If the cyl-

inder walls are badly scuffed or scored, the cylinder block should be replaced, and new pistons and rings fitted.

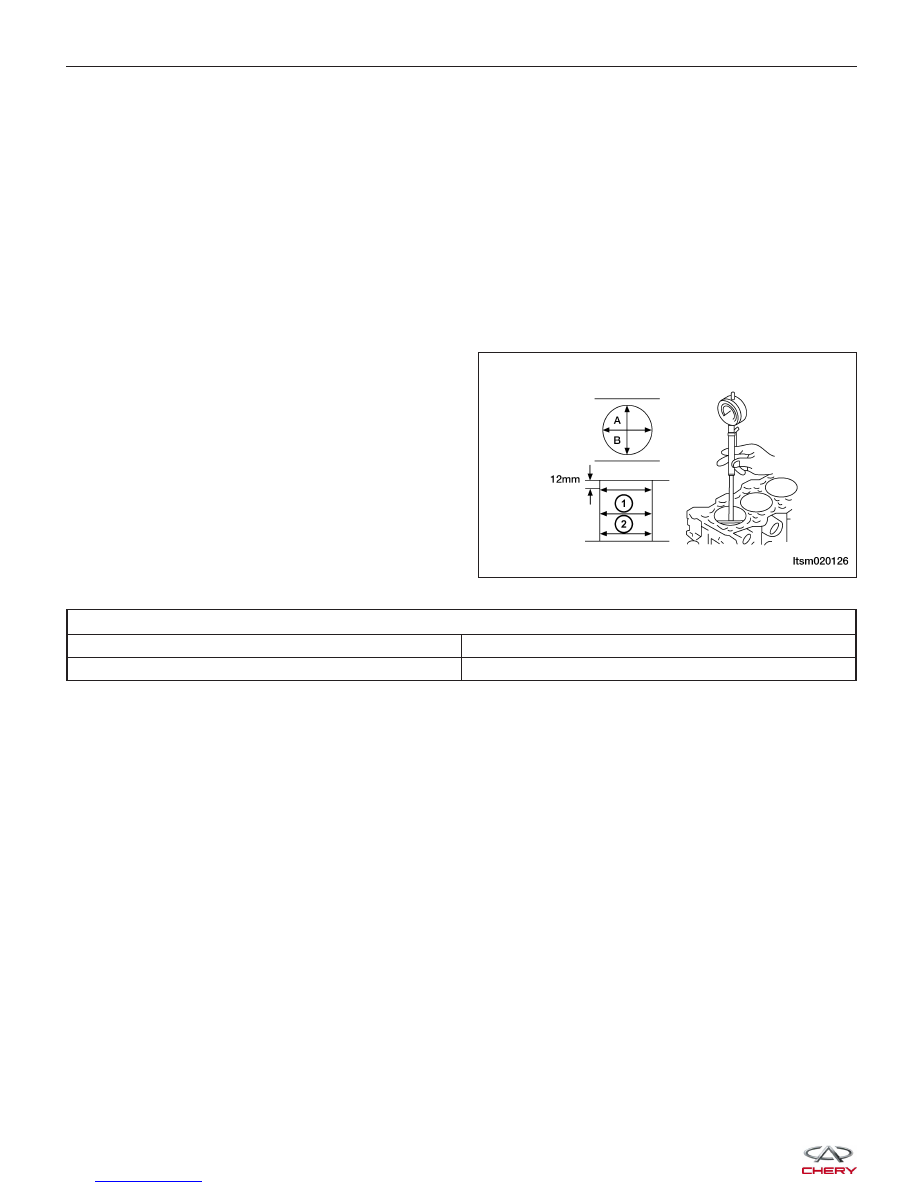
• Measure the cylinder bore at three levels in directions A and B. Top measurement should be 12 mm down and

bottom measurement should be 12 mm up from
bottom of bore.

CYLINDER BORE

Cylinder Size

86.50 - 86.53 mm

Cylinder Cylindrically

≤ 0.01 mm

Assembly

NOTE :
Cleanliness is extremely important during the engine assembly procedure. Any foreign material, including any mate-
rial created while cleaning gasket surfaces, that enters the oil passages, coolant passages or the oil pan can cause
engine failure.

NOTE :
Assemble all components in their original position.

1. Install the pistons to the connecting rods.

2. Using a piston ring expander, install the piston rings.

3. Assemble all components in the reverse order of disassembly.

ENGINE UNIT REPAIR

LTSM020126


Pistons

Specifications

Clearance Specifications - Pistons

DESCRIPTION

SPECIFICATION (mm)

Surface Distortion Limit

0.15

Out-Of-Round

< 0.008

Taper

< 0.01

Clearance Specifications - Piston Ring Groove

DESCRIPTION

SPECIFICATION

LIMIT

First Ring

0.02 - 0.06 mm

0.1 mm

Second Ring

0.02 - 0.06 mm

0.1 mm

Clearance Specifications - Piston Ring End Gap

DESCRIPTION

SPECIFICATION

LIMIT

First Ring

0.25 - 0.35 mm

0.8 mm

Second Ring

0.40 - 0.55 mm

0.8 mm

Oil Control Ring

0.10 - 0.40 mm

1.0 mm

Clearance Specifications - Piston to Piston Pin

DESCRIPTION

SPECIFICATION (mm)

Piston To Piston Pin

0.002 - 0.013

ENGINE UNIT REPAIR

02


Disassembly

Piston Ring Removal

• Using a suitable ring expander, remove upper and intermediate piston rings.

• Remove the upper oil ring side rail, lower oil ring side rail and then oil ring expander from piston.

• Clean ring grooves of any carbon deposits.

1 - No. 1 Compression Ring

2 - No. 2 Compression Ring

3 - Oil Control Ring

4 - Piston Pin

5 - Connecting Rod

6 - Connecting Rod Bolt

7 - Piston

8 - Piston and Connecting Rod Assembly

9 - Upper Connecting Rod Bearing

10 - Lower Connecting Rod Bearing

11 - Connecting Rod Cap

12 - Connecting Rod Nut

ENGINE UNIT REPAIR

LTSM020107


CAUTION:
Before removing the piston rings (1), check the
piston ring side clearance. Be careful to mark
the location of the piston rings if they are to
be reused.

Piston Pin Removal

• Using special tool MD-998780 (1) & (2), remove the piston pin for the pistons.

• Insert the tool push rod into the piston from the

notched side.

• Attach the tool guide into the piston and to the

push rod.

Connecting Rod & Piston Disassembly

• Connecting Rod & Piston Disassembly.

− Remove the piston from the connecting rod.

ENGINE UNIT REPAIR

BESM020046

LTSM020180

BESM020041

02


Content   ..  61  62  63  64   ..