Acura CSX. Manual - part 671


  Index      Acura     Acura CSX - P/NO. 61SNR03 - service repair manual 2006-2009 year


Search            


Content   ..  669  670  671  672   ..


Acura CSX. Manual - part 671


*01

SNR9A00H46200000000DAAT00

24-3

Seat Belts

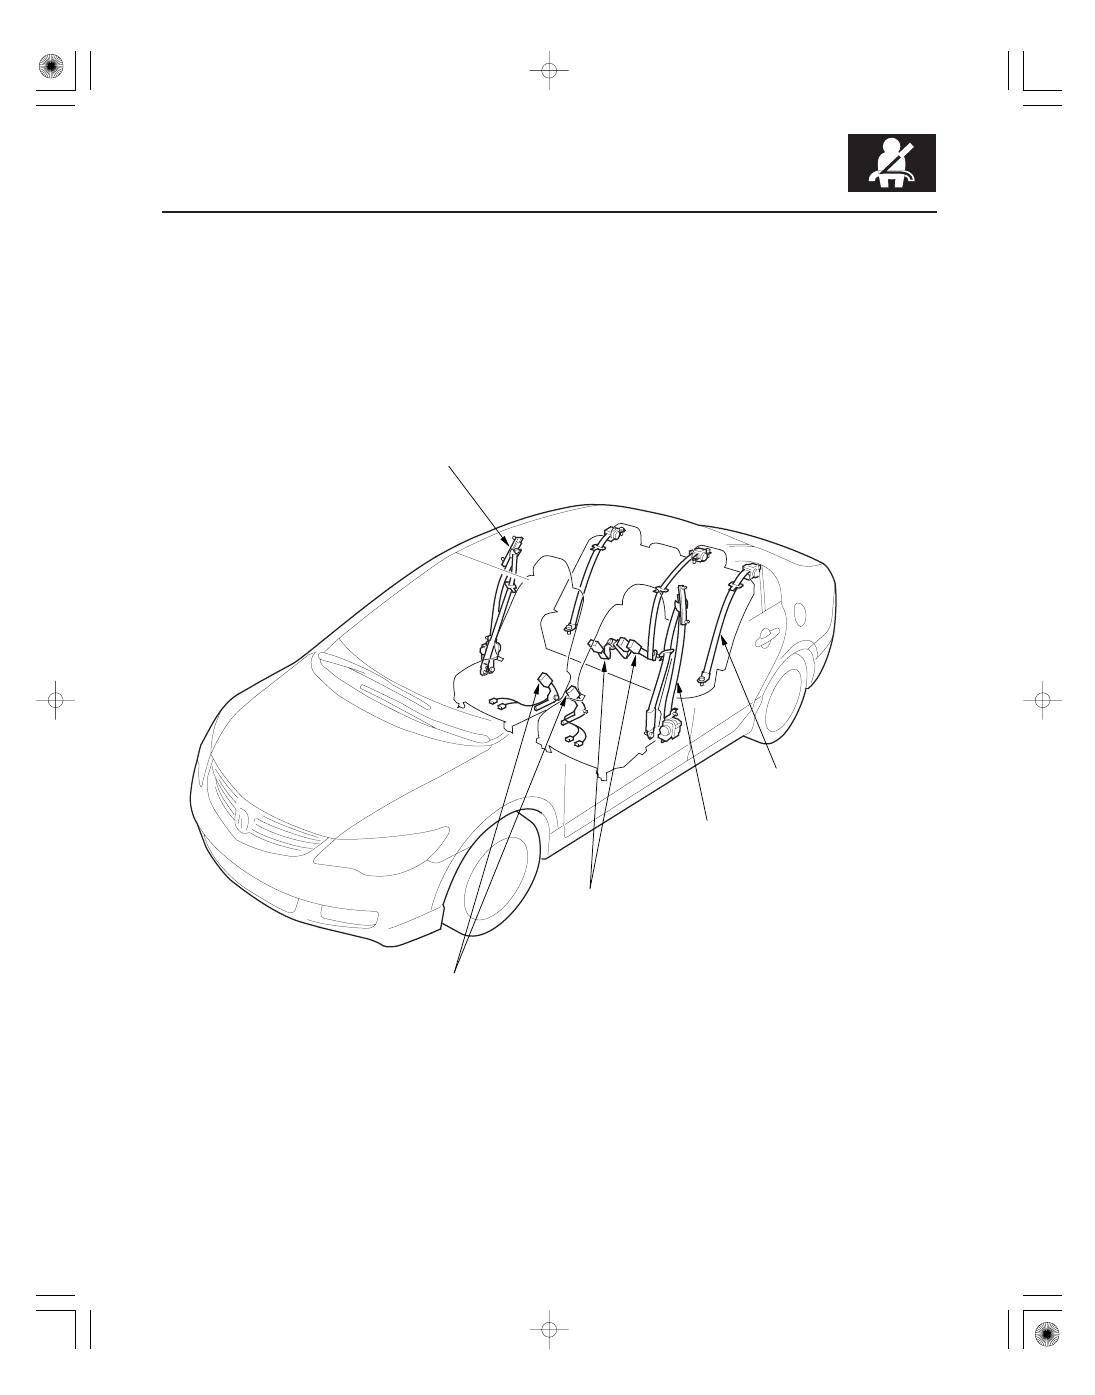
Component Location Index

REAR SEAT BELT

SHOULDER ANCHOR ADJUSTER

FRONT SEAT BELT

FRONT SEAT BELT BUCKLES

REAR CENTER SEAT BELT and
REAR SEAT BELT BUCKLES

Replacement, page 24-7
Inspection, page 24-9

Replacement, page 24-4
Inspection, page 24-9

Replacement, page 24-6

Replacement, page 24-8
Inspection, page 24-9

08/08/21 13:54:07 61SNR030_240_0003

01

02

03

04

SNR9A00H46200053401KBAT00

Front Seat Belt

24-4

Seat Belts

Front Seat Belt Replacement

A

A
7/16-20 UNF
32 N·m
(3.3 kgf·m, 24 lbf·ft)

A
7/16-20 UNF
32 N·m
(3.3 kgf·m, 24 lbf·ft)

A

F

D

B
6 x 1.0 mm
9.8 N·m
(1.0 kgf·m, 7.2 lbf·ft)

C
7/16-20 UNF
32 N·m (3.3 kgf·m, 24 lbf·ft)

F

E

Front

SRS components are located in this area. Review the
SRS component locations (see page 24-11) and the
precautions and procedures (see page 24-13) before
doing repairs or service.

NOTE:

• Check the front seat belts for damage (see page 24-9),

and replace them if necessary.

• If replacing the front seat belt after deployment, refer

to Component Replacement/Inspection After
Deployment (see page 24-185) for a complete list of
other parts that must also be replaced.

1. Do the battery terminal disconnection procedure

(see page 22-68), and wait at least 3 minutes before
beginning work.

2. Slide the front seat forward fully, and remove the

anchor cover (A).

3. Remove the lower anchor bolt (A).

4. Remove the B-pillar lower trim (see page 20-72).

5. Remove the B-pillar upper trim and slider (see page

20-72).

6. Remove the upper anchor bolt (A).

7. Disconnect the seat belt tensioner connector (A).

Remove the upper retractor mounting bolt (B) and
the lower retractor bolt (C), then remove the front
seat belt (D) and retractor (E).

8. If necessary, remove the front seat belt protector

(F).

08/08/21 13:54:08 61SNR030_240_0004

05

06

Upper anchor bolt installation

24-5

8 x 1.25 mm
22 N·m
(2.2 kgf·m, 16 lbf·ft)

A

UPPER ANCHOR

UPPER ANCHOR
BOLT

TOOTHED
LOCK WASHER

BUSHING

THREAD LOCK

COLLAR

9. Remove the shoulder anchor adjuster (A).

10. Install the seat belt in the reverse order of removal,

and note these items:

• Apply medium strength liquid thread lock to the

anchor bolts before reinstallation.

• Tighten the bolts by hand first, then tighten to the

specification with a torque wrench.

• Check that the retractor locking mechanism

functions as described (see page 24-9).

• Assemble the washer, collar, and bushing on the

upper anchor bolt as shown.

• If the seat belt tensioner has been deployed,

replace the front seat belt protector with a new
one.

• Before installing the anchor bolts, make sure

there are no twists or kinks in the seat belt.

• Make sure the seat belt tensioner connector is

properly plugged in.

• Check for any DTCs that may have been set

during repairs, and clear them using the HDS.

• Do the battery terminal reconnection procedure

(see page 22-68).

08/08/21 13:54:08 61SNR030_240_0005

07

02

09

Front Seat Belt Buckle

Driver’s seat

Passenger’s seat

24-6

Seat Belts

B

C

A

A

B

A
7/16-20 UNF
32 N·m
(3.3 kgf·m, 24 lbf·ft)

B

D

C

SRS components are located in this area. Review the
SRS component locations (see page 24-11) and the
precautions and procedures (see page 24-13) before
doing repairs or service.

NOTE: If replacing the front seat belt after deployment,
refer to Component Replacement/Inspection After
Deployment (see page 24-185) for a complete list of
other parts that must also be replaced.

1. Do the battery terminal disconnection procedure

(see page 22-68), and wait at least 3 minutes before
beginning work.

2. Remove the front seat (see page 20-118).

3. Lift up the front seat, then detach the seat belt

switch connector (A) and seat belt buckle tensioner
connector (B), and on the driver’s seat, detach the
harness clip (C).

4. Remove the center anchor bolt (A), then remove

the seat belt buckle (B) from the elastic band (C).

5. Pull the seat belt switch harness (D) out through the

space between the seat cushion and the seat track
(driver’s seat), or through the hole in the seat track
(passenger’s seat).

08/08/21 13:54:08 61SNR030_240_0006


Content   ..  669  670  671  672   ..