Acura CSX. Manual - part 329


  Index      Acura     Acura CSX - P/NO. 61SNR03 - service repair manual 2006-2009 year


Search            


Content   ..  327  328  329  330   ..


Acura CSX. Manual - part 329


01

02

*01

*02

SNR9A00E16226600000KCAT00

Grease quantity

K20Z2 engine model:

0.5

1.0 g (0.02

0.04 oz)

K20Z3 engine model:

2.0

3.0 g (0.08

0.12 oz)

16-20

Driveline/Axle

Driveshaft Installation

(P/N 08734-0001)

A

A

B

A

B

A

(P/N 08798-9002)

NOTE: Before starting installation, make sure the
mating surfaces of the joint and the splined section are
clean.

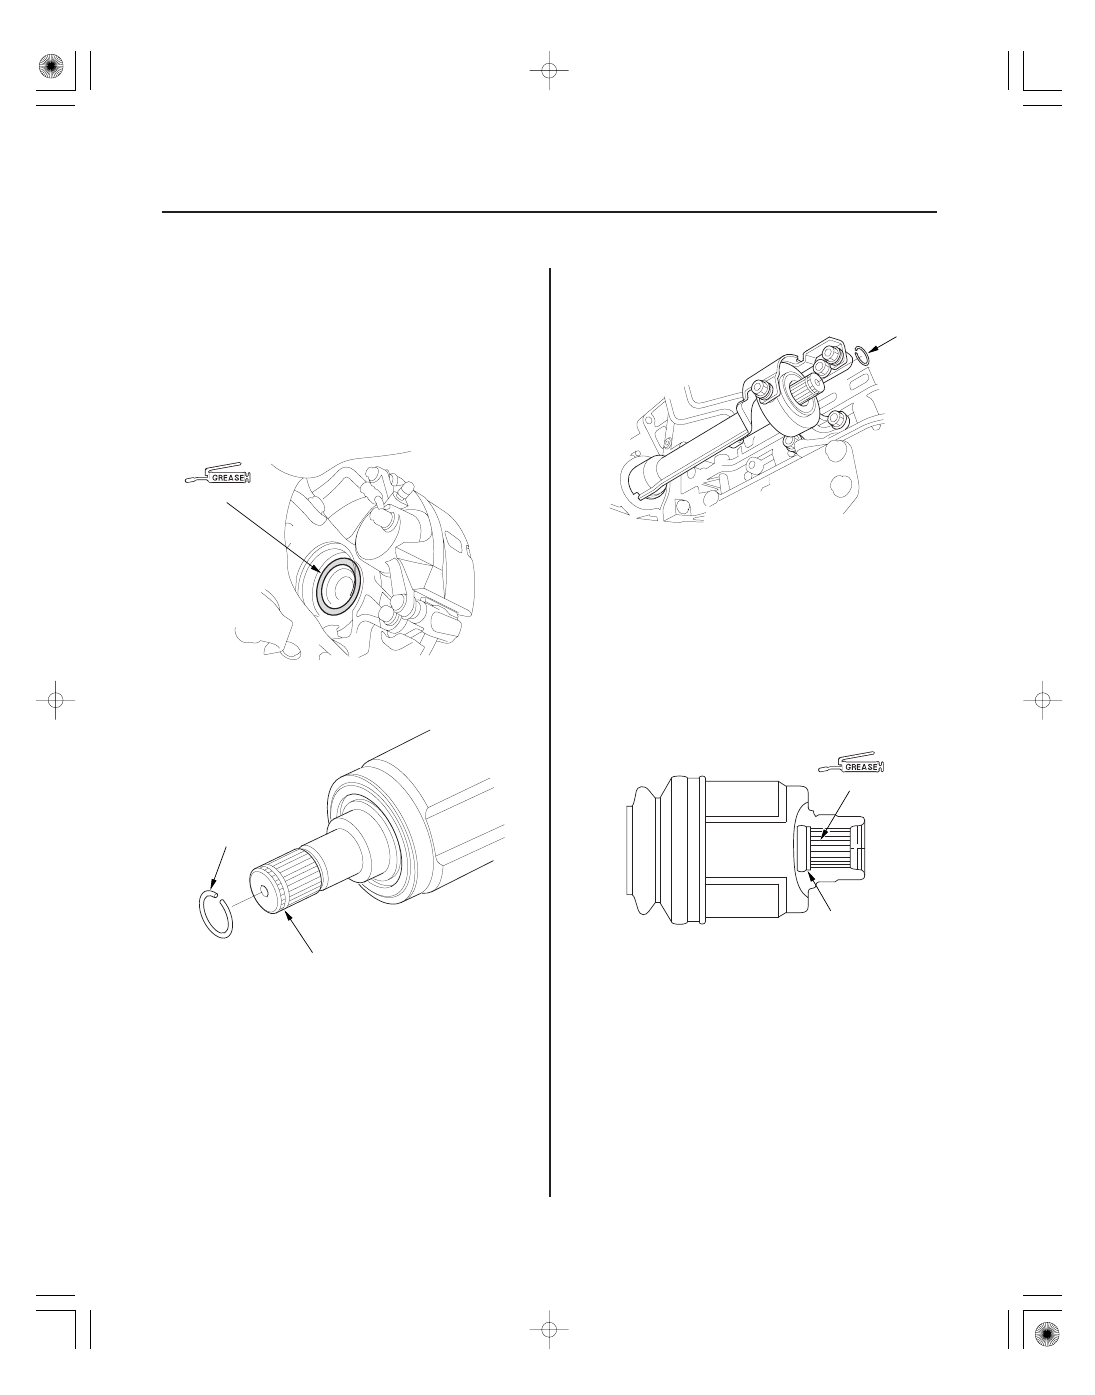
1. Apply about 5 g (0.18 oz) moly 60 paste

(P/N 08734-0001) to the contact area (A) of the
outboard joint and the front wheel bearing.

NOTE: The paste helps to prevent noise and
vibration.

2. Install a new set ring (A) onto the set ring groove

(B) of the driveshaft (left driveshaft).

3. Install a new set ring (A) onto the set ring groove

(B) of the intermediate shaft.

4. Apply super high temp urea grease

(P/N 08798-9002) to the whole splined surface (A) of
the right driveshaft. After applying grease, remove
the grease from the splined grooves at intervals of
2

3 splines and from the set ring groove (B) so

that air can bleed from the intermediate shaft.

Replace.

08/08/21 14:51:31 61SNR030_160_0020

03

*03

04

16-21

E

D

A

E

D

A

C

B

B

A

E
12 x 1.25 mm
59 N·m
(6.0 kgf·m,
43 lbf·ft)

C
12 x 1.25 mm
59 N·m
(6.0 kgf·m,
43 lbf·ft)

D
12 x 1.25 mm
59 N·m
(6.0 kgf·m,
43 lbf·ft)

A

B

5. Clean the areas where the driveshaft contacts the

differential thoroughly with solvent or brake
cleaner, and dry with compressed air.

NOTE: Do not wash the rubber parts with solvent.

6. Insert the inboard end (A) of the driveshaft into the

differential (B) or the intermediate shaft (C) until the
set ring (D) locks in the groove (E).

NOTE: Insert the driveshaft horizontally to prevent
damaging the oil seal.

7. Install the outboard joint (A) into the front hub (B).

8. Connect the knuckle (A) onto the lower arm (B).

During installation, install a new flange bolt and
new self-locking nuts. After lightly tightening all
three fasteners, tighten them to the specified
torque in the following order: the nut on the front
(C), the nut on the rear (D), then the bolt (E).

Replace.

Replace.

Replace.

08/08/21 14:51:44 61SNR030_160_0021

*04

16-22

Driveline/Axle

B

A
K20Z2 engine model:
22 x 1.5 mm
181 N·m
(18.5 kgf·m, 134 lbf·ft)

K20Z3 engine model:
24 x 1.5 mm
245 N·m
(25.0 kgf·m, 180 lbf·ft)

9. Apply small amount of engine oil to the seating

surface of new spindle nut (A).

10. Install the spindle nut, then tighten it. After

tightening, use a drift to stake the spindle nut
shoulder (B) against the driveshaft.

11. Clean the mating surfaces of the brake disc and the

wheel, then install the front wheels.

12. Turn the front wheel by hand, and make sure there

is no interference between the driveshaft and
surrounding parts.

13. Refill the transmission with the recommended

transmission fluid:

• 5-speed manual transmission (see page 13-5)
• 6-speed manual transmission (see page 13-82)
• Automatic transmission (see page 14-232)

14. Lower the vehicle on the lift.

15. Check the wheel alignment, and adjust it if

necessary (see page 18-5).

16. Test-drive the vehicle.

Replace.

Replace.

08/08/21 14:51:45 61SNR030_160_0022

01

02

03

SNR9A00E16236500000KAAT00

16-23

Intermediate Shaft Removal

A

B

A

B

1. Drain the transmission fluid. Reinstall the drain

plug with a new sealing washer:

• 5-speed manual transmission (see page 13-5)
• 6-speed manual transmission (see page 13-82)
• Automatic transmission (see page 14-232)

2. Remove the right driveshaft (see page 16-4).

3. Remove the three flange bolts, then remove the

heat shield.

4. Remove the flange bolt (A) and the two shoulder

bolts (B).

5. Remove the intermediate shaft (A) from the

differential. Hold the intermediate shaft horizontally
until it is clear of the differential to prevent
damaging the oil seal (B).

08/08/21 14:51:45 61SNR030_160_0023


Content   ..  327  328  329  330   ..