Iran Khodro Pars. Service Manual - part 7


  Index      Manuals     Iran Khodro Pars. Service Manual


Search            copyright infringement  


Content      ..     5      6      7      8     ..


Iran Khodro Pars. Service Manual - part 7


-------------------------------------------------------------------------------------------------------------------------------------------------------------

102

4

BRAKES

Brake system 

The most important part of safety in your 

vehicle, means brake system, is equipped 

with disk brakes in forward, bowl brakes at the 

back and also a binaural hydraulic system.

When the engine is on, the brake boosting 

system, reduces the required force for 

pressing the brake pedal.
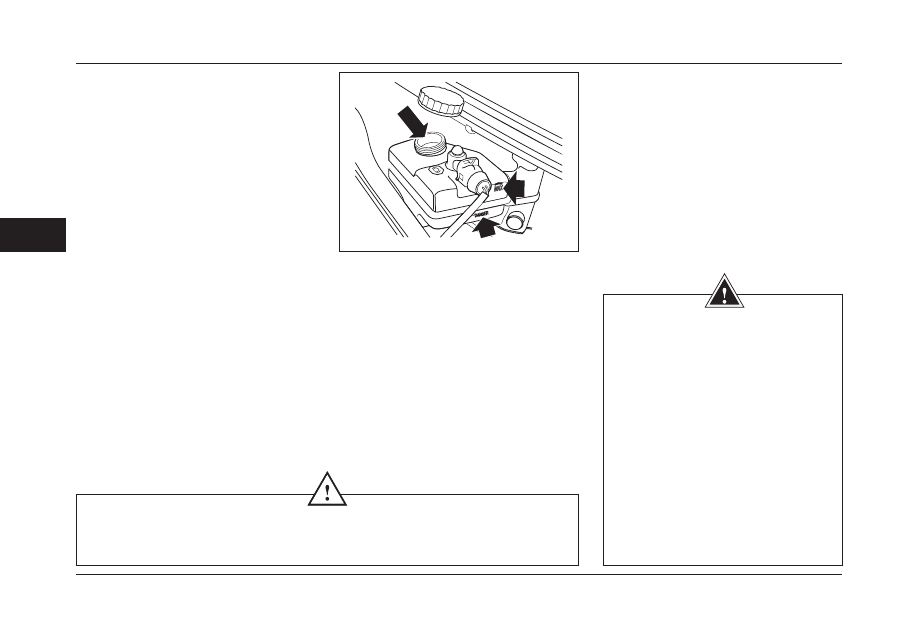
Brake oil 

With continuous using of the car, the 

level of the oil may be reduced due to the 

erosion of the linings and there is a need 

to add brake oil. If in short period of time 

you notice a considerable reduction in oil 

level, refer to authorized representative. If 

the level of oil is less than minimum marked 

level on the container, stop driving.

Checking the brake oil:

To avoid entrance of the dusts into the 

container, clean the cap of the container 

first and then open it and fill the container 

up to (MAX) sign with brake oil.

Do not let the level of oil comes down less 

than (MIN) sign.  Only use fresh oils in a 

sealed containers. (old or opened oils or 

oils which were leaked from the system 

before, absorbs the water and using 

them again, creates negative effects on 

operation of the system).

Just use the standard brake oils and 

approved brands and packages that are 

offered by ISACO.

CAUTION

Brake oil damages the paint work. In case, first collect the oil with a piece of  clean 

cloth and then wash the area with water and especial car shampoo.

WARNING

The Brake oil is strictly Toxic and it 

should be kept in a closed container 

away from reach of children. In case 

of swallowing brake oil, immediately 

consult a doctor.

- Avoid contacting with eyes and 

hands. In case of contact with skin, 

wash the area with lots of water and 

in case of contact with eye, after 

washing, consult a doctor.

- Due to danger of catching fire, take 

care that the brake oil is not purred 

on the hot engine.

-------------------------------------------------------------------------------------------------------------------------------------------------------------

-------------------------------------------------------------------------------------------------------------------------------------------------------------

103

4

HYDRAULIC STEERING

CAUTION

Brake oil damages the paint work. In 

case,  first  collect  the  oil  with  a  piece 

of  clean cloth and then wash the area 

with water and especial car shampoo.

WARNING

The hydraulic oil for steering wheel is 

strictly Toxic and it should be kept in a 

closed container away from reach of 

children. In case of accidental swallowing, 

immediately consult a doctor.

In case of contact of hydraulic oil with 

skin or eye, wash the area with lots of 

water . Due to danger of catching fire, 

take care that the hydraulic  oil is not 

purred on the hot engine.

Hydraulic steering wheel 

If the Hydraulic steering wheel, is working 

properly, there is no need to add extra 

oil in the container and if it is necessary, 

it will be very little. In case of sudden or 

frequent reduction in oil level, the car 

should be investigated by authorized 

representative. If the oil level is lower than 

the  minimum  sign  on  the  container,  fill 

the container before starting the engine, 

otherwise, the hydraulic pump for steering 

wheel, will get damaged.

In case of reduction of oil below the minimum 

sign, or it’s fast and considerable drop, do not 

use the vehicle under any circumstances. In 

spite of this, if the reduction of oil is gradual, 

you can fill the container up to maximum 

sign and with making a short distance, take 

the car to nearest authorize work shop for 

trouble shooting.

Check the oil level weekly. When checking 

hydraulic oil level, the engine should be off 

and cool and the wheels should be straight.

Checking the Hydraulic oil level for 

steering wheel 

To avoid entrance of the dusts into the 

container, clean the cap of the container 

before opening  it. Take out the cover and 

clean it’s rod with a piece of clean and 

coreless cloth. Put it in it’s place again and to 

check the level of oil take it out of container. 

In case of shortage of oil, add oil until the 

level of oil comes somewhere between the 

minimum and maximum level.

Do not put extra oils in the container. 

(More than required )

To get information regarding recommended  

oil specifications, refer to Maintenance and 

Service Guide. 

-------------------------------------------------------------------------------------------------------------------------------------------------------------

-------------------------------------------------------------------------------------------------------------------------------------------------------------

104

4

BATTERY

Disconnection of battery 

Before disconnecting the battery, switch off the 

anti theft system and make sure that the main 

switch is closed. First disconnect the negative 

cable (-) and then the positive cable (+). For 

reconnection, first connect the positive cable and 

then the negative cable. Do not let the poles of 

the battery come in contact with body and other 

metal parts of the car. To take out the battery, first 

open the clamps of the battery and take them 

out. For repositioning, first place the battery and 

it’s clamps precisely in their positions (it’s poles 

should be pointing the engine) and then tighten 

the nuts in such a way that the battery dose not 

move, but not too tight. 

Changing the battery 

Always use batteries that their type and 

specifications are like the original battery of the 

vehicle. Other types may have different size or 

poles. Their connection to electrical system of 

the vehicle may have danger of catching fire.

WARNINGS

The acid contained in the battery is Toxic and 
corrosive. In case of it’s leakage, note the 
followings:
-in case it is in contact with cloth or skin, 
immediately take out the infected cloth and wash 
the contacted skin areas with lots of water and 
consult doctors.
-In case of contact with eyes, immediately wash the 
eye with clean water for at least  15 minutes and 
quickly consult a doctor.
-If the required medical attentions do not take 
place immediately, swallowing acid can be fatal.
-The battery which is being charged, emits 
explosive hydrogen gas . take away any sparks 
and flames from engine space.
During working on engine space, for your own 
safety, take out your bracelets and ornaments .
Never allow the poles of the battery , contact 
with tools and metal parts of the car.a

CAUTIONS

-If the car was left unused for more than  6 days ,it 
should be switched on at least once and continue 
being on for one hour.
-If the car is not going to be used for long time, 
you should disconnect the battery cables .  In this 
situation charge the battery every four weeks.

WARNINGS

-Do not charge a battery which is suspected of 
being frozen.
-During battery charging , keep away any spark or 
flame from it ( charged battery or the battery being 
charged will emit flammable hydrogen ).
- After charging of the battery, and before it’s 
connection to the vehicle, wait for an hour so 
that flammable gases exit from it and danger of 
inflammation is reduced.

CAUTION

-Do not charge the battery when it is connected to the vehicle. This may cause serious damage to electrical 
systems of the vehicle.
-It is better to check the level of the water and acid in the battery, in case the caps of the battery can be 
opened, up to the maximum level marked on the body of the battery every month  and in case of shortage 
of water and acid,  Distilled water to be added.

-------------------------------------------------------------------------------------------------------------------------------------------------------------

-------------------------------------------------------------------------------------------------------------------------------------------------------------

105

4

CLEANING & CARING VEHICLE

Recommendations for washing the vehicle

1-Wash vehicle at least once per week if 

weather is normal. 

2- Wash vehicle away from direct sunlight

3- Start washing at least 30 minutes after 

engine has not been running.

4- Do not use cloth and / or hard materials 

which can scratch the paint during 

washing/wipe off. It is recommended to 

wear plastic gloves during washing. Use 

warm or lukewarm water for washing. 

Never use hot water. Meanwhile it is 

recommended to use waxes and polishers 

which are not abrasive or erosive.

5- Do not stand on the door step and don 

not depress the vehicle’s roof and body 

during washing / wipe off. Meanwhile it 

is recommended to use leather or cotton 

cloth for wiping off and polishing to avoid 

scratching the paint.

6- Since the brake’s dust is very corrosive, 

first  wash  the  wheels,  then  change 

the cloth and the washing solution and 

wash other parts of the vehicle from top 

to bottom. Wash Aluminum wheels and 

Chrome metal sheets with a water and 

mild soap using a soft and clean cloth. 

Wheels surfaces are very sensitive such 

as the vehicle’s paint. Do not use strong 

chemical and/or acid substances and 

also abrasive and erosive materials such 

as chrome polishers. Chrome polishers 

should be used only on the Chrome metal 

sheets on the Aluminum wheels.

7- Max. temperature of the water for 

washing the vehicle is 60º C, Max 4 to 5 

bar pressure, 10 cm distance between 

nozzle and washing area and 25 degree 

angle for spurting. This angle actually is 

the angles between water spurting out the 

nozzle in both side of the longitudinal axis 

(water exit direction) as following figure.

8- Suitable detergent for washing vehicle:

- Low basic (PH=7-9)

- Proper lubricant to protect the paint from 

scratching. Use preferably fluid detergent.

- Free from materials which affect on 

vehicle after drying;

- Containing polisher ingredients to 

maintain gloss and dry quickly.

- Do not wash the vehicles, having metallic 

and two coverage paint, by using  automatic 

carwashes which use rotary brushes;

- Foreign material such as bird droppings, 

tree sap, etc. may damage the finish of 

your vehicle. Remove these types of 

deposits as quickly as possible.

- If the water permeates to the luggage 

compartments and interior parts of the 

vehicle, dry it immediately.

-------------------------------------------------------------------------------------------------------------------------------------------------------------

-------------------------------------------------------------------------------------------------------------------------------------------------------------

106

4

CLEANING & CARING VEHICLE

Cleaning the Bodywork

In order to preserve the car painting finish, 

please consider the following advices.

Do not use hot water to wash the car.

- Use wet linen cloth to clean dirt and 

dust from the car metallic paint to prevent 

scratching.

- Do not use detergent powder or washing 

liquids.

- In hot weather, do not wash the car in 

direct sunlight.

- Do not flush the water directly to the windows, 

door liners or the brake components.

Avoid putting the the foot pad 

on the vehicle body .Otherwise it will 

change the color of the body by the 

course of time.

- Use a water hose to flush dust and dirt 

front the bodywork before washing, and 

when the car is too dirty. Then wash the 

car with cold water or lukewarm water 

and a good quality shampoo.

Use plenty of water to make sure that the 

bodywork has become free of dust. Rinse 

the car with clear water and soak up using 

a chamois leather cloth.

Cleaning The Underneath

Occasionally and especially in winter, 

flush away mud from underneath of the 

car such as the wheel compartment and 

frame gaps (seams), which can easily 

collect debris.

Do not flush water directly to susceptible 

areas.

Use the following materials to wash the 

exterior of the vehicle:

- Car shampoo

- Wax polish

- Tar remover

- Glass cleaner

- Rubber protector

- Cleaner of rings and aluminum

CAUTION

-In some high pressure, water 

penetrates in doors and windows 

liners, and cause damages to the 

locks. Do not use high pressure water 

on sensitive parts

- Blue straps on the trim, side mirrors, 

windows, fenders & ... should be 

detached. otherwise it may cause 

problem.

-------------------------------------------------------------------------------------------------------------------------------------------------------------

-------------------------------------------------------------------------------------------------------------------------------------------------------------

107

4

CLEANING & CARING VEHICLE

Cleaning of Tar stains 

To clean the tar and grease stains ,use 

white alcohol. Then wash the area with 

water and soap till the residues of alcohol 

disappears.

Plastic parts:

First clean these parts with diluted 

washing liquids. Then clean the area with 

wet cloth.  Do not shine front dashboard 

areas. This place should not shine , so 

that it’s reflection in front glass , dose not 

obstruct the driver’s vision.

Floor mat (Carpet) 

Use diluted home cleaners, like carpet 

shampoo and to avoid change of color, 

dry them up in the shades.

Paint polishing of the body

Sometimes use good quality polish 

containing following materials to finish up 

the paint works:

- Eroding soft particles to remove surface 

stains without damaging the paint.

-Filling materials for removing or covering 

the scratches on the body paint work.

-Wax for creating protection shield 

between the paint and foreign objects.

Blades of the wipers

Wash the blades with warm water and 

soap. Do not use alcohol or petrol cleaners.

Glasses and Mirrors

Regularly Clean the glasses from inside and 

outside with a high quality glass cleaner.

Front glass 

Wash the front glass with glass liquid 

cleaner, specially after polishing and 

cleaning of body and before installing 

new wipers.

Rear glass

Clean the interior side by soft cloth with 

left and right movements so that there is 

no damage to the heaters . Do not clean 

the glass with eroding cleaners. This will 

damage the heaters of the rear glass.

Mirrors 

Wash the mirrors with water and soap. To 

remove the ice patches from the mirror 

surface, use plastic pallet knife. 

NOTE:  Never use metal pallet knife or 

eroding cleaners.

Interior parts of the vehicle

Seats: To clean the dirt from the surface 

of the seats, use standard cleaning 

materials.

Dashboard:  To protect the dashboard, 

there is no need to use covers, because 

it is very resistible against sun light, heat 

and coldness.

To remove grease stains and other 

dirt from dashboard, only use cleaning 

materials…

-------------------------------------------------------------------------------------------------------------------------------------------------------------

-------------------------------------------------------------------------------------------------------------------------------------------------------------

108

4

*If equipped

CLEANING & CARING VEHICLE

Maintenance of the Vehicle's Natural 

Leather* 

Natural leather requires care to keep its 

beauty and durability. Clean any spots, 

whether made by foodstuff, alcohol or 

liquids, using an absorbent cloth. In case 

of water being spilt on the leather, do not 

use hair dryer or brush to dry it, just let it 

dry naturally. Never use tableware polish, 

solvents and soap or frictional polishes 

and cleaners on the leather. Just use 

special leather cleaners. These cleaners 

will completely clean all spots and grease 

marks without leaving any marks. 

To ensure the cleaning agent does not 

have any undesirable effects on the 

leather's color and appearance, first test 

it on a parts not in view. 

You need to clean the leather surface once 

every few months. First dust the leather, 

then to clean and protect leather surface, 

use leather cleaners and protectors using 

a circular motion. 

A smell of leather is natural in the first few 

months. 

If possible, when the vehicle is parked, 

leave one of the windows slightly down. 

Prevent direct sunlight on the leather 

surface for long periods, as much as 

possible. 

Do not use any types of wax on the 

leather surface since this will attract dust.

The leather covers may be cleaned 

using a damp clean cloth. If the leather 

surface is very dirty, you can use a cotton 

cloth with the suds made by a shampoo 

solution to clean it and then dry it. 

If as time passes, any signs of attrition or 

discoloration appears, apply to your Iran 

Khodro authorized representative to rectify it.

Care Of the Fabric Used in Inside 

Furnishings of the Vehicle*

This type of fabric, like any other, requires 

care to keep its beauty and durability. For 

this reason, any type of stain, whether 

from foodstuff, alcohol or liquids should 

be cleaned using a sponge and carpet 

shampoo. Never use tableware cleaners, 

solvents, soap or polish and especially 

abrasive cleaners on the fabric.

CAUTION

Clean any type of stain on the fabric, 

using only carpet shampoo and sponge.

-------------------------------------------------------------------------------------------------------------------------------------------------------------

-------------------------------------------------------------------------------------------------------------------------------------------------------------

109

TECHNICAL EMERGENCIES

5

*If equipped

TOWING ...........................................................................110

CHANGING WHEELS ....................................................112

CHANGING LAMPS .......................................................115

FUSES*  ...........................................................................119

MAINTENANCE & SERVICING OF BATTERY  ...........133

HANDLING METHOD IN A CASE OF LEAKAGE* ......137

-------------------------------------------------------------------------------------------------------------------------------------------------------------

-------------------------------------------------------------------------------------------------------------------------------------------------------------

110

5

VEHICLE TRANSPORT

Front Towing Ring

Use the ring beneath the front bumper 

only to tow the car on 4 wheels.

Towing the car with a manual gear box 

(non-automatic)

Neutralize the gear and turn on the flashers.

Drive carefully and never exceed the 

speed limit of 50km/hr when being towed

Always keep the tow rope stretched by 

gently applying the brake as necessary. It 

avoids impact on the rope and its rupture.

- Get help from experienced persons to 

carry the car.

Rear Towing Ring

The rear ring should be used only to tow 

cars lighter or with the same weight.

Do not use the rings for suspending tows 

(on two wheels)

WARNING

- If the engine is off, the hydraulic 

Steering wheel and brake system, do 

not operate.

- The vehicle on tow should be always 

lighter than the towing vehicle.

- The towed vehicle should never 

have any passengers. 

- Remember that the brake servo 

does not operate when the engine 

is off, and you need much generator 

force to operate on the brake pedal.

- Do not take out the start switch or 

turn it off when the vehicle is being 

towed on four wheels since this will 

cause the steering wheel to lock. It is 

recommended to place the switch in 

the A position.

- We recommend use of a sturdy and 

fixed  bar  when  towing  the  vehicle.  If 

using rope or cable (where it is legal), 

the towed vehicle should be able to 

brake (the engine could be turned on).

- Do not tow a vehicle that can not be 

moved and driven. 

- To prevent damage to the vehicle, 

do not brake violently or speed up 

suddenly.

- At any rate it is recommended not to 

let the speed go over 25 km an hour.

-------------------------------------------------------------------------------------------------------------------------------------------------------------

-------------------------------------------------------------------------------------------------------------------------------------------------------------

111

5

VEHICLE TRANSPORT

Transport by truck

This type of carrying is recommended to 

prevent any accident or damage.

Rear Towing

Avoid 

suspension towing on front wheels 

if possible. If it is necessary, tow it at least 

speed and short distances.

The steering should be locked when 

the wheels are completely ahead. Use 

supporting clamps or catches in addition 

to the steering lock.

Front Towing

The steering should be locked when 

the wheels are completely ahead. Use 

supporting clamps or catches in addition 

to the steering lock.

CAUTION

When the car is being towed from 

the front and moves on back wheels, 

make sure the handbrake operating 

on the rear wheels is released.

-------------------------------------------------------------------------------------------------------------------------------------------------------------

-------------------------------------------------------------------------------------------------------------------------------------------------------------

112

5

CHANGING WHEELS

Changing the wheels 

Stop the car on a hard and smooth 

surface, put the hand brake and shift the 

Gear lever to Gear one or reverse Gear 

and then intend to change the wheel.

Changing the reserve wheel

1- First, bring up the carpet covering 

the reserve wheel in the rear trunk and 

according to the sketch, hang it to the edge 

of the rear trunk.  Then open the belt.

2- Removing the reserve whee:

-Removing wheel spanner, jack and 

hubcap spanner from the foam cover of 

the reserve wheel.

-Removing reserve wheel from rear trunk.

3-Removing the wheel.

Removing the wheel 

- Put the peak of the wheel spanner into 

the groove of the hubcap, against the tire 

air manifold and remove the hubcap.

- loosen the nuts of the wheel.

- locate the head of the jack in special 

position for use of jack, in the required 

side and raise the jack up. Then unscrew 

the nuts of the wheel completely and take 

out the wheel.

WARNINGS

-Park your car on a smooth and hard 

surface which is not slippery (for 

example, do not park on ceramics) and 

if necessary use a barrier underneath 

the base of the jack and switch on the 

flashers (Emergency lights)

Put  the hand brake and remove the 

gear from neutral. Disembark the 

passengers and lead them to a place 

away from traffics.

Never work under the vehicle when 

the only resting point is jack. It is only 

for the purpose of changing wheels.

- Always in order to change the 

wheels, choose a safe place away 

from traffics.

Disembark the passengers and lead 

them to a place away from the vehicle.  

-------------------------------------------------------------------------------------------------------------------------------------------------------------

-------------------------------------------------------------------------------------------------------------------------------------------------------------

113

5

CHANGING WHEELS

Putting the reserve wheel

-Put the reserve wheel in to it’s place 

properly and tighten the nuts with hands 

as much as possible.

-Lower down the jack and remove it from 

the place underneath of the car.

-Tighten the wheel nuts with wheel 

spanner completely.

-Fix the hubcap on the ring in such a way 

that air manifold of the tire comes out of 

the  related  groove.  To  fix  tightly,  hit  the 

fringes of the hubcap strongly with palms 

of the hand.

- Put the flat tire (Punctured tire) in place 

of reserve tire in rear trunk.

-Put the Jack, wheel spanner and hubcap 

spanner on the foam cover and secure 

the wheel  with belt.

Attention

On vehicles equipped with aluminium wheels:

-There are four screws in the Jack Box for installation of  spare  steel wheels.

- Fifth wheel is a temporary wheel (to change in urgent situation and when one of 

the tires are punctured). 

So, due to the mismatch of tires and spare tire, there is no problem if the tire or the 

tire crown is different from the other aluminium ring tires.*

WARNINGS

-Jack is only used for changing the 

wheels only. Under no circumstances 

it should be used for other operations 

such as repairs or reaching underneath 

of the vehicle.

- If the life time of the reserve tire is 

over, take it to the one of the authorized 

repair shops, so that you can make 

sure about it’s good conditions  and 

safe usage.

-May be the air pressure in the reserve 

tire is not adequate. Therefore drive 

calmly and precautionary  and as soon 

as possible check it’s air pressure.  

Also check whether the nuts  of the 

wheels are correctly secured and 


they are absolutely tight.

-Repair the punctured tire quickly so 

that in case of any requirements , you 

can fix it on your vehicle again. 

-------------------------------------------------------------------------------------------------------------------------------------------------------------

-------------------------------------------------------------------------------------------------------------------------------------------------------------

114

5

CHANGING WHEELS

Tread wear indicator

The tires have molded-in tread wear 

indicators in the grooves. When the 

indicators appear on the tread surface, the 

remaining depth of the tread is 1.6 mm and 

the tire should be replaced.

Air pressure of the tires

Inspect your vehicle’s tires at least once 

a months when the tires are cold. Under-

inflation can cause heat which decreases 

the  tires  life.  Over-inflation  can  cause 

negative effects on convenient driving. 

Tire size:

Your vehicle’s tire size is molded on its 

body such as following:

185/65 R 15, in which 185 is the width of 

the tire in mm, 65 is the ration of the height 

to width of tire, R means Radial structure 

and 15 is the wheel diameter in inch.

Tire rotation

Front tires wear more than rear tires in front 

differential vehicles due to braking, driving 

and steering forces. To avoid uneven wear 

of your tires and to prolong their life, rotate 

the tires as follows every 10000 km driving:

Taking care of the tires

Inspect the treads and side wall of the tires 

to  find  out  damages  (especially  cracks 

and node).

Puncture

Change the punctured tire and have it 

inspected before patching.

To avoid more possible damages to the tire, 

it should be repaired by an expert technician. 

Repair should be performed by expert 

technicians who accept full responsibility for 

the quality of the repair.

WARNINGS

-Damaged tires are very dangerous! 

Avoid driving with damages, worn 

and/or over-inflated tires.

-Use always same type and size  

radial tires for front and rear tires. 

Do not use tires with crisscross form. 

Your vehicle’s wheel are not tubed, 

do not use tubed tires.

-Never drive with worn, punctured 

and not adjusted air pressure. Under-

inflated  tires  are  worn  quickly  and 

increase the fuel consumption and 

decrease the control on vehicle.

-------------------------------------------------------------------------------------------------------------------------------------------------------------

-------------------------------------------------------------------------------------------------------------------------------------------------------------

115

5

Changing the lamps 

Front lights

In order to dismantle the front lights , it 

is necessary to dismantle the forward 

bumper and forward vent channel window 

first . Then by opening the light installation 

screws to the light socket frame, separate 

the light combination from the socket 

frame.

6-Side lights on the mud guards

- By separating the plastic pins on the 

bottom and screws available (within the 

limits of the tires), remove the mud shield.

- Pull-out brushed metal of the traffic lights 

which is sliding. (1)

- By rotating the traffic lights, remove it from 

its place. Rotate the lights counterclockwise 

to remove the bulb base. (2)

- change the bulb.

-side light lamp on the mud guard  T8.4 = 4 

watts, 12 volts.

7-Anti fog lights on the bumper

Remove the blue socket of the anti fog 

light.  Change the bulb.

The front anti fog light  H1= 55 watts, 12 

volts.

8-Adjusting screws for front lights

CHANGING LAMPS

1-Front light bulbs

Turn the plastic covers behind the light, 

anticlockwise, until it gets separated. Then 

change the bulb.

2- Small lights of  5  watts 

3- Main lights (Big), lower beam H7= 55 

watts.

4- Main lights (Big), upper beam H7= 55 

watts.

5-Front side lights

By releasing the Brushed Metal, open the 

lamp and then replace it.

Side light lamp of 21watts

WARNING

For replacing the turn signal lamps، needed 

to open a large number of components. So, 

for  this reason it is recommended refer to one 

of the dealers authorized for do that.

The bulbs are under vacuumed and, at the 

time of replacing may be broken and cause 

injuries.

-------------------------------------------------------------------------------------------------------------------------------------------------------------

-------------------------------------------------------------------------------------------------------------------------------------------------------------

116

5

CHANGING LAMPS

Changing the combination of lights at 

the back

-Remove the decorative frame of the rear 

light sockets from the rear trunk.

-Unscrew the holding nut of the frame for 

rear side light and change the combination 

of light.

Changing the bulbs for rear lights

- Unscrew the holding nut of the rear light 

from the rear trunk and take out the rear light 

frame, then change the side light bulbs.

Change of lamp

Rear side lights

1-Side light lamp= 

21 watts.

2-Reverse gear light lamp= 

21 watts.

3-Light reflector-Small light lamp=  

5  watts.

4-Rear anti fog light lamp= 

21watts.

5-The brake light lamp=

21watts.

6-Small light lamp=

 5watts.

All rear light lamps are changed trough 

the rear trunk. To dismantle the frame 

of the lamp, first unscrew the nut of the 

frame and then change the fused bulb.

7-Vehicle number light lamp =

 5  watts.

Unscrew the plastic cap of the lamp and 

change the fused bulb.

WARNING 

The bulbs are vacuumed and may break 

during changing and cause injuries.  

It is recommended that always keep 

one set of required lamps, bulbs 

and fuses with you in the vehicle.

Front/Rear Ceiling Lights

Enter a screwdriver into the slot, at the end 

of the lamp, and lever off the lamp, detach 

the lamp assembly from the console. 

Keep the lights assembly, and open the 

lamp base. Remove and replace the bulb 

ensure that solid foundation is in place. 

Then install lamp assembly in place.

-------------------------------------------------------------------------------------------------------------------------------------------------------------

-------------------------------------------------------------------------------------------------------------------------------------------------------------

117

5

High brake lights (rear shelf) * 

- Pull the side clamp downwards and, open 

  the lamp assembly.(1)

CHANGING LAMPS

If equipped*

- Then detach the jack. (2)

- By opening the holding screws,  

  replace  the lamp assembly.(3)

LED map reader (middle)

For replacing LED map reader lamps, first, 

open the screws Decorative cantilever 

roof, remove the frame and then release 

sockets of LED map reader and rotate the 

bulb inside it in the opposite direction of 

clockwise and remove, then replace. After 

that, re-instal.

WARNING 

The bulbs are under vacuumed and, at 

the time of replacing may be broken and 

cause injuries.  

-------------------------------------------------------------------------------------------------------------------------------------------------------------


Content      ..     5      6      7      8     ..