Yanmar diesel tractor EF494T. OPERATOR'S MANUAL - part 16


  Index      Tractors     Yanmar diesel tractor EF494T. OPERATOR'S MANUAL


Search            


Content   ..  14  15  16  17   ..


Yanmar diesel tractor EF494T. OPERATOR'S MANUAL - part 16


EF494T OM 

60 

7. Fuel 

line 

 
Fuel filter 

 
Replace fuel filter every 300 hours
 

Replacing 

(1) Close fuel cock on water separator. 
(2) Remove the cartridge by turning anticlockwise. 
(3) Apply a little oil on the rubber ring on the new 

cartridge. Mount the cartridge by hand first and tight it 
with filter wrench. 

(4) Open the cock and bleed the air from the fuel. 


IMPORTANT 

Use genuine element.  Otherwise, FIE (Fuel 
Injection Pump) will be in trouble, premature 
wearing of plunger.  It may cause a hard start of 
the engine.


(A) Fuel filter 


Water separator 

 
Removing water from water separator 

The water separator separates water from fuel oil.  Water 
accumulates in the fuel tank by formation of dew.  The 
water in fuel may damage the fuel injection pump when the 
water gets in the plunger and barrel. 
 
Drain the water accumulated in the water separator 
regularly, every 100 hours or shorter if much water in the 
bowl. 
 

(1) Remove the cover [A]. 
(2) Turn the fuel cock (2) to (b) to close. 
(3) Turn the drain cock (4) to drain the water. 

 
[A] Cover 
[B] Water separator 
(2) Fuel cock 
(4) Drain cock 
(b) Close 


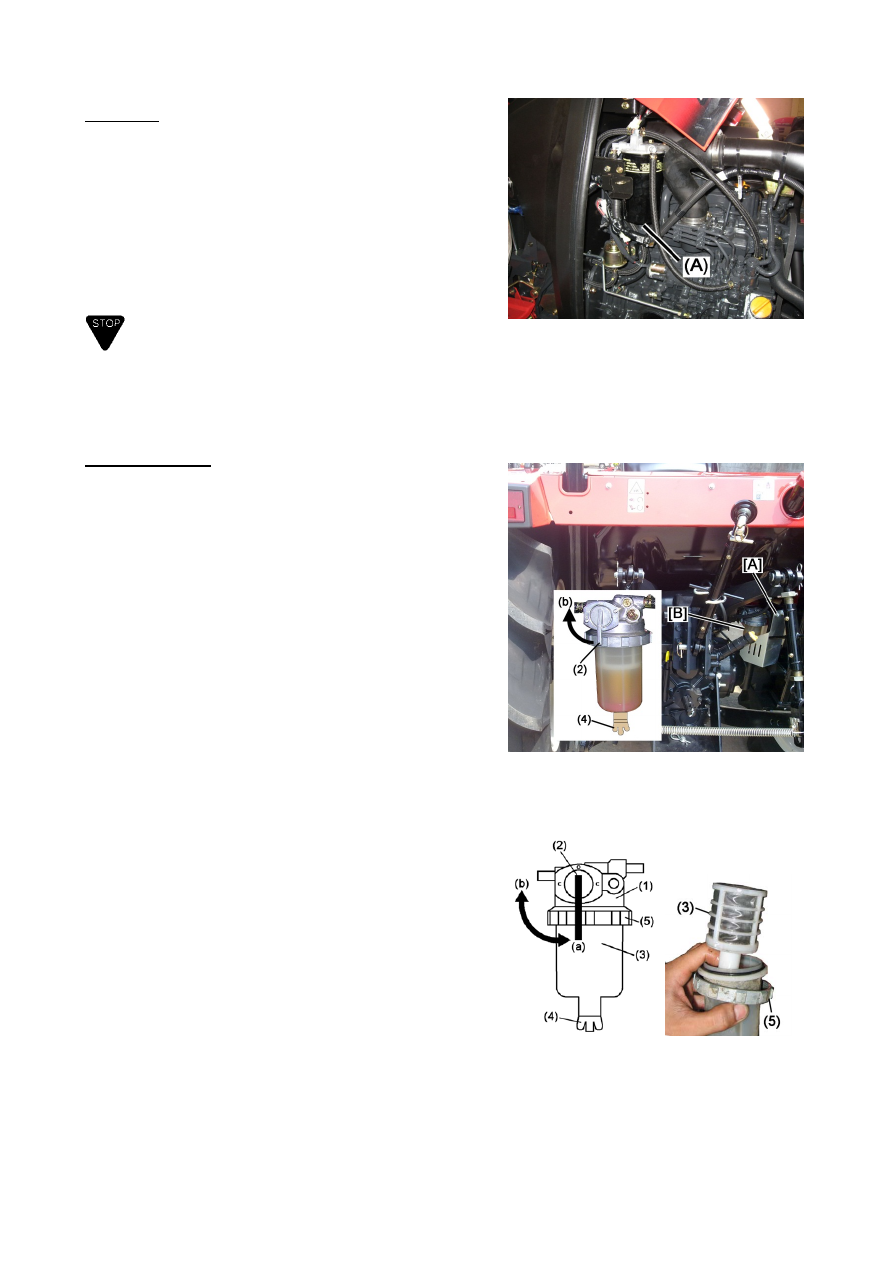
Cleaning water separator element 
 

Clean the element regularly, every 300 hours or shorter 
when it gets dirty. 
 

(1) Turn fuel cock (2) to (b) to close the fuel cock. 
(2) Turn retaining ring (5) to remove ring and detach 

water separator bowl. 

(3) Clean strainer (3), inside of bowl. 
(4) Reinstall strainer, bowl and retaining ring. 
(5) Turn fuel cock to (a) to open the fuel cock. 

 
NOTE: 
Strainer is made of plastic and be careful not to damage.  It 
is suggested to clean it with used toothbrush or soft brush. 
If strainer was damaged, replace it with a new genuine part.


(1) Water separator      (2) Fuel cock 
(3) Strainer                   (4) Drain cock 
(5) Retainer ring 
(a) Open 
(b) Close 


EF494T OM 

61 

8. 

Replacing radiator screen and air 

cleaner elements 

The air cleaner serves to keep the engine in favorable 
conditions by removing dust in air and preventing the 
cylinder liner and piston ring from wearing.  
 
For operation in a dusty environment, clean the air 
cleaner element every 50 hours and replace it every 300 
hours. 
 
For operation in a normal condition, clean it every 100 
hours and replace it every 1000 hours. Even before the 
said intervals, replace it every year. 


Cleaning air cleaner element  

(1) Open the bonnet.  
(2) Remove the sub tank. 
(3) Open the lid and take out the element.  

 
(A) Air cleaner (Outer) 
(B) Air cleaner (Inner) 
 

(4) Blow air from inside of the element or lightly pat it 

to take off dust. Be careful not to damage the fins. 


IMPORTANT 

When the inner element (B) is dirty, replace it. It cannot 
be cleaned. 


Cleaning radiator screen  

Pull the radiator screen upward and remove straws and 
dust from it. 
 

(A) Radiator screen 


EF494T OM 

62 

9. Checking 

battery 

 DANGER 

  Never use a fire while checking the battery or the 

battery cap is removed. Otherwise, a fire or gas 
explosion may result.  

  Do not come in contact with the battery fluid. If the 

fluid attaches on your body or cloth, immediately 
wash out with water. Otherwise, you may be burnt. 


 CAUTION 

To mount the battery, start with the positive lead (+). For 
removal, start at the negative lead (-). Otherwise, a short 
circuit will burn you. 


Check battery 

Check the level of battery electrolyte whether it is 
between upper and lower limit line. 
If the level is lower than the lower limit, add distilled water 
as high as the upper limit.  
 

(A) Battery  
(B) Upper limit  
(C) Lower limit  

 
NOTE:  
  Excessive battery fluid may overflow during 

recharging, damaging the metallic parts of the tractor. 

  Add distilled water only.  Adding battery electrolyte, 

such dilute sulphuric acid, may shorten the battery 
life. 

  Quick charge is not recommended.  
  When replacing the battery, use the specified battery.


IMPORTANT 

  Make sure the tractor is level when checking the level 

of electrolyte.


Removing and installing battery 

Remove 
(1) Open the bonnet 
(2) Disconnect the negative (ground) cable from the 

battery and disconnect the positive cable. 

(3) Loosen fixing nuts and remove the battery. 
 
Installation 
(1) Connect positive cable and negative cable. 
(2) Tighten fixing nut. 
 

(D) Negative (ground) cable 
(E) Positive cable 
(F) Fixing nut 


EF494T OM 

63 

IMPORTANT 

  Be sure the tractor is level when checking electrolyte level.


  When connecting the battery cables, wipe oil away 

from the terminal contacts.  After connecting cables, 
apply grease to the terminals. 

  Be sure to attach the rubber boots for the positive 

terminal of the battery. 

  When replacing the battery, be sure to use the genuine 

battery or equivalent specified in the right table. 

  For environmental protection and recycle of 

resources, return the old battery fallowing the 
regulation of your place.


Battery type 

Specified battery 

Parts code No. 

75D26R 1A7781-51510 


Voltage 12Volts 

Capacity 5HR 

52AH 

Charging rate 

11 Amperes 


10. 

Checking fluid lines 

 CAUTION 

Aged or damaged pipes are subject to fuel leak which 
will cause a fire. Check for a leak and replace the pipe 
with new one. 
 
Check the power steering pipes, fuel pipes and radiator 
hoses for leak or loose couplings. Replace them every 
two years, damaged or not damaged.  
 

(A) Radiator hose  
(B) Fuel pipe  
(C) Power steering pipes 

 
NOTE:  
Bleed the air after the fuel pipe has been replaced. 


11. Checking 

electrical 

wiring 

 WARNING 

  Check before starting day's work that the cables are 

not short circuit to other parts or insulator is not 
damaged, or contacts are not loosened.  

 
  Remove straws and dust from the cables and joints 

before starting works. Otherwise, a short circuit can 
cause a fire. 


Remove the engine side cover and check the 
electrical wires for damaged sheaths or loose 
connections. Repair them or consult your service 
representative. 
 
Check them every 50 hours or every year. 


Content   ..  14  15  16  17   ..