BMW Motorcycle (R1100RT, R1100RS, R850/1100GS, R850/1100R). Manual - part 15
 

  Index      Manuals     BMW AG Motorcycle (R1100RT, R1100RS, R850/1100GS, R850/1100R). Repair Manual


Search            


Content   ..  13  14  15  16   ..


BMW Motorcycle (R1100RT, R1100RS, R850/1100GS, R850/1100R). Manual - part 15


11.68

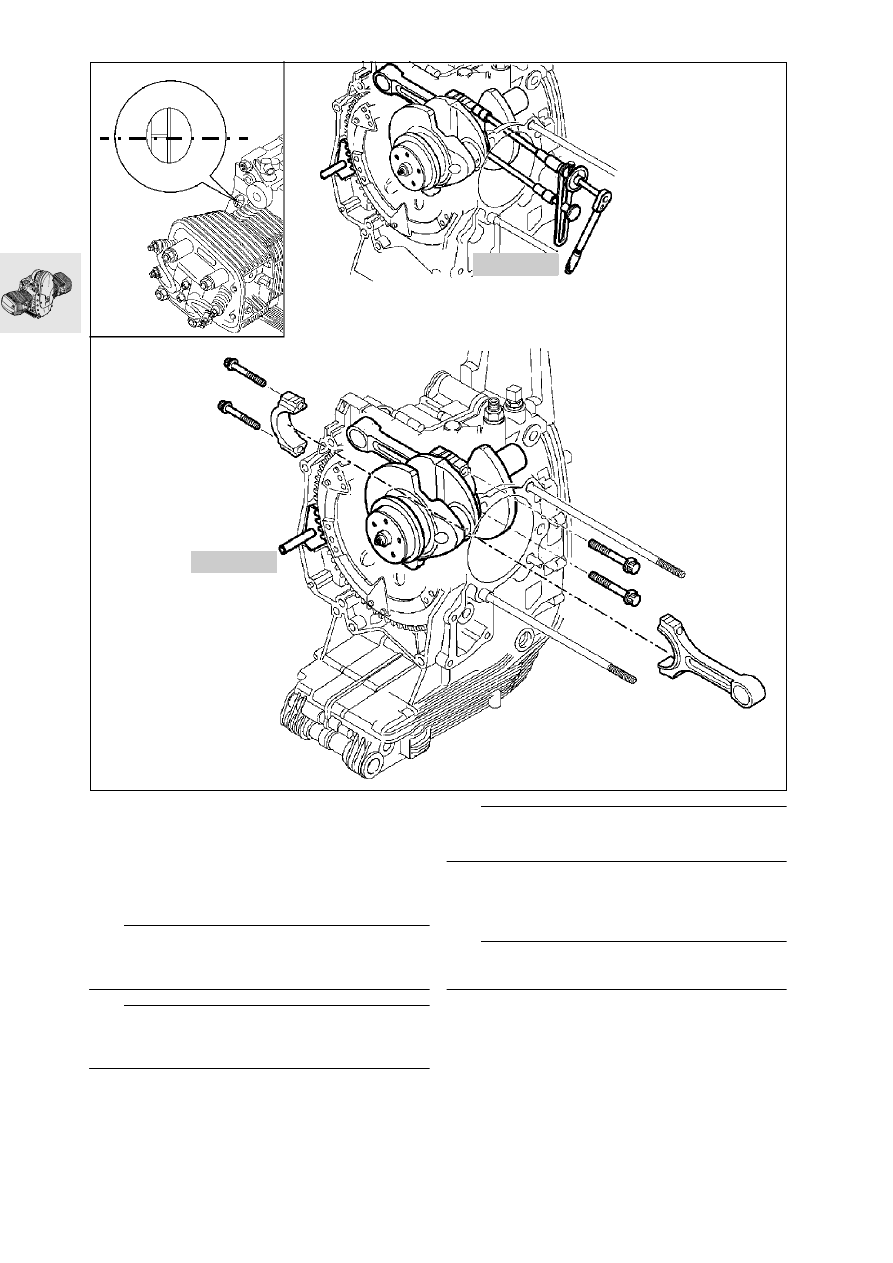
Removing/installing conrod

•

Turn crankshaft to TDC position.

•

Lock the clutch housing with retaining fixture, 
BMW No. 11 5 640.

•

Remove conrod.

L

 Note:

Conrods can also be removed/installed with the 
crankshaft removed.

e

 Caution:

Do not accidentally confuse conrods or 
bearing shells.

•

Install conrods.

Installed direction of conrods:

...................................................lettering facing up

e


Caution:

Oil the bearings.

•

Screw the big end bolts in by hand, then tighten 
with an angle-indicating wrench, 
BMW No. 11 2 500.

e

 Caution:

Use big end bolts once only.

X

 Tightening torque:

Big end bolts oiled
Joint torque.................................................. 20 Nm
Wrench angle ................................................... 80 °

11 2 500

11 5 640

TDC

RS110210

11.69

Removing and installing alternator cover 
with engine installed

•

Remove dualseat.

•

[RS/GS/RT] Remove side fairings.

•

Remove fuel tank.

e

 Caution:

Disconnect ground (earth) lead from battery. 
Insulate ground (earth) lead.

•

[RS/GS/R] Remove starter motor cover.

•

Remove starter motor.

•

Remove rear leading link mount.

Removing alternator mount cover

•

Remove alternator.

•

Remove rotary breather line (1).

•

Lock clutch housing with retaining device, 
BMW No. 11 5 640.

•

Remove pulley (2).

•

Remove magnetic gate (3).

L

 Note:

If complete alternator mount cover is re-
moved, leave magnetic gate (3) installed.

•

Remove alternator mount cover (4).

4

3

1

11 5 640

2

RS110230

11.70

Renewing radial shaft seal in alternator 
mount cover

•

Carefully lever radial shaft seal out, using a 
screwdriver.

•

Drive in a new radial shaft sealing ring with drift 
and sleeve, BMW No. 11 5 680,

L

 Note:

Slide new radial shaft seal over taper on slid-ing 
sleeve, pre-shape and pull off.

Renewing radial shaft seal for rotary 
breather

•

Carefully lever radial shaft seal out, using a 
screwdriver.

•

Carefully pre-form the lip of the radial shaft seal 
by hand.

•

Drive in the new radial shaft seal (oiled lightly) us-
ing handle, BMW No. 00 5 550, and drift, 
BMW No. 11 5 650.

11 5 680

RS110240

00 5 550

11 5 650

RS110241

11.71

Removing auxiliary-shaft drive

•

Align markings (arrows) on timing pinion and 
chain sprocket.

•

Unscrew and remove cooling oil pipe (1)/swing 
the pipe forwards.

•

Remove chain tensioner (2).

•

Remove chain tensioning rail (3).

•

Remove chain guide rail (4).

•

Lock the clutch housing with retaining device, 
BMW No. 11 5 640.

•

Unscrew and remove chain sprocket retaining 
bolt (5).

•

Remove rotor (6) with chain sprocket (7) and 
timing chain (8).

•

If necessary, remove chain sprocket (9).

2

3

8

9

5

7

1

4

11 5 640

6

RS1100251

RS110961

11.72

Removing oil pump

•

Remove oil pump cover (1).

•

Remove complete oil pump (2) together with 
cooling oil pipe (3), and dismantle.

e

 Caution:

Check installed positions of parts which have 
already been run together.

Oil temperature regulator

•

Expanding element (1).

L

 Note:

Do not dismantle the oil temperature 
regulator.

3

1

2

M6 x 50

M6 x 45

M6 x 45

M6 x 50

M6 x 45

RS110410

1

RT110580

11.73

Removing radial shaft seal on crank-
shaft with engine installed

•

Lock clutch housing with retaining device, 
BMW No. 11 5 640.

•

Remove clutch. 

•

Carefully lever radial shaft seal out, using a 
screwdriver.

e


Caution:

Avoid damaging the sealing faces on the 
housing and the crankshaft.

L

 Note:

When dismantling the crankcase, the radial seal can 
be taken out.

11 5 640

RS210010

RS110270

11.74

Dismantling crankcase

•

Turn engine on to its side.

•

Remove screws on right side.

M1

0 x

 1

0

0

M8

 x

 8

0

M8 x

 3

5

M1

0 x

 100

M8

 x

 8

0

M8

 x

 35

RS110261

11.75

•

Turn engine on to its side.

•

Remove screws on left side.

•

Remove upper section of crankcase.

M6

 x

 5

0

M6

 x

 2

5

M6

 x

 3

5

M6

 x

 5

0

M10

 x

 10

0

M6

 x

 2

5

M6

 x

 5

0

M6

 x

 2

5

M6

 x

 3

5

M6

 x

 3

5

M1

0 x

 10

0

M6 x

 50

M6 x

 3

5

M6 x

 3

5

M6 x

 3

5

M6

 x

 5

0

M6

 x

 5

0

M6

 x

 5

0

M6

 x

 50

M6

 x

 3

5

M6 x

 50

RS110260


Content   ..  13  14  15  16   ..